DRIVE SHAFT / PROPELLER SHAFT FRONT DRIVE SHAFT ASSEMBLY REASSEMBLY
CAUTION / NOTICE / HINT
- NOTICE:
- ·
When using a vise, place aluminum plates between the part and vise.
·When using a vise, do not overtighten it.
- HINT:
- ·
Use the same procedure for the RH and LH sides.
·The procedure listed below is for the LH side.
PROCEDURE

 1.INSTALL FRONT AXLE HUB DUST SEAL
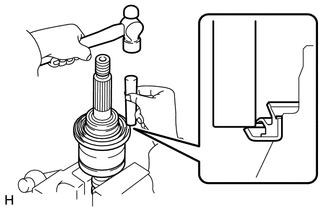
Using a brass bar and hammer, tap on a new dust seal.
- NOTICE:
-
Do not damage the dust seal.
2.INSTALL FRONT DRIVE SHAFT DUST COVER
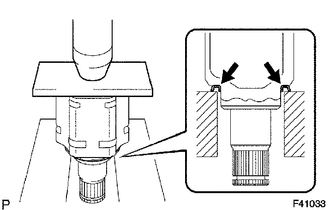
Using SST and a press, install a new dust cover.
- SST
- 09527-10011
3.INSTALL OUTBOARD JOINT BOOT
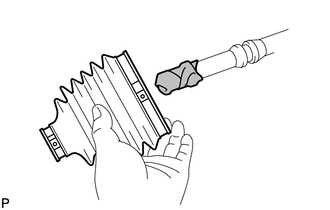
| *1 | Protective Tape |
Before installing the boot, wrap the splines of the drive shaft with protective tape to prevent the boot from being damaged.
Install new parts to the outboard joint shaft in the following order.
Large outboard joint boot clamp
Outboard joint boot
Small outboard joint boot clamp
Pack the outboard joint shaft and boot with grease from the boot kit.
- Standard grease capacity:
60 to 80 g (2.2 to 2.8 oz.)
4.INSTALL FRONT AXLE OUTBOARD JOINT BOOT CLAMP
Install a new large boot clamp to the joint boot.
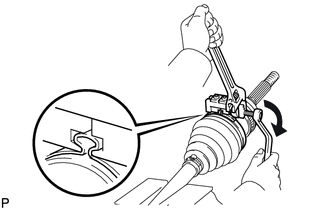
Place SST onto the boot clamp.
- SST
- 09521-24010
Tighten SST so that the boot clamp is pinched.
- NOTICE:
-
Do not overtighten SST.
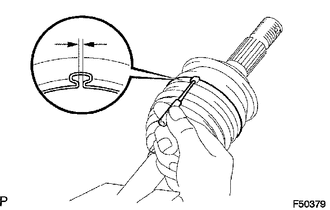
Using SST, adjust the clearance of the boot clamp.
- SST
- 09240-00020
- Standard clearance:
0.8 mm (0.0314 in.) or less
- NOTICE:
-
If the measured value exceeds the specified value, retighten the boot clamp.
Use the same procedure described above to install a new outboard joint small boot clamp.
5.INSTALL INBOARD JOINT
Before installing the boot, wrap the splines of the drive shaft with protective tape to prevent the boot from being damaged.
Install new parts to the outboard joint shaft in the following order.
Small inboard joint boot clamp
Inboard joint boot
Large inboard joint boot clamp
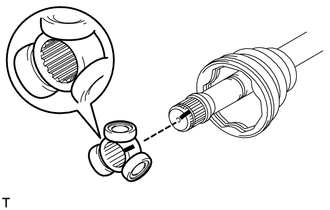
| *1 | Matchmark |
Place the beveled side of the tripod axial spline toward the outboard joint shaft.
Align the matchmarks placed before removal.
Using a brass bar and hammer, tap the tripod onto the outboard joint.
- NOTICE:
- ·
Do not tap the rollers.
·Be sure to install the tripod in the correct direction.
Pack the inboard joint and boot with grease from the boot kit.
- Standard grease capacity:
121 to 141 g (4.3 to 4.9 oz.)
Using a snap ring expander, install a new snap ring.
Align the matchmarks and install the inboard joint to the outboard joint shaft.
6.INSTALL INBOARD JOINT BOOT
Install a new inboard joint boot to the inboard joint.
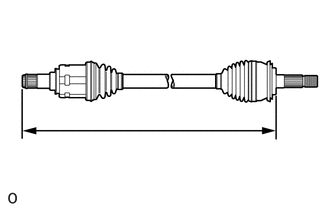
Check that the 2 joint boots are not stretched or contracted when the front drive shaft is at the standard length.
- Length (A):
Item Length for LH Side 540.9 mm (1.77 ft.) for RH Side
- NOTICE:
-
Keep the front drive shaft level during inspection.
If the joint boots are stretched or contracted, correct them.
7.INSTALL FRONT AXLE INBOARD JOINT BOOT CLAMP
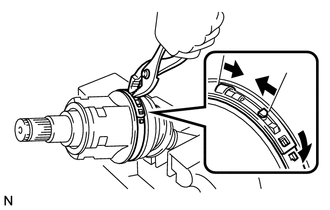
Using pliers, install a new large boot clamp as shown in the illustration.
- NOTICE:
-
Be careful not to damage the joint boot.
Install a new small boot clamp to the boot.
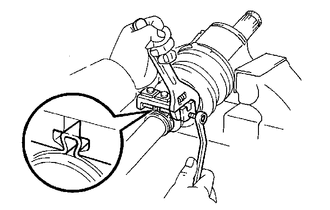
Place SST onto the clamp.
- SST
- 09521-24010
Tighten SST so that the boot clamp is pinched as shown in the illustration.
- NOTICE:
-
Do not overtighten SST.
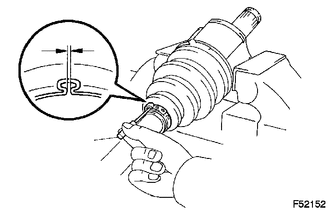
Using SST, adjust the clearance of the small boot clamp.
- SST
- 09240-00020
- Standard clearance:
0.8 mm (0.0314 in.) or less
8.INSPECT FRONT DRIVE SHAFT ASSEMBLY LH