DOOR LOCK FRONT DOOR LOCK INSTALLATION
CAUTION / NOTICE / HINT
- HINT:
- ·
Use the same procedure for the RH and LH sides.
·The procedure listed below is for the LH side.
·A bolt without a torque specification is shown in the standard bolt chart (See page General>SPECIFICATIONS>STANDARD BOLT>SPECIFIED TORQUE FOR STANDARD BOLTS).
PROCEDURE

 1.INSTALL FRONT DOOR LOCK REMOTE CONTROL CABLE ASSEMBLY LH
2.INSTALL FRONT DOOR INSIDE LOCKING CABLE ASSEMBLY LH
3.INSTALL FRONT DOOR LOCK ASSEMBLY LH
Install a new door lock wiring harness seal to the front door lock assembly.
- NOTICE:
- ·
When reusing the removed front door lock assembly, replace the door lock wiring harness seal on the connector with a new one.
·Do not allow grease or dust to adhere to the surface of the connector which contacts the door lock wiring harness seal.
·Reusing the door lock wiring harness seal or using a damaged door lock wiring harness seal may allow water into the connection. This may result in a malfunction of the front door lock assembly.
Apply MP grease to the sliding parts of the front door lock assembly.
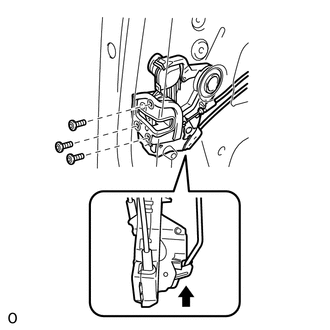
Insert the front door lock open rod into the front door lock assembly.
Check that the front door lock open rod is securely connected to the front door lock assembly.
Using a T30 "TORX" wrench, install the front door lock assembly with the 3 screws.
- Torque:
- 5.0 N*m (51 kgf*cm, 44 in.*lbf)
Connect the door lock connector.
Attach the claw to connect the front door lock remote control cable assembly to the door lock link clamp.
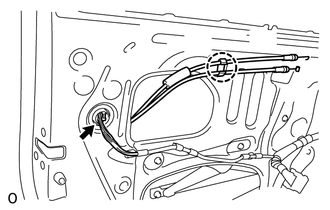
| *1 | Front Door Inside Locking Cable Assembly LH |
| *2 | Front Door Lock Remote Control Cable Assembly |
| *3 | Door Lock Link Clamp |
Attach the claw to connect the front door inside locking cable assembly to the door lock link clamp.
4.INSTALL FRONT DOOR OUTSIDE HANDLE COVER
5.INSTALL FRONT DOOR REAR LOWER FRAME SUB-ASSEMBLY LH
6.INSTALL FRONT DOOR GLASS SUB-ASSEMBLY LH
7.INSTALL FRONT DOOR SERVICE HOLE COVER LH
8.INSTALL FRONT DOOR NO. 1 TRIM BRACKET
9.INSTALL FRONT DOOR INSIDE HANDLE SUB-ASSEMBLY LH
10.INSTALL FRONT DOOR TRIM BOARD SUB-ASSEMBLY LH
11.INSTALL POWER WINDOW REGULATOR MASTER SWITCH ASSEMBLY WITH FRONT DOOR ARMREST BASE PANEL (for Driver Side)
12.INSTALL POWER WINDOW REGULATOR SWITCH ASSEMBLY WITH FRONT DOOR ARMREST BASE PANEL (for Passenger Side)
13.INSTALL DOOR PULL HANDLE
14.INSTALL FRONT DOOR LOWER FRAME BRACKET GARNISH LH
15.CONNECT CABLE TO NEGATIVE BATTERY TERMINAL
- NOTICE:
-
When disconnecting the cable, some systems need to be initialized after the cable is reconnected (See page General>INTRODUCTION>REPAIR INSTRUCTION>INITIALIZATION).