INTERIOR PANELS / TRIM ROOF HEADLINING(for Extra Cab) REMOVAL
PROCEDURE

 1. PRECAUTION (w/ Airbag System)
- NOTICE:
-
After turning the ignition switch off, waiting time may be required before disconnecting the cable from the battery terminal. Therefore, make sure to read the disconnecting the cable from the battery terminal notice before proceeding with work (See page General>INTRODUCTION>REPAIR INSTRUCTION>PRECAUTION).
2.DISCONNECT CABLE FROM NEGATIVE BATTERY TERMINAL (w/ Airbag System)
- CAUTION:
-
Wait at least 90 seconds after disconnecting the cable from the negative (-) battery terminal to disable the SRS system.
- NOTICE:
-
When disconnecting the cable, some systems need to be initialized after the cable is reconnected (See page General>INTRODUCTION>REPAIR INSTRUCTION>INITIALIZATION)
3.REMOVE FRONT SEAT ASSEMBLY LH
4.REMOVE FRONT SEAT ASSEMBLY RH
- HINT:
-
Use the same procedure described for the LH side.
5.REMOVE FRONT DOOR SCUFF PLATE LH
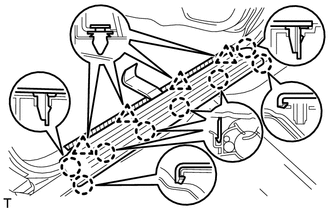
| *1 | Protective Tape |
Put protective tape around the front door scuff plate.
Using a moulding remover, detach the 4 clips and 8 claws and remove the front door scuff plate.
6.REMOVE FRONT DOOR SCUFF PLATE RH
- HINT:
-
Use the same procedure described for the LH side.
7.REMOVE FRONT DOOR OPENING TRIM LH
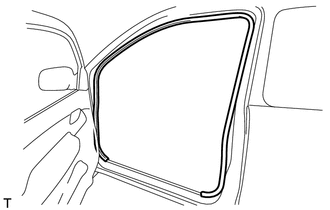
Remove the front door opening trim.
8.REMOVE FRONT DOOR OPENING TRIM RH
- HINT:
-
Use the same procedure described for the LH side.
9.REMOVE ASSIST GRIP PLUG LH (w/ Assist Grip)
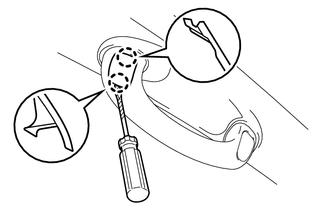
| *1 | Protective Tape |
- HINT:
-
Use the same procedure for both front No. 1 assist grip plugs.
Using a screwdriver, detach the 2 claws and remove the front No. 1 assist grip plug.
- HINT:
-
Tape the screwdriver tip before use.
10.REMOVE ASSIST GRIP PLUG RH (w/ Assist Grip)
- HINT:
-
Use the same procedure described for the LH side.
11.REMOVE FRONT ASSIST GRIP SUB-ASSEMBLY (w/ Assist Grip)
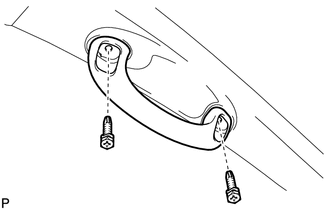
- HINT:
-
Use the same procedure for both front assist grips.
Remove the 2 screws and front assist grip.
12.REMOVE FRONT PILLAR GARNISH LH
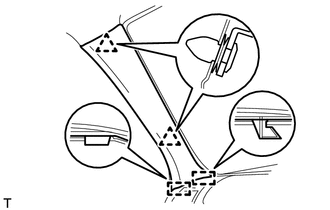
Detach the 2 clips and 2 guides and remove the front pillar garnish.
13.REMOVE FRONT PILLAR GARNISH RH
- HINT:
-
Use the same procedure described for the LH side.
14.REMOVE REAR SEAT CUSHION ASSEMBLY LH (w/ Seat Cushion)
15.REMOVE REAR SEAT CUSHION ASSEMBLY RH (w/ Seat Cushion)
16.REMOVE UPPER BACK PANEL GARNISH
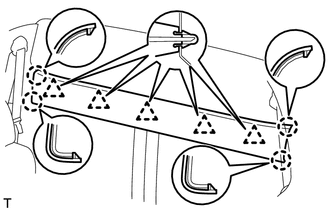
Detach the 4 claws and 5 clips and remove the upper back panel garnish.
17.REMOVE REAR SEATBACK ASSEMBLY
18.REMOVE LOWER BACK PANEL GARNISH
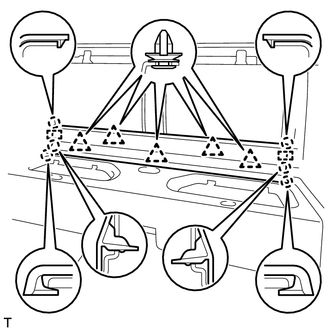
Detach the 6 claws, 2 guides and 5 clips and remove the lower back panel garnish.
19.REMOVE QUARTER INSIDE TRIM BOARD LH
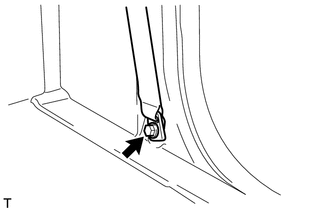
Remove the bolt and disconnect the front seat outer belt floor anchor.
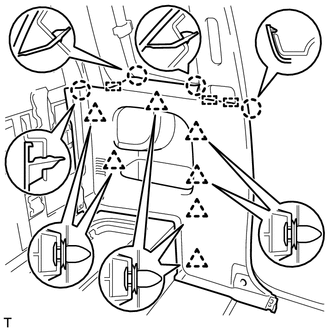
Detach the 4 claws, 3 guides and 7 clips and remove the quarter inside trim board.
20.REMOVE QUARTER INSIDE TRIM BOARD RH
- HINT:
-
Use the same procedure described for the LH side.
21.REMOVE QUARTER PILLAR GARNISH LH
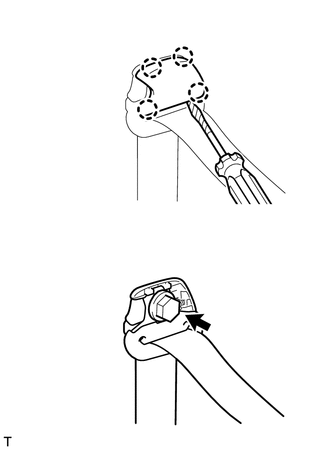
| *1 | Protective Tape |
Using a screwdriver, detach the 4 claws and remove the front seat belt shoulder anchor cover.
- HINT:
-
Tape the screwdriver tip before use.
)Remove the bolt and disconnect the front seat belt shoulder anchor.
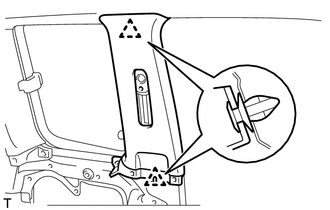
Detach the 2 clips and remove the quarter pillar garnish.
22.REMOVE QUARTER PILLAR GARNISH RH
- HINT:
-
Use the same procedure described for the LH side.
23.REMOVE INNER UPPER ROOF SIDE GARNISH LH
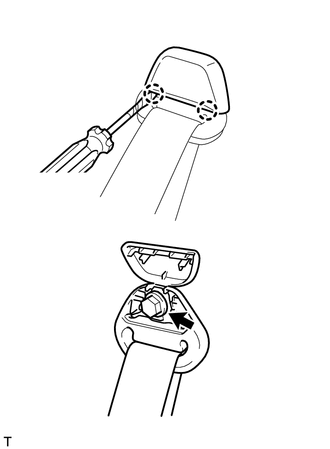
| *1 | Protective Tape |
w/ Seat Cushion:
Using a screwdriver, detach the 2 claws and open the rear seat belt shoulder anchor cover.
- HINT:
-
Tape the screwdriver tip before use.
Remove the bolt and disconnect the rear seat belt shoulder anchor.
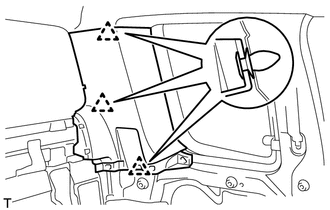
Detach the 3 clips and remove the inner upper roof side garnish.
24.REMOVE INNER UPPER ROOF SIDE GARNISH RH
- HINT:
-
Use the same procedure described for the LH side.
25.REMOVE MAP LIGHT ASSEMBLY (w/ Map Light)
26.REMOVE NO. 1 ROOM LIGHT ASSEMBLY
27.REMOVE VISOR ASSEMBLY LH
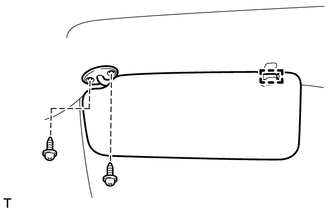
Detach the guide.
Remove the 2 screws and visor.
28.REMOVE VISOR ASSEMBLY RH
- HINT:
-
Use the same procedure described for the LH side.
29.REMOVE VISOR HOLDER LH
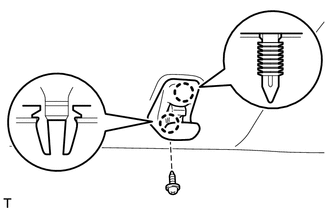
Remove the screw.
Detach the 2 claws and remove the visor holder.
30.REMOVE VISOR HOLDER RH
- HINT:
-
Use the same procedures described for the LH side.
31.REMOVE ASSIST GRIP
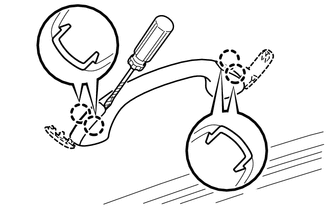
| *1 | Protective Tape |
Using a screwdriver, detach the 4 claws and open the 2 covers.
- HINT:
-
Tape the screwdriver tip before use.
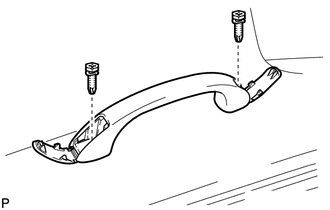
Remove the 2 screws and assist grip.
32.REMOVE UPPER INSTRUMENT PANEL SUB-ASSEMBLY
33.REMOVE LOWER INSTRUMENT PANEL FINISH PANEL SUB-ASSEMBLY
34.REMOVE NO. 2 HEATER TO REGISTER DUCT
35.REMOVE NO. 1 HEATER TO REGISTER DUCT
36.REMOVE NO. 3 HEATER TO REGISTER DUCT
37.REMOVE DEFROSTER NOZZLE ASSEMBLY
38.REMOVE ROOF HEADLINING ASSEMBLY
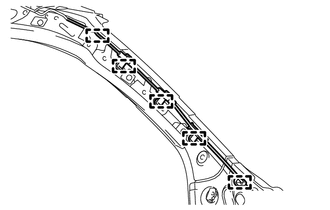
Detach the 5 clamps from the front pillar.
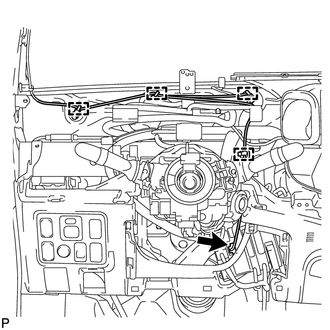
Disconnect the connectors and detach the 4 clamps.
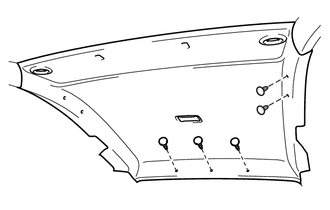
Using a clip remover, remove the 5 clips.
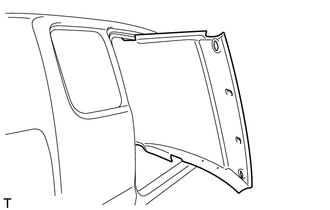
Remove the roof headlining as shown in the illustration.
- NOTICE:
-
Be careful not to damage the roof headlining when removing it.
39.REMOVE FRONT SIDE RAIL SPACER LH
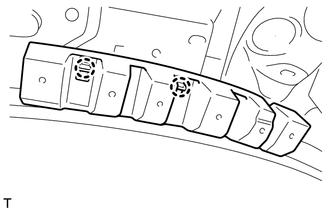
Detach the 2 claws and remove the front side rail spacer.
40.REMOVE FRONT SIDE RAIL SPACER RH
- HINT:
-
Use the same procedure described for the LH side.
41.REMOVE SIDE RAIL SPACER
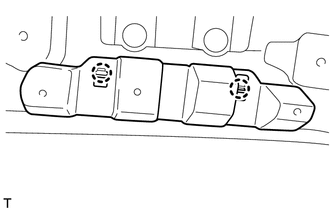
Detach the 2 claws and remove the side rail spacer.
42.REMOVE REAR NO. 2 SIDE RAIL SPACER LH
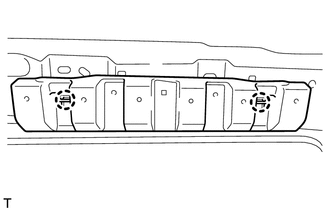
Detach the 2 claws and remove the rear No. 2 side rail spacer.
43.REMOVE REAR NO. 2 SIDE RAIL SPACER RH
- HINT:
-
Use the same procedure described for the LH side.
44.REMOVE REAR NO. 3 SIDE RAIL SPACER LH
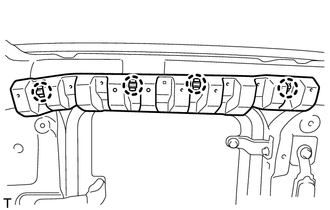
Detach the 4 claws and remove the rear No. 3 side rail spacer.
45.REMOVE REAR NO. 3 SIDE RAIL SPACER RH
- HINT:
-
Use the same procedure described for the LH side.