WINDOW / GLASS BACK WINDOW GLASS(for Double Cab) REMOVAL
PROCEDURE

 1.REMOVE REAR SEAT ASSEMBLY
2.REMOVE REAR DOOR SCUFF PLATE LH
3.REMOVE REAR DOOR SCUFF PLATE RH
4.REMOVE REAR DOOR OPENING TRIM LH
Partially remove the rear door opening trim LH so that the lower quarter trim panel LH and quarter inside trim board LH can be removed (See page Vehicle Interior>INTERIOR PANELS / TRIM>ROOF HEADLINING(for Double Cab)>REMOVAL).
5.REMOVE REAR DOOR OPENING TRIM RH
- HINT:
-
Use the same procedure described for the LH side.
6.REMOVE UPPER BACK PANEL GARNISH
7.REMOVE LOWER QUARTER TRIM PANEL LH
8.REMOVE LOWER QUARTER TRIM PANEL RH
9.REMOVE QUARTER INSIDE TRIM BOARD LH
10.REMOVE QUARTER INSIDE TRIM BOARD RH
11.REMOVE ASSIST GRIP
12.REMOVE ROOF HEADLINING ASSEMBLY
Partially remove the roof headlining.
- HINT:
-
It is not necessary to completely remove the roof headlining. Slightly lower the rear section of the roof headlining so that the back window glass can be removed in a later step (See page Vehicle Interior>INTERIOR PANELS / TRIM>ROOF HEADLINING(for Double Cab)>REMOVAL).
13.REMOVE BACK WINDOW GLASS
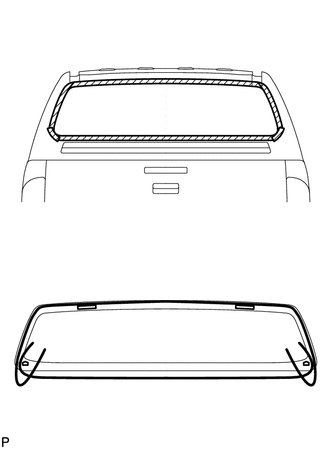
| *1 | Protective Tape |
| *2 | Stopper |
| *3 | Spacer |
| *4 | Piano Wire |
w/ Defogger:
Disconnect the back window defogger connector.
Apply protective tape to the outer surface of the vehicle body to prevent scratches.
From the interior, insert a piano wire between the vehicle body and back window glass as shown in the illustration.
Tie objects that can serve as handles (for example, wooden blocks) to all wire ends.
- NOTICE:
-
When separating the back window glass from the vehicle, be careful not to damage the vehicle's paint or interior/exterior ornaments.
Cut through the adhesive by pulling the piano wire around the back window glass.
- NOTICE:
-
Leave as much adhesive on the vehicle body as possible when cutting through the adhesive.
Using suction cups, remove the back window glass.
14.CLEAN BACK WINDOW GLASS
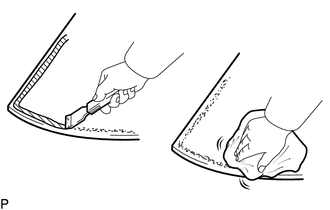
Using a scraper, remove the stoppers, spacers, moulding and adhesive sticking to the back window glass.
Clean the outer edges of the back window glass with non-residue solvent.
- NOTICE:
- ·
Do not touch the back window glass surface after cleaning it.
·Even if using new back window glass, clean it with non-residue solvent.
15.REMOVE NO. 1 BACK WINDOW GLASS STOPPER
Using a scraper, remove the 2 No. 1 back window glass stoppers from the vehicle body.
16.CLEAN VEHICLE BODY
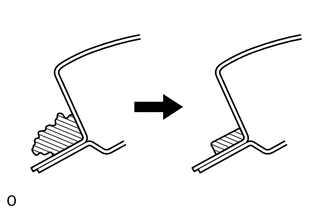
| *1 | Adhesive |
| *2 | Vehicle Body |
Clean and shape the contact surface of the vehicle body.
Use a knife to cut away excess adhesive on the contact surface of the vehicle body as shown in the illustration.
- NOTICE:
-
Be careful not to damage the vehicle body.
- HINT:
-
Leave as much adhesive on the vehicle body as possible.
Clean the contact surface of the vehicle body with cleaner.
- NOTICE:
-
Even if all the adhesive has been removed, clean the vehicle body.