Home › Brake › BRAKE CONTROL / DYNAMIC CONTROL SYSTEMS › VEHICLE STABILITY CONTROL SYSTEM › from 2013.10
RM1840EF _54 Brake _009623 BRAKE CONTROL / DYNAMIC CONTROL SYSTEMS _0052601 VEHICLE STABILITY CONTROL SYSTEM J

BRAKE CONTROL / DYNAMIC CONTROL SYSTEMS  VEHICLE STABILITY CONTROL SYSTEM  TC and CG Terminal Circuit  


DESCRIPTION

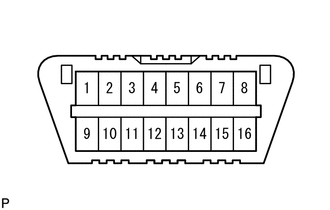
Connecting terminals TC and CG of the DLC3 causes the ECU to output the DTCs by blinking the ABS warning light and slip indicator light.

WIRING DIAGRAM
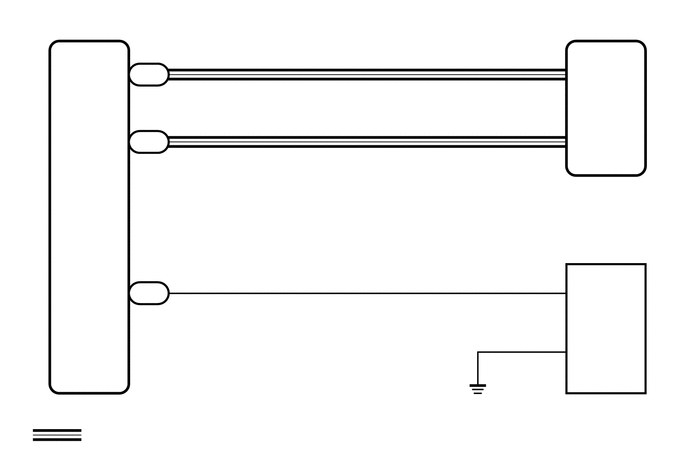
C239114
5.99,0.688 6.385,0.844 0.396,0.156 10 false CANL 5.594,1.792 5.875,1.948 0.281,0.156 10 false A36 5.708,0.552 5.896,0.708 0.188,0.156 10 false 14 5.708,1.26 5.896,1.417 0.188,0.156 10 false 25 1.469,0.49 1.656,0.646 0.188,0.156 10 false 23 1.469,1.188 1.656,1.344 0.188,0.156 10 false 24 1.479,2.771 1.667,2.927 0.188,0.156 10 false 11 5.99,1.396 6.406,1.552 0.417,0.156 10 false CANH 0.896,0.688 1.292,0.844 0.396,0.156 10 false CANL 0.875,1.396 1.292,1.552 0.417,0.156 10 false CANH 5.99,2.979 6.198,3.135 0.208,0.156 10 false TC 1.094,2.979 1.302,3.135 0.208,0.156 10 false TC 5.719,2.885 5.896,3.042 0.177,0.156 10 false 13 5.76,3.51 5.865,3.667 0.104,0.156 10 false 4 5.99,3.604 6.229,3.76 0.24,0.156 10 false CG 5.979,4.135 6.313,4.292 0.333,0.156 10 false G18 5.979,4.333 6.365,4.49 0.385,0.156 10 false DLC3 0.74,4.135 1.156,4.292 0.417,0.156 10 false ECM 5.49,1.948 7.063,2.323 1.573,0.375 10 false Skid Control ECU (Brake Actuator Assembly) 1.406,0.698 1.708,0.854 0.302,0.156 10 false G38 1.427,1.396 1.771,1.552 0.344,0.156 10 false G38 1.427,2.979 1.75,3.135 0.323,0.156 10 false G39 0.948,4.469 2.854,4.677 1.906,0.208 10 false : CAN Communication System

HINT:

When the warning light and indicator light continue to blink, there may be a ground short in the wiring of terminal TC of the DLC3 or an internal ground short in one or more ECUs.


CAUTION / NOTICE / HINT

NOTICE:
·

After replacing the brake actuator assembly, perform calibration (See page Brake>BRAKE CONTROL / DYNAMIC CONTROL SYSTEMS>VEHICLE STABILITY CONTROL SYSTEM>CALIBRATION).

·

Before disconnecting the connector, make sure that there are no problems with the connection.

·

After disconnecting the connector, make sure that the connector case and terminals are not deformed or corroded.


PROCEDURE

1.CHECK CAN COMMUNICATION SYSTEM
a.

Check if a CAN communication system DTC is output.

Click herePower Source / Network>NETWORKING>CAN COMMUNICATION SYSTEM(w/ VSC)>DIAGNOSIS SYSTEM

Result:
Result Proceed to
DTC is not output A
DTC is output B


A

2.INSPECT DLC3

B

GO TO CAN COMMUNICATION SYSTEM (HOW TO PROCEED WITH TROUBLESHOOTING)

2.INSPECT DLC3
a.
C146309
1.615,0.813 1.979,0.292 1.979,0.292 2.104,0.292 false 1.854,1.5 2.031,1.99 2.031,1.99 2.167,1.99 false 0.115,0.083 0.427,0.24 0.313,0.156 10 false *a 2.156,0.208 2.583,0.5 0.427,0.292 10 false CG 2.229,1.917 2.552,2.125 0.323,0.208 10 false TC
*a Front view of DLC3


Measure the voltage according to the value(s) in the table below.

Standard Voltage:
Tester Connection Switch Condition Specified Condition
G18-13 (TC) - G18-4 (CG) Ignition switch ON 11 to 14 V


Result:
Proceed to
OK
NG


OK

3.CHECK ECM (DLC3 INPUT)

NG

4.CHECK HARNESS AND CONNECTOR (DLC3 - ECM)
3.CHECK ECM (DLC3 INPUT)
SST
09843-18040  

a.
C146309
1.646,0.802 2,0.323 2,0.323 2.156,0.323 false 1.854,1.49 2.01,1.979 2.01,1.979 2.135,1.99 false 0.115,0.073 0.427,0.229 0.313,0.156 10 false *a 2.208,0.24 2.625,0.51 0.417,0.271 10 false CG 2.219,1.906 2.635,2.177 0.417,0.271 10 false TC
*a Front view of DLC3


Turn the ignition switch off.


b.

Connect the G39 ECM connector.


c.

Using SST, connect terminals 13 (TC) and 4 (CG) of the DLC3.


d.

Turn the ignition switch to ON.


e.

Check that the MIL is blinking.

Result:
Result Proceed to
MIL is blinking A
MIL is not blinking B


HINT:

If troubleshooting has been carried out according to the Problem Symptoms Table, refer back to the table and proceed to the next step before replacing the part.

Click hereBrake>BRAKE CONTROL / DYNAMIC CONTROL SYSTEMS>VEHICLE STABILITY CONTROL SYSTEM>PROBLEM SYMPTOMS TABLE


A

B

REPAIR OR REPLACE WIRE HARNESS OR ECM

4.CHECK HARNESS AND CONNECTOR (DLC3 - ECM)
a.

Turn the ignition switch off.


b.

Disconnect the G39 ECM connector.


c.

Measure the resistance according to the value(s) in the table below.

Standard Resistance:
Tester Connection Condition Specified Condition
G18-13 (TC) - G39-11 (TC) Always Below 1 Ω
G18-13 (TC) - Body ground Always 10 kΩ or higher


Result:
Proceed to
OK
NG


OK

5.CHECK HARNESS AND CONNECTOR (DLC3 - BODY GROUND)

NG

REPAIR OR REPLACE HARNESS OR CONNECTOR

5.CHECK HARNESS AND CONNECTOR (DLC3 - BODY GROUND)
a.

Measure the resistance according to the value(s) in the table below.

Standard Resistance:
Tester Connection Condition Specified Condition
G18-4 (CG) - Body ground Always Below 1 Ω


Result:
Proceed to
OK
NG


OK

6.CHECK ECM (DLC3 INPUT)

NG

REPAIR OR REPLACE HARNESS OR CONNECTOR

6.CHECK ECM (DLC3 INPUT)
SST
09843-18040  

a.
C146309
1.646,0.802 2,0.323 2,0.323 2.156,0.323 false 1.854,1.49 2.01,1.979 2.01,1.979 2.135,1.99 false 0.115,0.073 0.427,0.229 0.313,0.156 10 false *a 2.208,0.24 2.625,0.51 0.417,0.271 10 false CG 2.219,1.906 2.635,2.177 0.417,0.271 10 false TC
*a Front view of DLC3


Turn the ignition switch off.


b.

Connect the G39 ECM connector.


c.

Using SST, connect terminals 13 (TC) and 4 (CG) of the DLC3.


d.

Turn the ignition switch to ON.


e.

Check that the MIL is blinking.

Result:
Result Proceed to
MIL is blinking A
MIL is not blinking B


A

B

REPAIR OR REPLACE WIRE HARNESS OR ECM