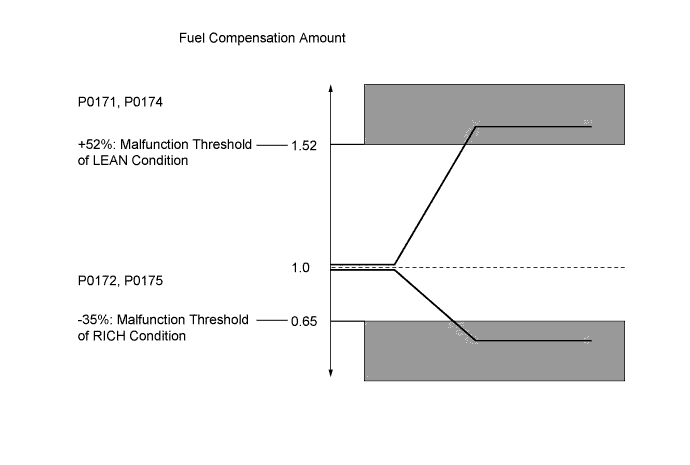
DTC P0171 System Too Lean (Bank 1) |
DTC P0172 System Too Rich (Bank 1) |
DTC P0174 System Too Lean (Bank 2) |
DTC P0175 System Too Rich (Bank 2) |
| DTC No. | DTC Detection Condition | Trouble Area |
| P0171 P0174 | When air-fuel ratio feedback is stable after warming up engine, fuel trim is considered to be in error on LEAN side (2 trip detection logic) |
|
| P0172 P0175 | When air-fuel ratio feedback is stable after warming up the engine, fuel trim is considered to be in error on RICH side (2 trip detection logic) |
|
| Tester Display (Sensor) | Injection Volume | Status | Voltage |
| AFS B1S1 or AFS B2S1 (A/F) | +12% | Rich | Less than 3.1 V |
| AFS B1S1 or AFS B2S1 (A/F) | -12% | Lean | More than 3.4 V |
| O2S B1S2 or O2S B2S2 (heated oxygen sensor) | +12% | Rich | More than 0.55 V |
| O2S B1S2 or O2S B2S2 (heated oxygen) | -12% | Lean | Less than 0.4 V |
| Case | Air Fuel Ratio Sensor (Sensor 1) Output Voltage | Heated Oxygen Sensor (Sensor 2) Output Voltage | Main Suspected Trouble Area |
| 1 |   |  | - |
| 2 |  | |
|
| 3 | | |
|
| 4 | | |
|
| 1.CHECK OTHER DTC OUTPUT (IN ADDITION TO DTC P0171, P0172, P0174 OR P0175) |
Connect the intelligent tester to the DLC3.
Turn the ignition switch ON and turn the tester ON.
Enter the following menus: Powertrain / Engine and ECT / DTC.
Read the DTCs.
| Display (DTC output) | Proceed to |
| P0171, P0172, P0174 or P0175 is output | A |
| P0171, P0172, P0174 or P0175 and other DTCs are output | B |
|
| ||||
| A | |
 |
| 2.CHECK PCV HOSE CONNECTIONS |
Check the PCV hose connections.
|
| ||||
| OK | |
|
| 3.CHECK AIR INDUCTION SYSTEM |
Check the air induction system for vacuum leaks.
|
| ||||
| OK | |
|
| 4.PERFORM ACTIVE TEST USING INTELLIGENT TESTER (INJECTION VOLUME) |
Connect the intelligent tester to the DLC3.
Start the engine and turn the tester ON.
Warm up the engine and run the engine at an engine speed of 2500 rpm for approximately 90 seconds.
Enter the following menus: Powertrain / Engine and ECT / Active Test / Control the Injection Volume.
Perform the Control the Injection Volume operation with the engine idling.
Monitor the output voltages of the air fuel ratio and heated oxygen sensors (AFS Voltage B1S1 and O2S B1S2 or AFS Voltage B2S1 and O2S B2S2) displayed on the tester.
| Tester Display (Sensor) | Injection Volume | Status | Voltage |
| AFS Voltage B1S1 or AFS Voltage B2S1 (Air fuel ratio) | +12% | Rich | Less than 3.1 V |
| AFS Voltage B1S1 or AFS Voltage B2S1 (Air fuel ratio) | -12% | Lean | More than 3.4 V |
| O2S B1S2 or O2S B2S2 (Heated oxygen) | +12% | Rich | More than 0.55 V |
| O2S B1S2 or O2S B2S2 (Heated oxygen) | -12% | Lean | Less than 0.4 V |
| Status of AFS Voltage B1S1 or AFS Voltage B2S1 | Status of O2S B1S2 or O2S B2S2 | Air Fuel Ratio Condition and Air Fuel Ratio Sensor Condition | Misfire | Suspected Trouble Area | Proceed to |
| Lean / Rich | Lean / Rich | Normal | - | - | A |
| Lean | Lean | Actual air-fuel ratio lean | May occur |
| A |
| Rich | Rich | Actual air-fuel ratio rich | - |
| A |
| Lean | Lean / Rich | A/F sensor malfunction | - |
| B |
| Rich | Lean / Rich | A/F sensor malfunction | - |
| B |
|
| ||||
| A | |
|
| 5.READ VALUE USING INTELLIGENT TESTER (COOLANT TEMP) |
Connect the intelligent tester to the DLC3.
Turn the ignition switch ON and turn the tester ON.
Enter the following menus: Powertrain / Engine and ECT / Data List / Coolant Temp.
Read Coolant Temp twice, when the engine is both cold and warmed up.
|
| ||||
| OK | |
|
| 6.READ VALUE USING INTELLIGENT TESTER (MAF) |
Connect the intelligent tester to the DLC3.
Turn the ignition switch ON and turn the tester ON.
Enter the following menus: Powertrain / Engine and ECT / Data List / Coolant Temp and MAF.
Allow the engine to idle until Coolant Temp reaches 75°C (167°F) or higher.
Read MAF with the engine speed at 3000 rpm.
|
| ||||
| OK | |
|
| 7.CHECK FUEL PRESSURE |
Check the fuel pressure (high or low pressure).
|
| ||||
| OK | |
|
| 8.CHECK FOR EXHAUST GAS LEAK |
Check for exhaust gas leaks.
|
| ||||
| OK | |
|
| 9.CHECK FOR SPARK AND IGNITION |
Perform a spark test.
|
| ||||
| OK | |
|
| 10.INSPECT FUEL INJECTOR ASSEMBLY (INJECTION AND VOLUME) |
Check the injection and volume.
|
| ||||
|
| ||||
| 11.INSPECT AIR FUEL RATIO SENSOR (HEATER RESISTANCE) |
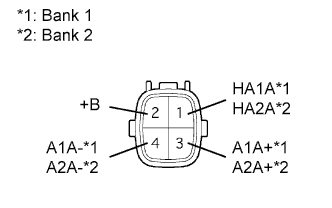 |
Disconnect the A35 and A36 A/F sensor connectors.
Measure the resistance of the A/F sensor.
| Tester Connection | Condition | Specified Condition |
| 1 (HA1A) - 2 (+B) | 20°C (68°F) | 1.8 to 3.4 Ω |
| 1 (HA1A) - 4 (A1A-) | - | 10 kΩ or higher |
| Tester Connection | Condition | Specified Condition |
| 1 (HA2A) - 2 (+B) | 20°C (68°F) | 1.8 to 3.4 Ω |
| 1 (HA2A) - 4 (A2A-) | - | 10 kΩ or higher |
|
| ||||
| OK | |
|
| 12.CHECK TERMINAL VOLTAGE (+B OF AIR FUEL RATIO SENSOR) |
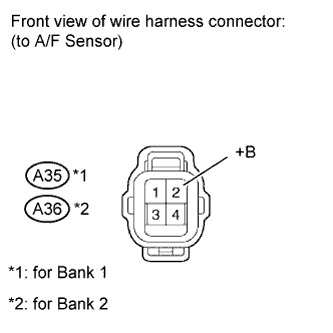 |
Disconnect the air fuel ratio sensor connector.
Turn the ignition switch to ON.
Measure the voltage according to the value(s) in the table below.
| Tester Connection | Switch Condition | Specified Condition |
| A35-2 (+B) - Body ground | Ignition switch ON | 11 to 14 V |
| A36-2 (+B) - Body ground | Ignition switch ON | 11 to 14 V |
|
| ||||
| OK | |
|
| 13.CHECK HARNESS AND CONNECTOR (AIR FUEL RATIO SENSOR - ECM) |
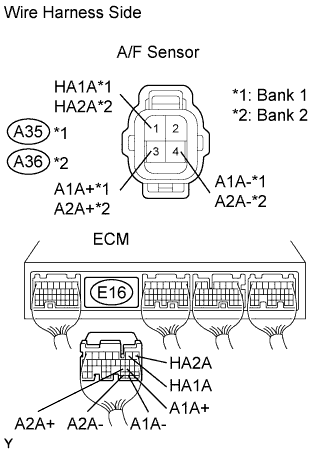 |
Disconnect the air fuel ratio sensor connector.
Disconnect the ECM connector.
Measure the resistance according to the value(s) in the table below.
| Terminal Connection | Specified Condition |
| A35-1 (HA1A) - E16-2 (HA1A) | Below 1 Ω |
| A35-3 (A1A+) - E16-22 (A1A+) | Below 1 Ω |
| A35-4 (A1A-) - E16-30 (A1A-) | Below 1 Ω |
| A35-1 (HA1A) or E16-2 (HA1A) - Body ground | 10 kΩ or higher |
| A35-3 (A1A+) or E16-22 (A1A+) - Body ground | 10 kΩ or higher |
| A35-4 (A1A-) or E16-30 (A1A-) - Body ground | 10 kΩ or higher |
| Terminal Connection | Specified Condition |
| A36-1 (HA2A) - E16-1 (HA2A) | Below 1 Ω |
| A36-3 (A2A+) - E16-23 (A2A+) | Below 1 Ω |
| A36-4 (A2A-) - E16-31 (A2A-) | Below 1 Ω |
| A36-1 (HA2A) or E16-1 (HA2A) - Body ground | 10 kΩ or higher |
| A36-3 (A2A+) or E16-23 (A2A+) - Body ground | 10 kΩ or higher |
| A36-4 (A2A-) or E16-31 (A2A-) - Body ground | 10 kΩ or higher |
|
| ||||
| OK | |
|
| 14.REPLACE AIR FUEL RATIO SENSOR |
Replace the air fuel ratio sensor
| NEXT | |
|
| 15.PERFORM CONFIRMATION DRIVING PATTERN |
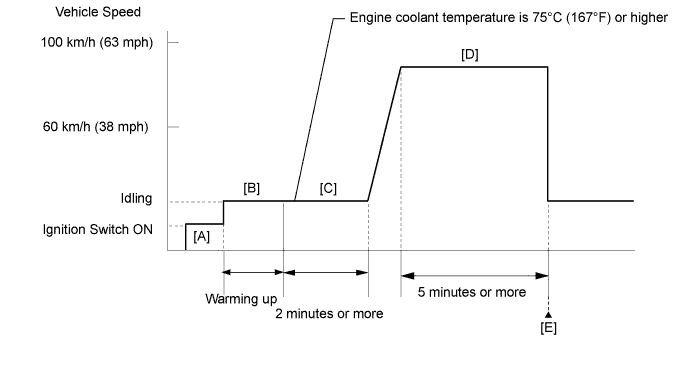
Drive the vehicle in accordance with the driving pattern described in Confirmation Driving Pattern.
Read the DTCs.
| Result | Proceed to |
| DTC P0171, P0172, P0174 or P0175 is output | A |
| DTC is not output | B |
|
| ||||
| A | |
|
| 16.CHECK HARNESS AND CONNECTOR |
Check the connection and terminal contact pressure of connectors and wire harnesses between the mass air flow meter and ECM.
| NEXT | |
|
| 17.CHECK WHETHER DTC OUTPUT RECURS |
Drive the vehicle in accordance with the driving pattern described in Confirmation Driving Pattern.
Read the DTCs.
| Result | Proceed to |
| DTC P0171, P0172, P0174 or P0175 is output | A |
| DTC is not output | B |
|
| ||||
| A | |
|
| 18.CHECK HARNESS AND CONNECTOR (MASS AIR FLOW METER - ECM) |
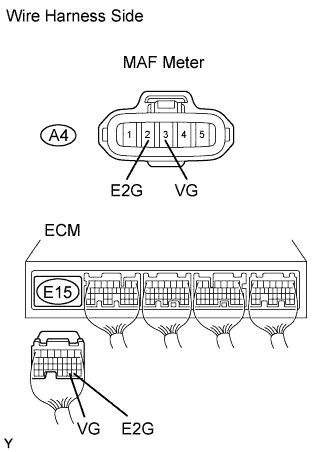 |
Disconnect the A4 MAF meter connector.
Disconnect the E15 ECM connector.
Measure the resistance of the wire harness side connectors.
| Tester Connection | Specified Condition |
| A4-3 (VG) - E15-30 (VG) | Below 1 Ω |
| A4-2 (E2G) - E15-29 (E2G) | Below 1 Ω |
| A4-3 (VG) or E15-30 (VG) - Body ground | 10 kΩ or higher |
|
| ||||
| OK | |
|
| 19.REPLACE MASS AIR FLOW METER SUB-ASSEMBLY |
Replace the mass air flow meter sub-assembly.
| NEXT | |
|
| 20.CONFIRM WHETHER MALFUNCTION HAS BEEN SUCCESSFULLY REPAIRED |
Drive the vehicle in accordance with the driving pattern described in Confirmation Driving Pattern.
Read the DTCs.
| Result | Proceed to |
| DTC is not output | A |
| DTC P0171, P0172, P0174 or P0175 is output | B |
|
| ||||
| A | ||
 | ||
| ||
| 21.CHECK HARNESS AND CONNECTOR (AIR FUEL RATIO SENSOR - A/F RELAY) |
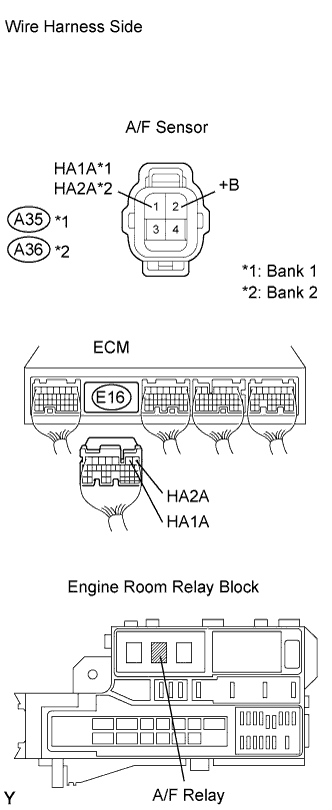 |
Disconnect the A35 and A36 A/F sensor connectors.
Disconnect the E16 ECM connector.
Remove the A/F relay from the engine room relay block.
Measure the resistance of the wire harness side connectors.
| Tester Connection | Specified Condition |
| A35-1 (HA1A) - E16-2 (HA1A) | Below 1 Ω |
| A35-2 (+B) - Relay block A/F relay terminal 3 | Below 1 Ω |
| A35-1 (HA1A) or E16-2 (HA1A) - Body ground | 10 kΩ or higher |
| A35-2 (+B) or relay block A/F relay terminal 3 - Body ground | 10 kΩ or higher |
| Tester Connection | Specified Condition |
| A36-1 (HA2A) - E16-1 (HA2A) | Below 1 Ω |
| A36-2 (+B) - Relay block A/F relay terminal 3 | Below 1 Ω |
| A36-1 (HA2A) or E16-1 (HA2A) - Body ground | 10 kΩ or higher |
| A36-2 (+B) or relay block A/F relay terminal 3 - Body ground | 10 kΩ or higher |
|
| ||||
| OK | |
|
| 22.INSPECT A/F RELAY |
Inspect the A/F relay (Click here).
|
| ||||
| OK | ||
| ||
| ||

