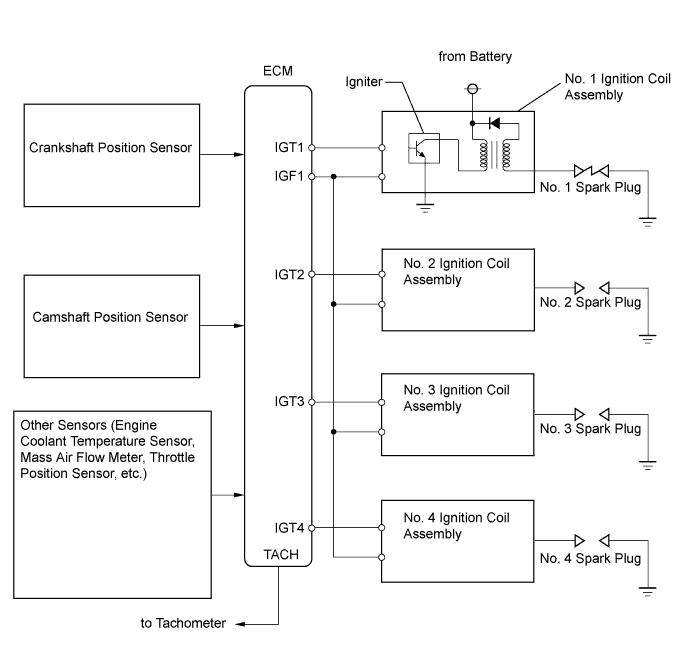
DTC P0351 Ignition Coil "A" Primary / Secondary Circuit |
DTC P0352 Ignition Coil "B" Primary / Secondary Circuit |
DTC P0353 Ignition Coil "C" Primary / Secondary Circuit |
DTC P0354 Ignition Coil "D" Primary / Secondary Circuit |
| DTC No. | DTC Detection Condition | Trouble Area |
| P0351 P0352 P0353 P0354 | No IGF signal is sent to the ECM while the engine is running (1 trip detection logic). |
|
| 1.CHECK DTC OUTPUT |
Connect the intelligent tester to the DLC3.
Turn the ignition switch to ON.
Turn the tester on.
Enter the following menus: Powertrain / Engine and ECT / DTC.
Read the DTCs.
| Result | Proceed to |
| DTC P0351, P0352, P0353 or P0354 is output | A |
| DTC P0351, P0352, P0353 and P0354 are output | B |
|
| ||||
| A | |
 |
| 2.CHECK WHETHER DTC OUTPUT RECURS (DTC P0351, P0352, P0353 OR P0354) |
Connect the intelligent tester to the DLC3.
Turn the ignition switch to ON.
Turn the tester on.
Clear the DTCs (Click here).
Shuffle the arrangement of the ignition coil assemblies (among the No. 1 to No. 4 cylinders).
Perform a simulation test.
Check the DTCs output to the tester.
| Result | Proceed to |
| Same DTC output | A |
| Different ignition coil assembly DTC output | B |
|
| ||||
| A | |
|
| 3.CHECK IGNITION COIL ASSEMBLY (POWER SOURCE) |
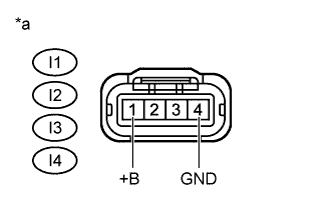 |
Disconnect the ignition coil assembly connectors.
Measure the voltage according to the value(s) in the table below.
| Tester Connection | Switch Condition | Specified Condition |
| I1-1 (+B) - I1-4 (GND) | Ignition switch ON | 11 to 14 V |
| I2-1 (+B) - I2-4 (GND) | Ignition switch ON | 11 to 14 V |
| I3-1 (+B) - I3-4 (GND) | Ignition switch ON | 11 to 14 V |
| I4-1 (+B) - I4-4 (GND) | Ignition switch ON | 11 to 14 V |
| *a | Front view of wire harness connector (to Ignition Coil Assembly) |
Reconnect the ignition coil assembly connectors.
|
| ||||
| OK | |
|
| 4.CHECK HARNESS AND CONNECTOR (IGNITION COIL ASSEMBLY - ECM) |
Disconnect the ignition coil assembly connectors.
Disconnect the ECM connector.
Measure the resistance according to the value(s) in the table below.
| Tester Connection | Condition | Specified Condition |
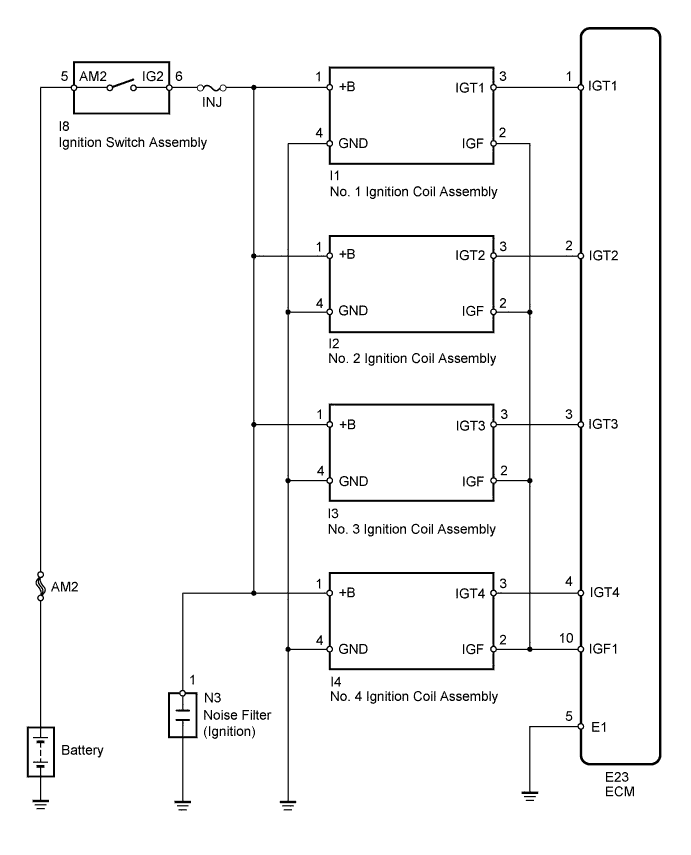
| I1-2 (IGF) - E23-10 (IGF1) | Always | Below 1 Ω |
| I2-2 (IGF) - E23-10 (IGF1) | Always | Below 1 Ω |
| I3-2 (IGF) - E23-10 (IGF1) | Always | Below 1 Ω |
| I4-2 (IGF) - E23-10 (IGF1) | Always | Below 1 Ω |
| Tester Connection | Condition | Specified Condition |
| I1-2 (IGF) or E23-10 (IGF1) - Body ground | Always | 10 kΩ or higher |
| I2-2 (IGF) or E23-10 (IGF1) - Body ground | Always | 10 kΩ or higher |
| I3-2 (IGF) or E23-10 (IGF1) - Body ground | Always | 10 kΩ or higher |
| I4-2 (IGF) or E23-10 (IGF1) - Body ground | Always | 10 kΩ or higher |
Reconnect the ECM connector.
Reconnect the ignition coil assembly connectors.
|
| ||||
| OK | |
|
| 5.CHECK HARNESS AND CONNECTOR (IGNITION COIL ASSEMBLY - ECM) |
Disconnect the ignition coil assembly connectors.
Disconnect the ECM connector.
Measure the resistance according to the value(s) in the table below.
| Tester Connection | Condition | Specified Condition |
| I1-3 (IGT1) - E23-1 (IGT1) | Always | Below 1 Ω |
| I2-3 (IGT2) - E23-2 (IGT2) | Always | Below 1 Ω |
| I3-3 (IGT3) - E23-3 (IGT3) | Always | Below 1 Ω |
| I4-3 (IGT4) - E23-4 (IGT4) | Always | Below 1 Ω |
| Tester Connection | Condition | Specified Condition |
| I1-3 (IGT1) or E23-1 (IGT1) - Body ground | Always | 10 kΩ or higher |
| I2-3 (IGT2) or E23-2 (IGT2) - Body ground | Always | 10 kΩ or higher |
| I3-3 (IGT3) or E23-3 (IGT3) - Body ground | Always | 10 kΩ or higher |
| I4-3 (IGT4) or E23-4 (IGT4) - Body ground | Always | 10 kΩ or higher |
Reconnect the ECM connector.
Reconnect the ignition coil assembly connectors.
|
| ||||
| OK | ||
 | ||
| ||
| 6.CHECK HARNESS AND CONNECTOR (IGNITION COIL ASSEMBLY - BODY GROUND) |
Disconnect the ignition coil assembly connectors.
Measure the resistance according to the value(s) in the table below.
| Tester Connection | Condition | Specified Condition |
| I1-4 (GND) - Body ground | Always | Below 1 Ω |
| I2-4 (GND) - Body ground | Always | Below 1 Ω |
| I3-4 (GND) - Body ground | Always | Below 1 Ω |
| I4-4 (GND) - Body ground | Always | Below 1 Ω |
Reconnect the ignition coil assembly connectors.
|
| ||||
| OK | |
|
| 7.CHECK HARNESS AND CONNECTOR (IGNITION COIL ASSEMBLY - IGNITION SWITCH ASSEMBLY) |
Disconnect the ignition coil assembly connectors.
Disconnect the ignition switch assembly connectors.
Measure the resistance according to the value(s) in the table below.
| Tester Connection | Condition | Specified Condition |
| I1-1 (+B) - I8-6 | Always | Below 1 Ω |
| I2-1 (+B) - I8-6 | Always | Below 1 Ω |
| I3-1 (+B) - I8-6 | Always | Below 1 Ω |
| I4-1 (+B) - I8-6 | Always | Below 1 Ω |
| Tester Connection | Condition | Specified Condition |
| I1-1 (+B) or I8-6 - Body ground | Always | 10 kΩ or higher |
| I2-1 (+B) or I8-6 - Body ground | Always | 10 kΩ or higher |
| I3-1 (+B) or I8-6 - Body ground | Always | 10 kΩ or higher |
| I4-1 (+B) or I8-6 - Body ground | Always | 10 kΩ or higher |
Reconnect the ignition switch assembly connectors.
Reconnect the ignition coil assembly connectors.
|
| ||||
| OK | ||
| ||
| ||

