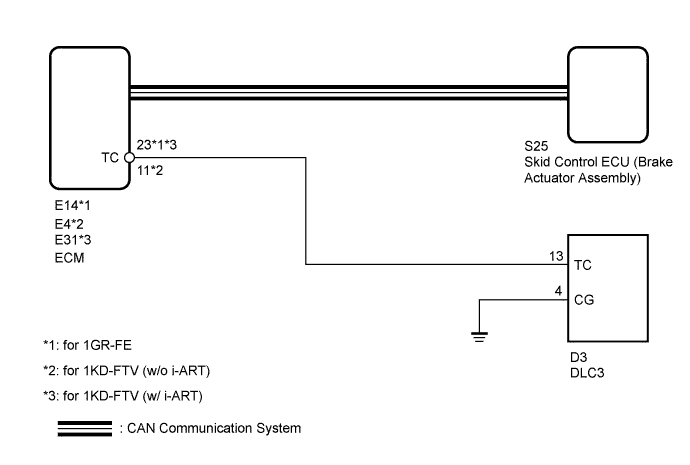
VEHICLE STABILITY CONTROL SYSTEM > TC and CG Terminal Circuit |
| 1.CHECK CAN COMMUNICATION SYSTEM |
Check if a CAN communication system DTC is output (Click here).
| Result | Proceed to |
| DTC is not output | A |
| DTC is output | B |
|
| ||||
| A | |
 |
| 2.INSPECT DLC3 |
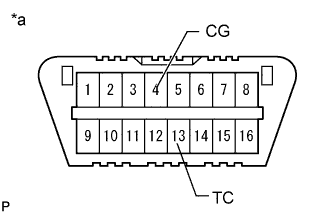 |
Measure the voltage according to the value(s) in the table below.
| Tester Connection | Switch Condition | Specified Condition |
| D3-13 (TC) - D3-4 (CG) | Ignition switch ON | 11 to 14 V |
| *a | Front view of DLC3 |
|
| ||||
| OK | |
|
| 3.CHECK ECM (DLC3 INPUT) |
Turn the ignition switch off.
Connect the ECM connector.
|
Using SST, connect terminals 13 (TC) and 4 (CG) of the DLC3.
| *a | Front view of DLC3 |
Turn the ignition switch to ON.
Check that the MIL is blinking.
| Result | Proceed to |
| MIL is blinking | A |
| MIL is not blinking | B |
|
| ||||
| A | ||
 | ||
| ||
| 4.CHECK HARNESS AND CONNECTOR (DLC3 - ECM) |
Turn the ignition switch off.
for 1GR-FE:
Disconnect the E14 ECM connector.
for 1KD-FTV (w/o i-ART):
Disconnect the E4 ECM connector.
for 1KD-FTV (w/ i-ART):
Disconnect the E31 ECM connector.
Measure the resistance according to the value(s) in the table below.
| Tester Connection | Condition | Specified Condition |
| D3-13 (TC) - E14-23 (TC) | Always | Below 1 Ω |
| D3-13 (TC) - Body ground | Always | 10 kΩ or higher |
| Tester Connection | Condition | Specified Condition |
| D3-13 (TC) - E4-11 (TC) | Always | Below 1 Ω |
| D3-13 (TC) - Body ground | Always | 10 kΩ or higher |
| Tester Connection | Condition | Specified Condition |
| D3-13 (TC) - E31-23 (TC) | Always | Below 1 Ω |
| D3-13 (TC) - Body ground | Always | 10 kΩ or higher |
|
| ||||
| OK | |
|
| 5.CHECK HARNESS AND CONNECTOR (DLC3 - BODY GROUND) |
Measure the resistance according to the value(s) in the table below.
| Tester Connection | Condition | Specified Condition |
| D3-4 (CG) - Body ground | Always | Below 1 Ω |
|
| ||||
| OK | |
|
| 6.CHECK ECM (DLC3 INPUT) |
Turn the ignition switch off.
Connect the ECM connector.
|
Using SST, connect terminals 13 (TC) and 4 (CG) of the DLC3.
| *a | Front view of DLC3 |
Turn the ignition switch to ON.
Check that the MIL is blinking.
| Result | Proceed to |
| MIL is blinking | A |
| MIL is not blinking | B |
|
| ||||
| A | ||
| ||
| ||

