 |
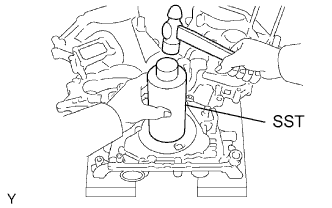
Using SST and a hammer, tap in a new oil seal until its surface is flush with the timing chain cover edge.
- SST
- 09226-10010
OIL PUMP > INSTALLATION |
| 1. INSTALL TIMING CHAIN COVER OIL SEAL |
Using a screwdriver, pry out the oil seal.
|
Using SST and a hammer, tap in a new oil seal until its surface is flush with the timing chain cover edge.
Apply MP grease to the lip of the oil seal.
| 2. INSTALL TIMING CHAIN COVER |
Remove any old seal packing (FIPG material) and be careful not to drop any oil on the contact surfaces of the timing chain cover, cylinder head and cylinder block.
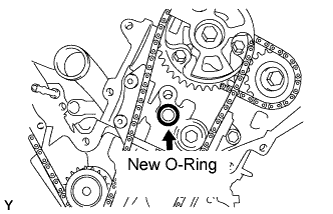 |
Install a new O-ring to the cylinder head LH as shown in the illustration.
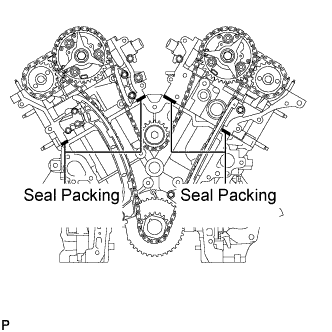 |
Apply seal packing as shown in the illustration.
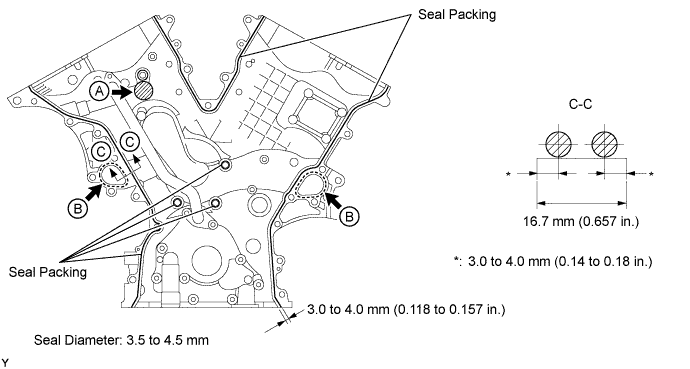
Apply seal packing in a continuous line to the timing chain cover as shown in the illustration.
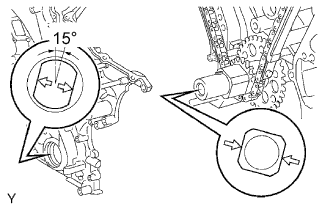 |
Align the hole of the oil pump drive rotor with the rectangular portion of the crankshaft timing sprocket, and slide the timing chain cover into place.
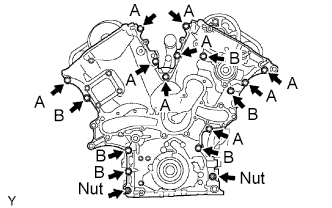 |
Install the timing chain cover with the 15 bolts and 2 nuts. Uniformly tighten the bolts and nuts in several passes.
| 3. INSTALL OIL FILTER BRACKET |
Install a new gasket and the oil filter bracket with the 3 bolts and 2 nuts.
| 4. INSTALL VVT SENSOR |
Apply a light coat of engine oil to the O-ring of each VVT sensor.
Install the 2 VVT sensors with the 2 bolts.
| 5. INSTALL CAMSHAFT TIMING OIL CONTROL VALVE |
Install the 2 camshaft timing oil control valves with the 2 bolts.
| 6. INSTALL CYLINDER HEAD COVER LH |
Remove any old packing (FIPG) material and be careful not to drop any oil on the contact surfaces of the cylinder head, timing chain cover and cylinder head cover.
Apply adhesive on the threads of the ventilation valve.
Install the ventilation valve to the cylinder head cover.
Install the gasket to the cylinder head cover.
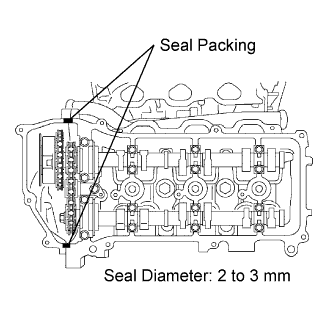 |
Apply seal packing to the cylinder head and timing chain cover as shown in the illustration.
Install the seal washers to the bolts.
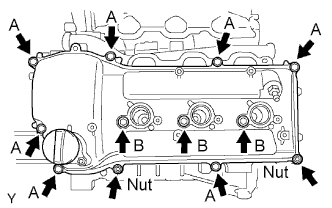 |
Install the cylinder head cover with the 10 bolts and 2 nuts. Uniformly tighten the bolts and nuts in several passes.
| 7. INSTALL CYLINDER HEAD COVER RH |
Remove any old packing (FIPG) material and be careful not to drop any oil on the contact surfaces of the cylinder head, timing chain cover and cylinder head cover.
Install the gasket to the cylinder head cover.
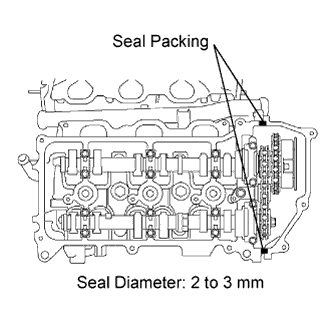 |
Apply seal packing to the cylinder head and timing chain cover as shown in the illustration.
Install the seal washers to the bolts.
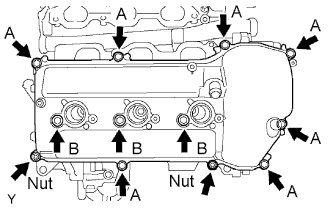 |
Install the cylinder head cover with the 10 bolts and 2 nuts. Uniformly tighten the bolts and nuts in several passes.
| 8. INSTALL IGNITION COIL |
Install the 6 ignition coils with the 6 bolts.
| 9. INSTALL NO. 1 OIL PAN |
Remove any old packing (FIPG) material, and be careful not to drop any oil on the contact surfaces of the cylinder block, rear oil seal retainer and oil pan.
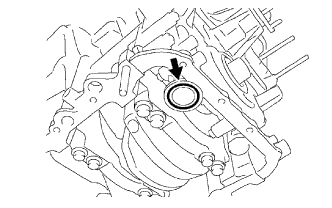 |
Install a new O-ring to the oil pump.
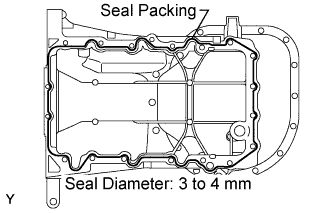 |
Apply seal packing in a continuous line as shown in the illustration.
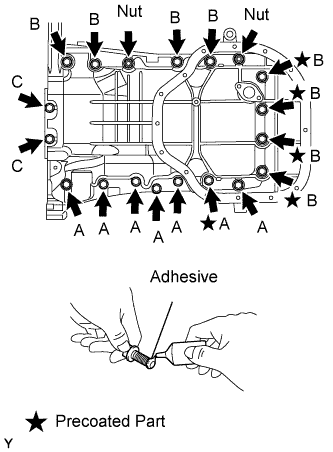 |
Install the oil pan with the 17 bolts and 2 nuts. Uniformly tighten the bolts and nuts in several passes.
| 10. INSTALL OIL STRAINER |
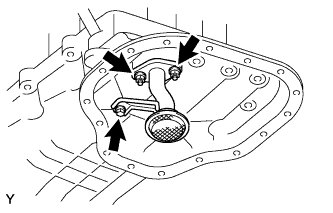 |
Install a new gasket and the oil strainer with the bolt and 2 nuts.
| 11. INSTALL NO. 2 OIL PAN |
Remove any old packing (FIPG) material, and be careful not to drop any oil on the contact surfaces of the No. 1 oil pan and No. 2 oil pan.
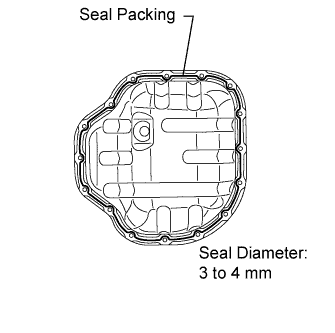 |
Apply seal packing in a continuous line as shown in the illustration.
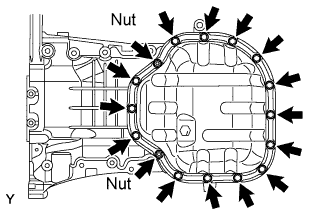 |
Install the No. 2 oil pan with the 14 bolts and 2 nuts. Uniformly tighten the bolts and nuts in several passes.
| 12. INSTALL CRANKSHAFT PULLEY |
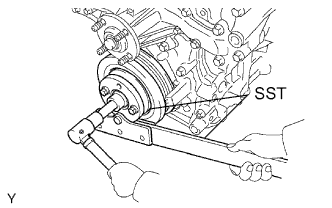 |
Using SST, install the pulley set bolt.
| 13. INSTALL NO. 1 IDLER PULLEY |
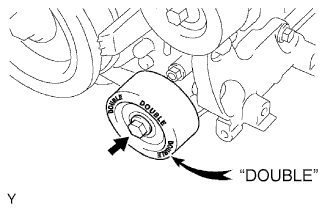 |
Install the idler pulley with the bolt.
| 14. INSTALL NO. 2 IDLER PULLEY |
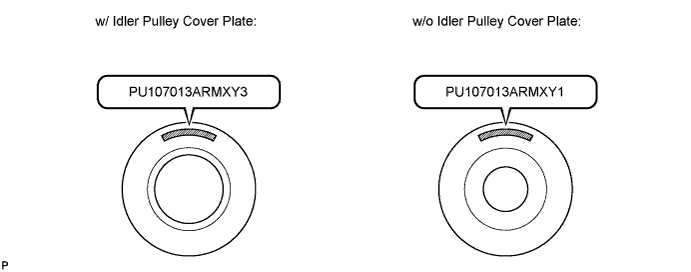
w/ Idler Pulley Cover Plate (PU107013ARMXY3):
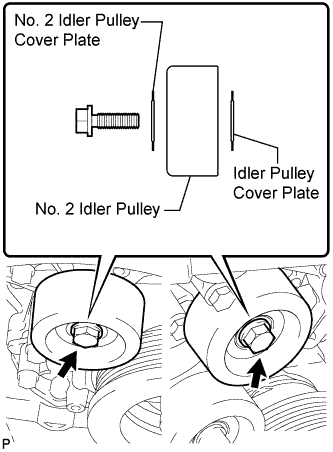 |
Install the idler pulley cover plate, idler pulley and No. 2 idler pulley cover plate with the bolt.
w/o Idler Pulley Cover Plate (PU107013ARMXY1):
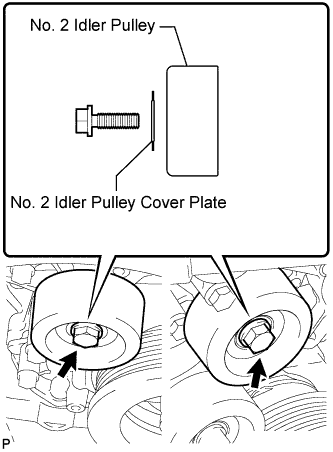 |
Install the idler pulley and No. 2 idler pulley cover plate with the bolt.
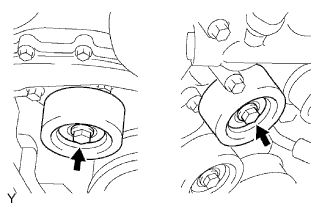 |
for Integrated Type:
Install the 2 No. 2 idler pulleys with the 2 bolts.
| 15. INSTALL V-RIBBED BELT TENSIONER |
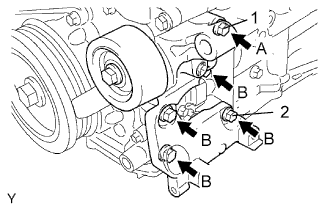 |
Temporarily install the V-ribbed belt tensioner with the 5 bolts.
Install the V-ribbed belt tensioner by tightening bolt 1 and then bolt 2.
Tighten the other bolts.
| 16. INSTALL GENERATOR |
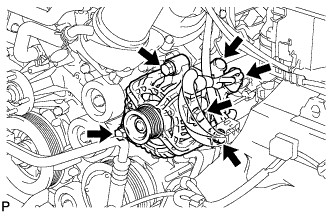 |
Install the generator and adjusting bar with the 2 bolts.
Install the generator wire with the nut.
Install the terminal cap.
Connect the generator connector.
| 17. INSTALL WATER INLET |
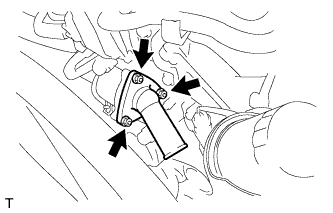 |
Install a new gasket to the water inlet housing with thermostat.
Install the water inlet housing with thermostat with the 3 nuts.
| 18. INSTALL OIL DIPSTICK GUIDE |
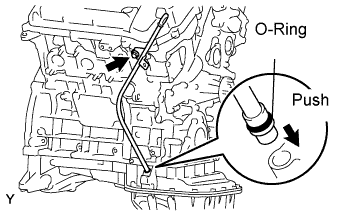 |
Install a new O-ring to the oil dipstick guide.
Apply a light coat of engine oil to the O-ring.
Push in the oil dipstick guide end into the guide hole of the oil pan.
Install the oil dipstick guide with the bolt.
Install the oil dipstick.
| 19. REMOVE ENGINE ASSEMBLY FROM STAND |
| 20. INSTALL FLYWHEEL (for Manual Transmission) |
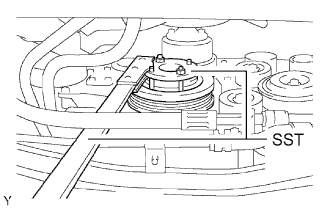 |
Using SST, hold the crankshaft.
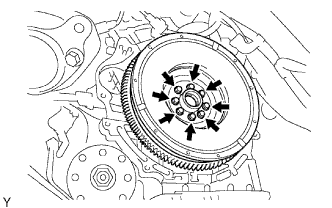 |
Temporarily install the flywheel with 8 new bolts.
Install and tighten the 8 bolts uniformly in several steps.
Mark the top of the bolts with paint.
Tighten the 8 bolts 90° in the same sequence.
Check that the paint marks are now at a 90° angle to the top.
| 21. INSTALL DRIVE PLATE AND RING GEAR ASSEMBLY (for Automatic Transmission) |
|
Using SST, hold the crankshaft.
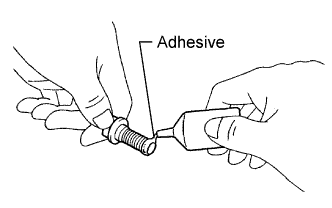 |
Apply adhesive to 2 or 3 threads of the mounting bolt end.
 |
Install the front spacer, drive plate and rear spacer to the crankshaft.
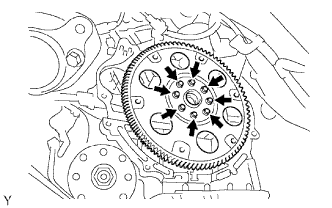
Install and uniformly tighten the 8 mounting bolts in several passes in the sequence as shown in the illustration.
| 22. INSTALL ENGINE ASSEMBLY |
Install the engine assembly to the vehicle (Click here).
| 23. CONNECT CABLE TO NEGATIVE BATTERY TERMINAL |
| 24. ADD ENGINE OIL |
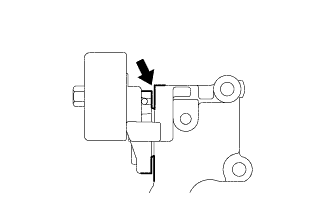
Clean and install the oil drain plug with a new gasket.
 |
Add fresh engine oil.
| Item | Specified Condition |
| Drain and refill with oil filter change | 5.5 liters (5.8 US qts, 4.8 Imp. qts) |
| Drain and refill without oil filter change | 5.2 liters (5.5 US qts, 4.6 Imp. qts) |
| Dry fill | 6.6 liters (7.0 US qts, 5.8 Imp. qts) |
Install the oil filler cap.
| 25. ADD ENGINE COOLANT |
Tighten all the plugs and fill the radiator with TOYOTA Super Long Life Coolant (SLLC).
| Item | Specified Condition |
| A/T | 9.8 liters (10.4 US qts, 8.6 Imp. qts) |
| M/T | 8.5 liters (9.0 US qts, 7.5 Imp. qts) |
Fill the radiator reservoir with TOYOTA Super Long Life Coolant (SLLC) to the F line.
Install the radiator cap.
Bleed air from the cooling system.
Warm up the engine until the thermostat opens.
While the thermostat is open, circulate the coolant for several minutes.
Maintain the engine speed at 2,500 to 3,000 rpm.
Press the inlet and outlet radiator hoses several times by hand to bleed air.
Stop the engine and wait until the coolant cools down to ambient temperature.
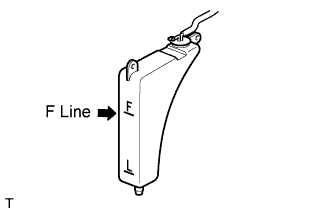 |
Check the coolant level in the radiator reservoir.
If the coolant level is below the L line, add SLLC to the reservoir F line.
| 26. CHECK FOR ENGINE COOLANT LEAKS |
Check for engine coolant leaks .
| 27. CHECK FOR FUEL LEAKS |
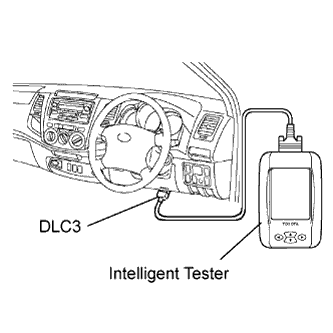 |
Connect the intelligent tester to the DLC3.
Turn the ignition switch ON.
Push the intelligent tester main switch ON.
To perform the Active Test, enter the following menus: Powertrain / Engine and ECT / Active Test / Control the Fuel Pump / Speed.
Check the fuel pump operation.
Check for pressure in the fuel inlet tube from the fuel line. Check that the sound of fuel flowing in the fuel tank can be heard.
If there is no sound, check the integration relay, fuel pump, ECM and wiring connector.
Check for fuel leaks.
Check that there are no fuel leaks after performing maintenance anywhere on the system.
If there are fuel leaks, repair or replace the leaking parts.
| 28. CHECK FOR ENGINE OIL LEAKS |
| 29. INSTALL V-BANK COVER |
Install the V-bank cover with the 2 nuts.
| 30. INSPECT IGNITION TIMING |
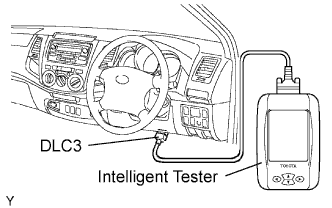 |
When using intelligent tester:
Check the ignition timing.
Connect the intelligent tester to the DLC3.
Disconnect the intelligent tester from the DLC3.
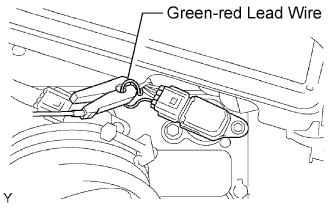 |
When not using intelligent tester:
Check the ignition timing.
Remove the air cleaner cap.
Connect the tester probe of a timing light to the green-red lead wire of the ignition coil connector of the No. 1 cylinder.
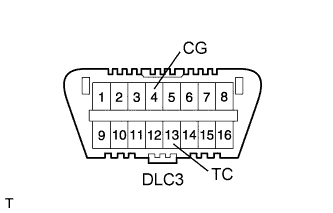 |
Using SST, connect terminals 13 (TC) and 4 (CG) of the DLC3.
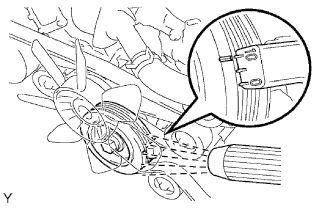 |
Using the timing light, check the ignition timing.
Remove SST from the DLC3.
Check the ignition timing.
Disconnect the timing light from the engine.
Install the air cleaner cap.
| 31. INSPECT IDLE SPEED |
|
When using intelligent tester:
Check the idle speed.
Connect the intelligent tester to the DLC3.
Switch the air conditioning OFF.
Race the engine at 2,500 rpm for approximately 90 seconds.
Check the idle speed.
Disconnect the intelligent tester from the DLC3.
 |
When not using intelligent tester:
Check the idle speed.
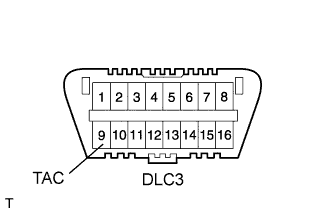
Using SST, connect the tachometer probe to terminal 9 (TAC) of the DLC3.
Switch the air conditioning OFF.
Race the engine speed at 2,500 rpm for approximately 90 seconds.
Check the idle speed.
Disconnect the tachometer from the DLC3.
| 32. INSPECT CO/HC |
Start the engine.
Keep the engine speed at 2,500 rpm for approximately 180 seconds.
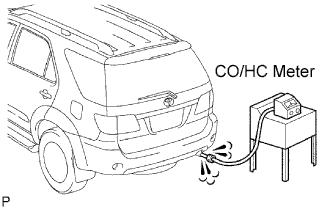 |
Insert a CO/HC meter testing probe at least 40 cm (1.3 ft.) into the tailpipe during idling.
Immediately check CO/HC concentration at idle and/or 2,500 rpm.
Check the A/F sensor operation and heated oxygen sensor operation.
See the table below for possible causes, then inspect and correct the applicable causes if necessary.
| CO | HC | Symptom | Causes |
| Normal | High | Rough idle | 1. Faulty ignitions:
3. Leaky intake and exhaust valves 4. Leaky cylinder |
| Low | High | Rough idle (Fluctuating HC reading) | 1. Vacuum leaks:
|
| High | High | Rough idle (Black smoke from exhaust) | 1. Restricted air filter 2. Faulty SFI system:
|