 |
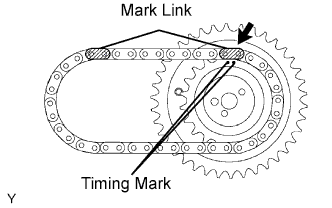
Align the mark link (yellow) with the timing mark (2 dot mark) of the camshaft timing gear as shown in the illustration.
CAMSHAFT (for Bank 2) > INSTALLATION |
| 1. INSTALL NO. 3 CAMSHAFT |
|
Align the mark link (yellow) with the timing mark (2 dot mark) of the camshaft timing gear as shown in the illustration.
Apply new engine oil to the thrust portion and journal of the camshafts.
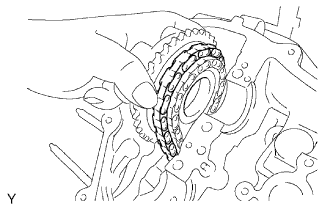 |
Temporarily put the No. 1 chain on the No. 2 chain of the camshaft timing gear.
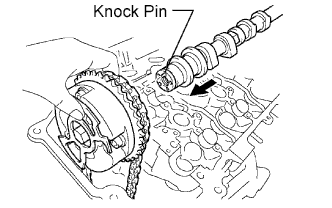 |
Align the knock pin hole in the camshaft timing gear with the knock pin of the No. 3 camshaft, and insert the No. 3 camshaft into the camshaft timing gear.
Temporarily install the camshaft timing gear set bolt.
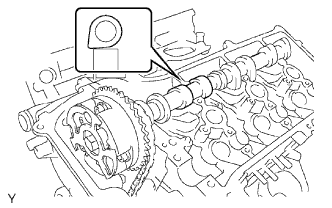 |
Set the No. 3 camshaft onto the LH cylinder head with the cam lobes of the No. 2 cylinder facing downward as shown in the illustration.
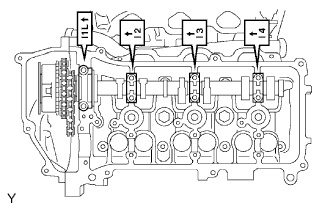 |
Install the 4 bearing caps in their proper locations.
Apply a light coat of engine oil on the threads and under the heads of the bearing cap bolts.
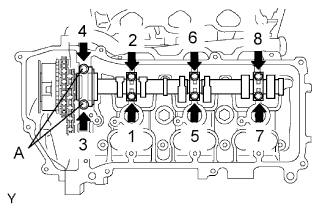 |
Install and uniformly tighten the 8 bearing cap bolts in several passes in the sequence shown in the illustration.
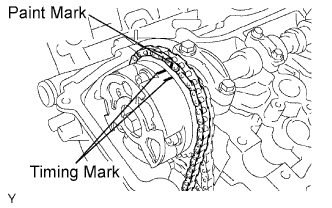 |
Set the paint mark of the No. 1 chain between the timing marks of the camshaft timing gear.
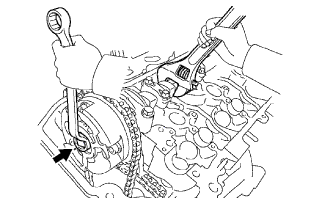 |
Hold the hexagonal portion of the No. 3 camshaft with a wrench, and tighten the camshaft timing gear set bolt.
| 2. INSTALL NO. 3 CHAIN TENSIONER |
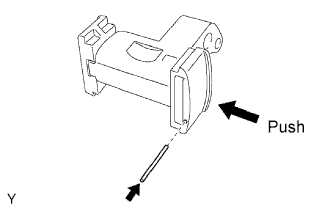 |
While pushing in the tensioner, insert a pin of φ1.0 mm (0.039 in.) into the hole to fix it in place.
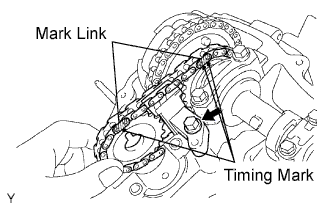 |
Temporarily install the camshaft timing gear and No. 3 chain tensioner, and align the mark links (yellow) with the timing marks (1 dot mark and 2 dot mark) of the camshaft timing gears.
Tighten the No. 3 chain tensioner bolt.
| 3. INSTALL NO. 4 CAMSHAFT |
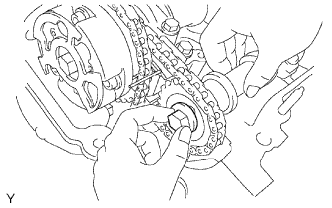 |
Align the knock pin hole in the camshaft timing gear with the knock pin of the No. 4 camshaft, and insert the No. 4 camshaft into the camshaft timing gear.
Temporarily install the camshaft timing gear set bolt.
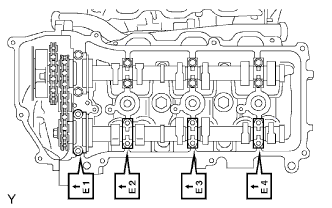 |
Install the 4 bearing caps in their proper locations.
Apply a light coat of engine oil on the threads of the bearing cap bolts.
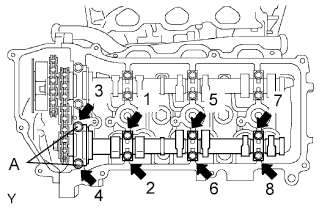 |
Using several steps, install and tighten the 8 bearing cap bolts uniformly in the sequence as shown in the illustration.
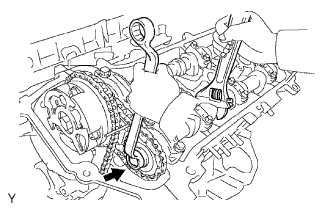 |
Hold the hexagonal portion of the No. 4 camshaft with a wrench, and tighten the camshaft timing gear set bolt.
Remove the pin from the No. 3 chain tensioner.
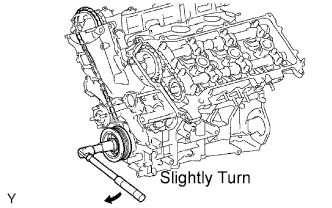 |
Release the chain tension between the camshaft timing gear (RH bank) and crankshaft timing gear by turning the crankshaft pulley clockwise slightly.
| 4. INSTALL NO. 1 CHAIN TENSIONER |
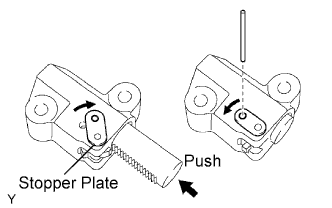 |
While rotating the stopper plate of the tensioner clockwise, push in the plunger of the tensioner as shown in the illustration.
While rotating the stopper plate of the tensioner counterclockwise, insert a pin of φ3.5 mm (0.138 in.) into the holes in the stopper plate and tensioner to fix the stopper plate.
Install the chain tensioner with the 2 bolts.
| 5. SET NO. 1 CYLINDER TO TDC/COMPRESSION |
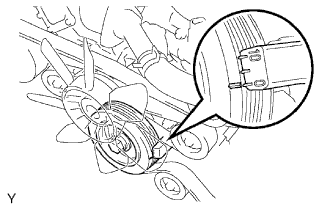 |
Turn the crankshaft pulley, and align its groove with the timing mark 0 of timing chain cover.
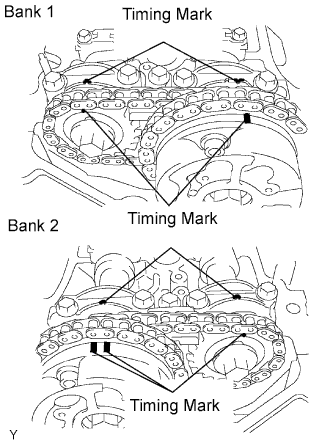 |
Check that the timing marks of the camshaft timing gears are aligned with the timing marks of the bearing cap as shown in the illustration.
If not, turn the crankshaft 1 complete revolution (360°) and align the timing marks as described above.
| 6. INSPECT VALVE CLEARANCE |
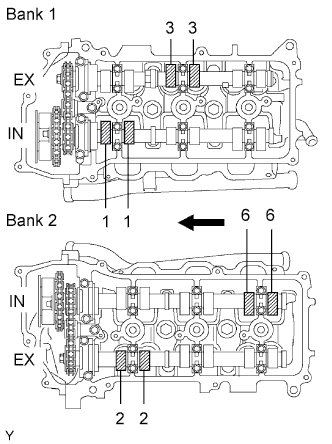 |
Check the valves indicated in the illustration.
Using a feeler gauge, measure the clearance between the valve lifter and camshaft.
| Item | Specified Condition |
| Intake | 0.15 to 0.25 mm (0.006 to 0.010 in.) |
| Exhaust | 0.29 to 0.39 mm (0.011 to 0.015 in.) |
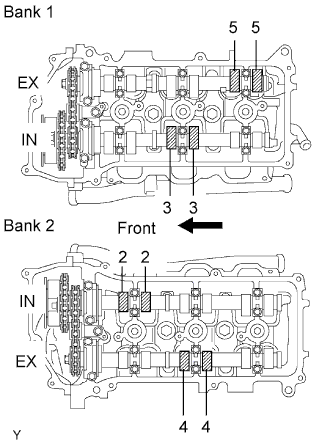 |
Turn the crankshaft 2/3 of a revolution (240°), and check the valves indicated in the illustration.
Using a feeler gauge, measure the clearance between the valve lifter and camshaft.
| Item | Specified Condition |
| Intake | 0.15 to 0.25 mm (0.006 to 0.010 in.) |
| Exhaust | 0.29 to 0.39 mm (0.011 to 0.015 in.) |
Write down valve clearance measurements that are not within the specified range. They will be used later to determine the required replacement valve lifter.
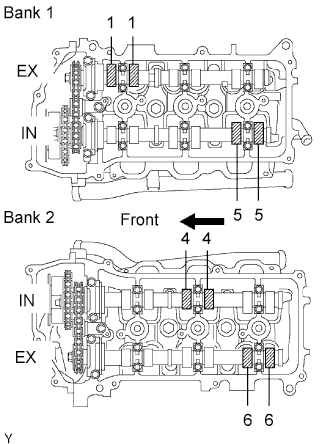 |
Turn the crankshaft 2/3 of a revolution (240°), and check the valves indicated in the illustration.
Using a feeler gauge, measure the clearance between the valve lifter and camshaft.
| Item | Specified Condition |
| Intake | 0.15 to 0.25 mm (0.006 to 0.010 in.) |
| Exhaust | 0.29 to 0.39 mm (0.011 to 0.015 in.) |
Write down valve clearance measurements that are not within the specified range. They will be used later to determine the required replacement valve lifter.
| 7. ADJUST VALVE CLEARANCE |
|
Set the No. 1 cylinder to TDC/compression.
Turn the crankshaft pulley, and align the notch with the timing mark 0 of the timing chain cover.
|
Check that the timing marks of the camshaft timing gears are aligned with the timing marks of the bearing cap as shown in the illustration.
If not, turn the crankshaft 1 complete revolution (360°) and align the timing marks as described above.
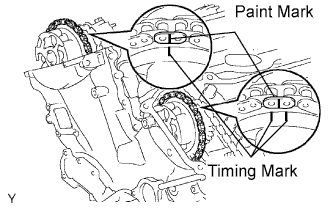 |
Place paint marks on the No. 1 chain links that correspond with the timing marks of the camshaft timing gears.
Remove the No. 1 chain tensioner.
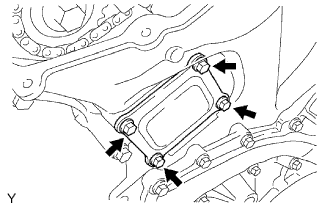 |
Remove the 4 bolts, timing chain cover plate and gasket.
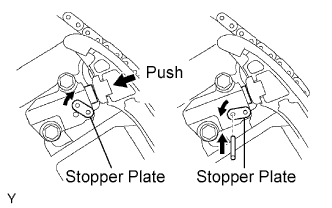 |
While rotating the stopper plate of the tensioner upward, push in the plunger of the chain tensioner as shown in the illustration.
While rotating the stopper plate of the tensioner downward, insert a pin of φ3.5 mm (0.138 in.) into the holes in the stopper plate and tensioner to fix the stopper plate.
Remove the 2 bolts and chain tensioner.
Remove the No. 2 camshaft.
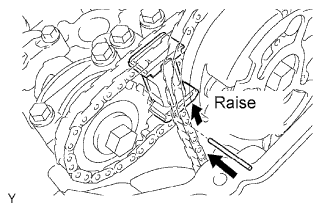 |
While raising up the No. 2 chain tensioner, insert a pin of φ1.0 mm (0.039 in.) into the hole to fix it.
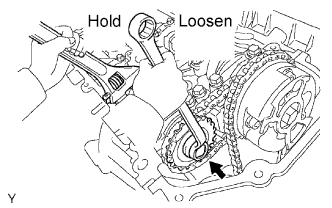 |
Hold the hexagonal portion of the No. 2 camshaft with a wrench, and remove the camshaft timing gear set bolt.
Separate the camshaft timing gear from the No. 2 camshaft.
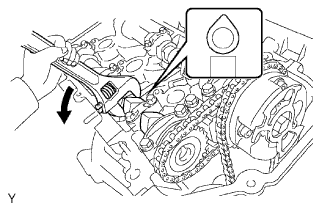 |
Rotate the camshaft counterclockwise using the wrench so that the cam lobes of the No. 1 cylinder face upward as shown in the illustration.
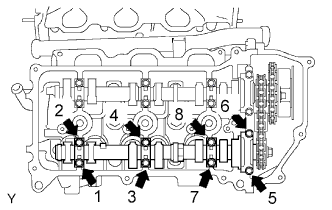 |
Uniformly loosen and remove the 8 bearing cap bolts in several passes in the sequence shown in the illustration.
Remove the 4 bearing caps and No. 2 camshaft.
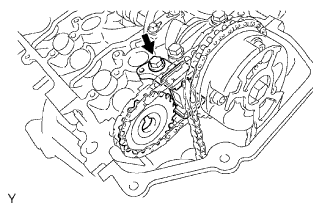 |
Remove the No. 2 chain tensioner.
Remove the No. 2 chain tensioner bolt, and then remove the No. 2 chain tensioner and camshaft timing gear.
Remove the No. 1 camshaft.
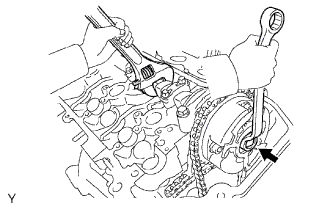 |
Hold the hexagonal portion of the No. 1 camshaft with a wrench, and loosen the camshaft timing gear set bolt.
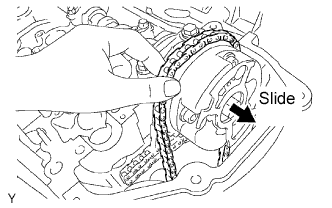 |
Slide the camshaft timing gear and separate the No. 1 chain from the camshaft timing gear.
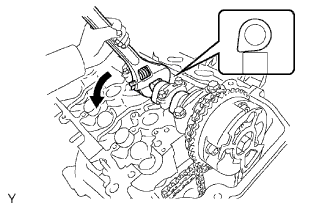 |
Rotate the No. 1 camshaft counterclockwise using the wrench so that the cam lobes of No. 1 cylinder face downward as shown in the illustration.
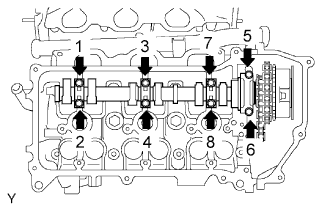 |
Uniformly loosen and remove the 8 bearing cap bolts in several passes in the sequence shown in the illustration.
Remove the 4 bearing caps.
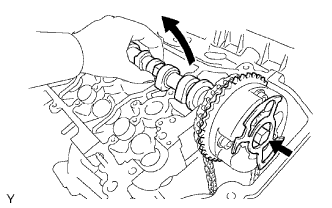 |
Remove the camshaft timing gear set bolt with the No. 1 camshaft lifted up, and then remove the No. 1 camshaft and camshaft timing gear with No. 2 chain.
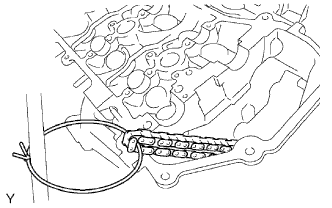 |
Tie the No. 1 chain with a string as shown in the illustration.
Remove the No. 4 camshaft.
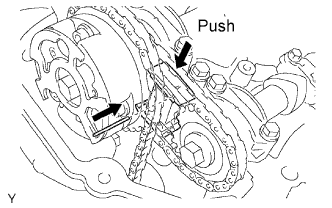 |
While pushing down the No. 3 chain tensioner, insert a pin of φ1.0 mm (0.039 in.) into the hole to fix it.
|
Hold the hexagonal portion of the No. 4 camshaft with a wrench, and remove the camshaft timing gear set bolt.
Separate the camshaft timing gear from the No. 4 camshaft.
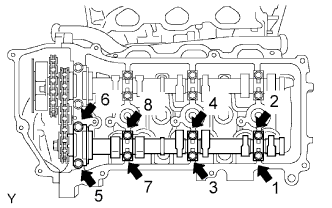 |
Uniformly loosen and remove the 8 bearing cap bolts in several passes in the sequence shown in the illustration.
Remove the 4 bearing caps and No. 4 camshaft.
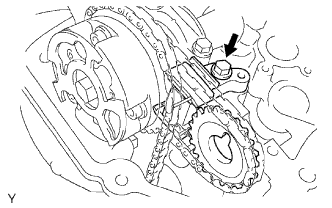 |
Remove the No. 3 chain tensioner assembly.
Remove the No. 3 chain tensioner bolt, and then remove the No. 3 chain tensioner and camshaft timing gear.
Remove the No. 3 camshaft sub-assembly.
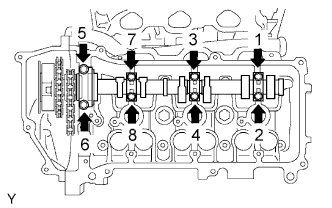 |
Using several steps, loosen and remove the 8 bearing cap bolts uniformly in the sequence as shown in the illustration.
Remove the 4 bearing caps.
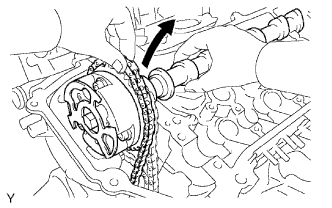 |
Hold the No. 1 chain, and remove the No. 3 camshaft, camshaft timing gear and No. 2 chain.
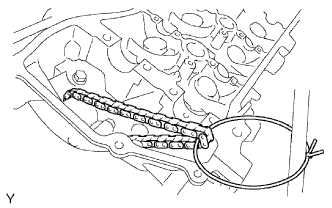 |
Tie the No. 1 chain with a string as shown in the illustration.
Remove the valve lifters.
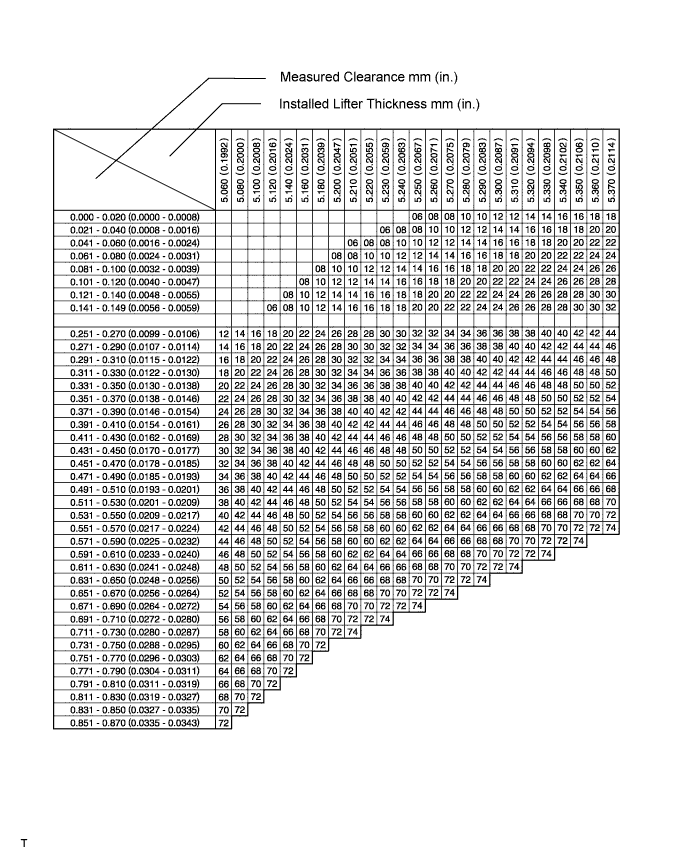
Determine the replacement valve lifter size by following the procedures below.
Using a micrometer, measure the thickness of the removed lifter.
Calculate the thickness of a new lifter so that the valve clearance comes within the specified value.
| T | Thickness of removed lifter |
| A | Measured valve clearance |
| N | Thickness of new lifter |
| Item | Thickness |
| Intake | N = T + (A to 0.20 mm (0.008 in.)) |
| Exhaust | N = T + (A to 0.30 mm (0.012 in.)) |
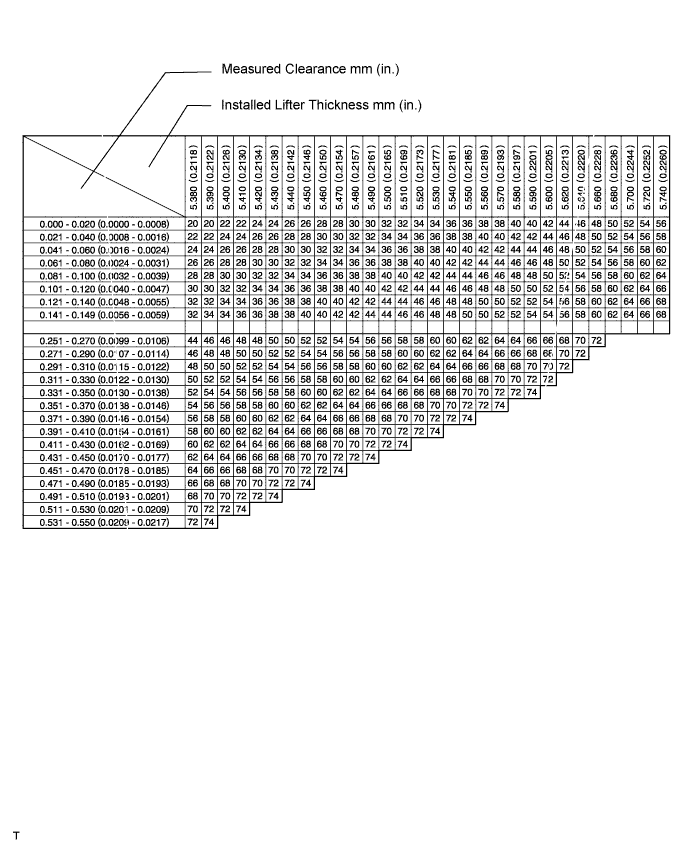
Select a new intake side lifter with a thickness as close as possible to the calculated value.
Valve lifter selection chart (intake).
Valve lifter selection chart (intake) (continued).
| No. | Thickness | No. | Thickness | No. | Thickness |
| 06 | 5.060 mm (0.1992 in.) | 30 | 5.300 mm (0.2087 in.) | 54 | 5.540 mm (0.2181 in.) |
| 08 | 5.080 mm (0.2000 in.) | 32 | 5.320 mm (0.2094 in.) | 56 | 5.560 mm (0.2189 in.) |
| 10 | 5.100 mm (0.2008 in.) | 34 | 5.340 mm (0.2102 in.) | 58 | 5.580 mm (0.2197 in.) |
| 12 | 5.120 mm (0.2016 in.) | 36 | 5.360 mm (0.2110 in.) | 60 | 5.600 mm (0.2205 in.) |
| 14 | 5.140 mm (0.2024 in.) | 38 | 5.380 mm (0.2118 in.) | 62 | 5.620 mm (0.2213 in.) |
| 16 | 5.160 mm (0.2031 in.) | 40 | 5.400 mm (0.2126 in.) | 64 | 5.640 mm (0.2220 in.) |
| 18 | 5.180 mm (0.2039 in.) | 42 | 5.420 mm (0.2134 in.) | 66 | 5.660 mm (0.2189 in.) |
| 20 | 5.200 mm (0.2047 in.) | 44 | 5.440 mm (0.2142 in.) | 68 | 5.680 mm (0.2236 in.) |
| 22 | 5.220 mm (0.2055 in.) | 46 | 5.460 mm (0.2150 in.) | 70 | 5.700 mm (0.2244 in.) |
| 24 | 5.240 mm (0.2063 in.) | 48 | 5.480 mm (0.2157 in.) | 72 | 5.720 mm (0.2252 in.) |
| 26 | 5.260 mm (0.2071 in.) | 50 | 5.500 mm (0.2165 in.) | 74 | 5.740 mm (0.2260 in.) |
| 28 | 5.280 mm (0.2079 in.) | 52 | 5.520 mm (0.2173 in.) | - | - |
Valve lifter selection chart (exhaust).
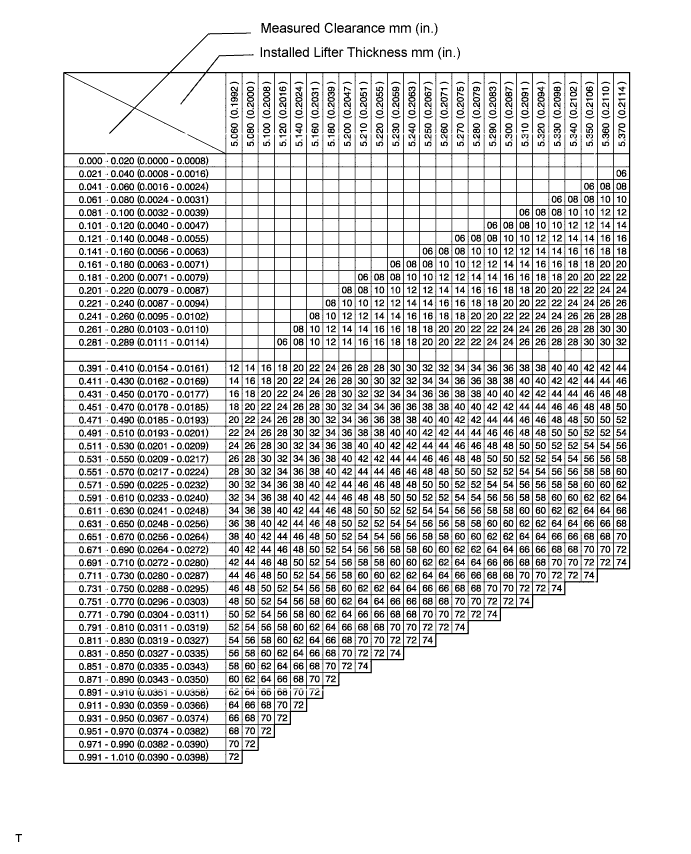
Valve lifter selection chart (exhaust) (continued).
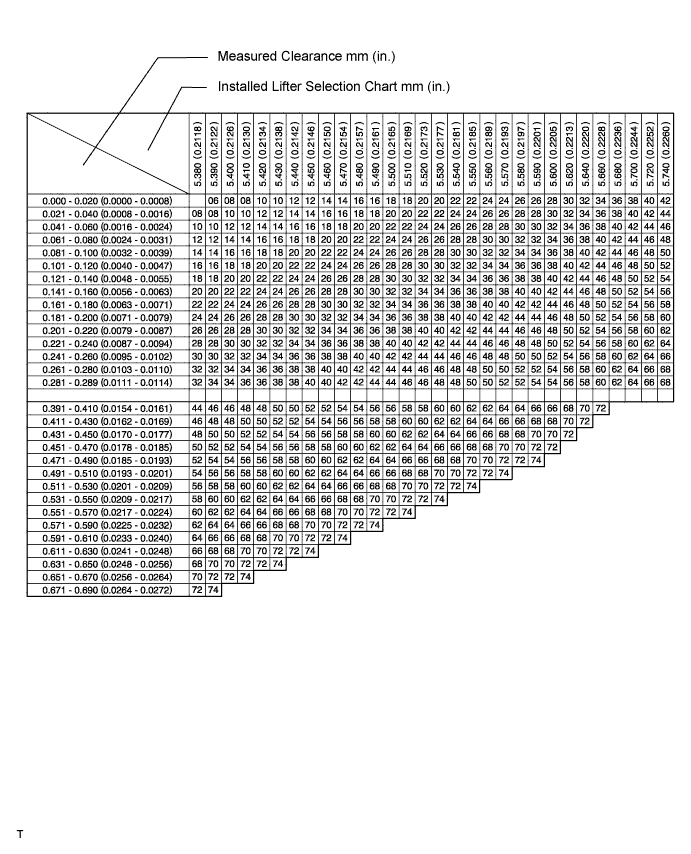
| No. | Thickness | No. | Thickness | No. | Thickness |
| 06 | 5.060 mm . (0.1992 in.) | 30 | 5.300 mm (0.2087 in.) | 54 | 5.540 mm (0.2181 in.) |
| 08 | 5.080 mm (0.2000 in.) | 32 | 5.320 mm (0.2094 in.) | 56 | 5.560 mm (0.2189 in.) |
| 10 | 5.100 mm (0.2008 in.) | 34 | 5.340 mm (0.2102 in.) | 58 | 5.580 mm (0.2197 in.) |
| 12 | 5.120 mm (0.2016 in.) | 36 | 5.360 mm (0.2110 in.) | 60 | 5.600 mm (0.2205 in.) |
| 14 | 5.140 mm (0.2024 in.) | 38 | 5.380 mm (0.2118 in.) | 62 | 5.620 mm (0.2213 in.) |
| 16 | 5.160 mm (0.2031 in.) | 40 | 5.400 mm (0.2126 in.) | 64 | 5.640 mm (0.2220 in.) |
| 18 | 5.180 mm (0.2039 in.) | 42 | 5.420 mm (0.2134 in.) | 66 | 5.660 mm (0.2189 in.) |
| 20 | 5.200 mm (0.2047 in.) | 44 | 5.440 mm (0.2142 in.) | 68 | 5.680 mm (0.2236 in.) |
| 22 | 5.220 mm (0.2055 in.) | 46 | 5.460 mm (0.2150 in.) | 70 | 5.700 mm (0.2244 in.) |
| 24 | 5.240 mm (0.2063 in.) | 48 | 5.480 mm (0.2157 in.) | 72 | 5.720 mm (0.2252) |
| 26 | 5.260 mm (0.2071 in.) | 50 | 5.500 mm (0.2165 in.) | 74 | 5.740 mm (0.2260) |
| 28 | 5.280 mm (0.2079 in.) | 52 | 5.520 mm (0.2173 in.) | - | - |
Install the No. 3 camshaft.
|
Align the mark link (yellow) with the timing mark (2 dot mark) of the camshaft timing gear as shown in the illustration.
Apply new engine oil to the thrust portion and journal of the camshafts.
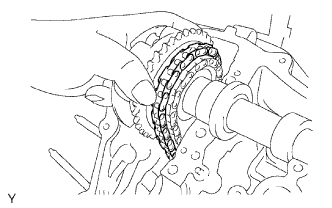 |
Temporarily put the No. 1 chain on the No. 2 chain of the camshaft timing gear.
|
Set the No. 3 camshaft onto the LH cylinder head with the cam lobes of the No. 2 cylinder facing downward as shown in the illustration.
|
Install the 4 bearing caps in their proper locations.
Apply a light coat of engine oil on the threads of the bearing cap bolts.
|
Install the 8 bearing cap bolts. Using several steps, tighten the bolts uniformly in the sequence as shown in the illustration.
|
Set the paint mark of the No. 1 chain between the timing marks of the camshaft timing gear.
|
Install the No. 3 chain tensioner.
While pushing in the tensioner, insert a pin of φ1.0 mm (0.039 in.) into the hole to fix it in place.
|
Temporarily install the camshaft timing gear and No. 3 chain tensioner, and align the mark links (yellow) with the timing marks (1 dot mark and 2 dot mark) of the camshaft timing gears.
Tighten the No. 3 chain tensioner bolt.
Install the No. 4 camshaft sub-assembly.
|
Align the knock pin hole in the camshaft timing gear with the knock pin of the No. 4 camshaft, and insert the No. 4 camshaft into the camshaft timing gear.
Temporarily install the camshaft timing gear set bolt.
|
Install the 4 bearing caps in their proper locations.
Apply a light coat of engine oil on the threads and under the heads of the bearing cap bolts.
|
Install the 8 bearing cap bolts. Using several steps, tighten the bolts uniformly in the sequence as shown in the illustration.
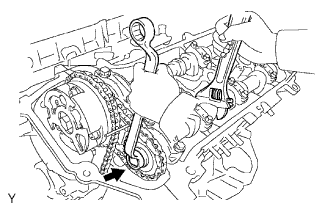 |
Hold the hexagonal portion of the No. 4 camshaft with a wrench, and tighten the camshaft timing gear set bolt.
Remove the pin from the No. 3 chain tensioner.
Install the camshaft.
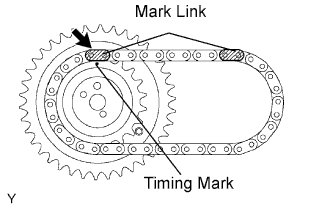 |
Align the mark link (yellow) with the timing mark (1 dot mark) of the camshaft timing gear as shown in the illustration.
Apply new engine oil to the thrust portion and journal of the camshafts.
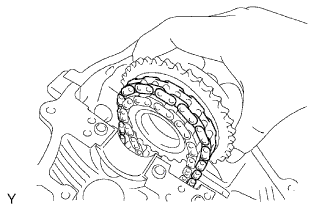 |
Temporarily put the No. 1 chain on the No. 2 chain of the camshaft timing gear.
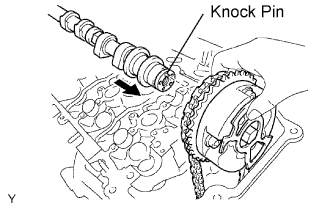 |
Align the knock pin hole in the camshaft timing gear with the knock pin of the No. 1 camshaft, and insert the No. 1 camshaft into the camshaft timing gear.
Temporarily install the camshaft timing gear set bolt.
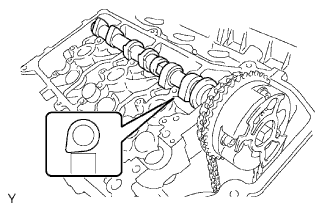 |
Set the No. 1 camshaft onto the RH cylinder head with the cam lobes of the No. 1 cylinder facing downward as shown in the illustration.
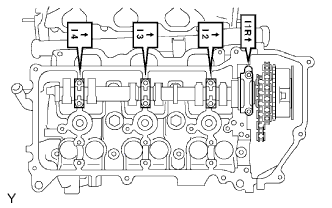 |
Install the 4 bearing caps in their proper locations.
Apply a light coat of engine oil on the threads and under the heads of the bearing cap bolts.
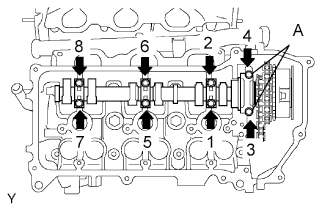 |
Install the 8 bearing cap bolts. Using several steps, tighten the bolts uniformly in the sequence as shown in the illustration.
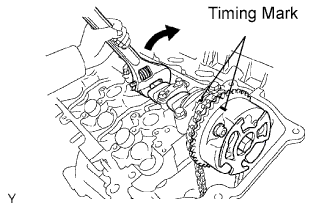 |
Hold the hexagonal portion of the No. 1 camshaft using a wrench. Rotate the No. 1 camshaft so that the timing mark of the camshaft timing gear is aligned with the timing marks of the camshaft bearing cap.
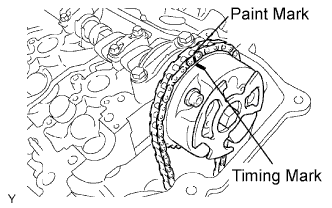 |
Align the paint mark of the No. 1 chain with the timing mark of the camshaft timing gear.
|
Hold the hexagonal portion of the No. 1 camshaft with a wrench, and tighten the camshaft timing gear set bolt.
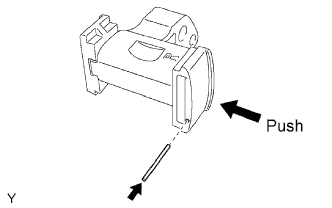 |
Install the No. 2 chain tensioner.
While pushing in the tensioner, insert a pin of φ1.0 mm (0.039 in.) into the hole to fix it in place.
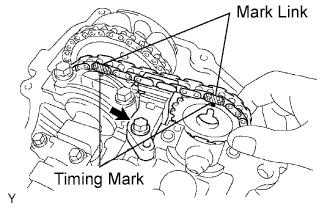 |
Temporarily install the camshaft timing gear and No. 2 chain tensioner and align the mark links (yellow) with the timing marks (1 dot mark) of the camshaft timing gears.
Tighten the No. 2 chain tensioner bolt.
Install the No. 2 camshaft.
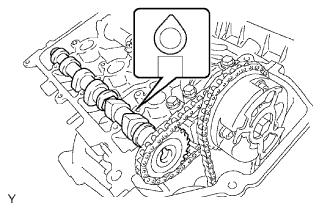 |
Set the No. 2 camshaft onto the RH cylinder head with the cam lobes of No. 1 cylinder facing upward as shown in the illustration.
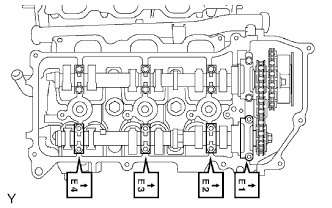 |
Install the 4 bearing caps in their proper locations.
Apply a light coat of engine oil on the threads and under the heads of the bearing cap bolts.
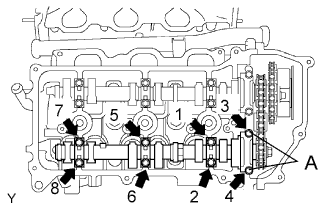 |
Install the 8 bearing cap bolts. Using several steps, tighten the bolts uniformly in the sequence as shown in the illustration.
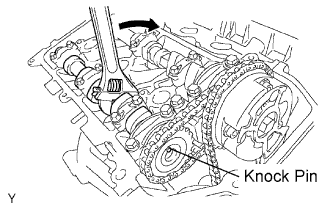 |
Rotate the No. 2 camshaft clockwise using a wrench so that the knock pin of the No. 2 camshaft is aligned with the knock pin hole of the camshaft timing gear.
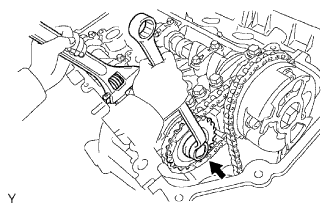 |
Hold the hexagonal portion of the No. 2 camshaft with a wrench, and install the camshaft timing gear set bolt.
Remove the pin from the No. 2 chain tensioner.
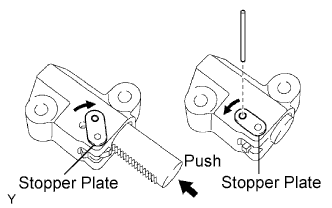 |
Install the No. 1 chain tensioner.
While turning the stopper plate of the tensioner clockwise, push in the plunger of the tensioner as shown in the illustration.
While turning the stopper plate of the tensioner counterclockwise, insert a pin of φ3.5 mm (0.138 in.) into the holes in the stopper plate and tensioner to fix the stopper plate.
Install the chain tensioner with the 2 bolts.
Remove the pin from the chain tensioner.
Install a new gasket and the timing chain cover plate with the 4 bolts.
|
Slowly turn the crankshaft pulley 2 complete revolutions, and align the notch with timing mark 0 of the timing chain cover.
|
Check that the timing marks of the camshaft timing gears are aligned with the timing marks of the bearing cap as shown in the illustration.
| 8. INSTALL CYLINDER HEAD COVER LH |
Remove any old packing (FIPG) material and be careful not to drop any oil on the contact surfaces of the cylinder head, timing chain cover and cylinder head cover.
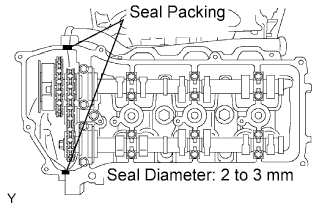 |
Apply seal packing (diameter: 2 to 3 mm (0.08 to 0.12 in.)) to the cylinder head and timing chain cover as shown in the illustration.
Install the seal washers to the bolts.
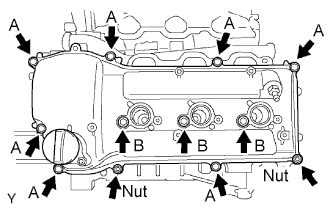 |
Install the cylinder head cover with the 10 bolts and 2 nuts. Uniformly tighten the bolts and nuts in several passes.
| 9. INSTALL CYLINDER HEAD COVER RH |
Remove any old packing (FIPG) material and be careful not to drop any oil on the contact surfaces of the cylinder head, timing chain cover and cylinder head cover.
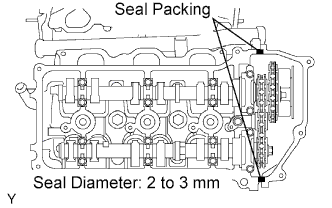 |
Apply seal packing to the cylinder head and timing chain cover as shown in the illustration.
Install the seal washers to the bolts.
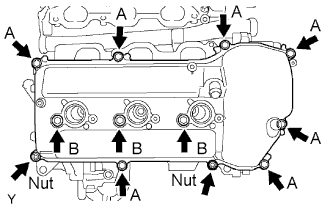 |
Install the cylinder head cover with the 10 bolts and 2 nuts. Uniformly tighten the bolts and nuts in several passes.
| 10. INSTALL IGNITION COIL |
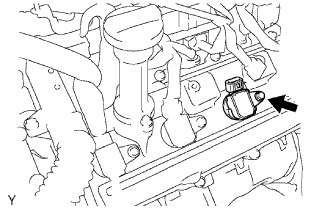 |
Install the ignition coil with the bolt.
Connect the connector.
| 11. INSTALL INTAKE AIR SURGE TANK |
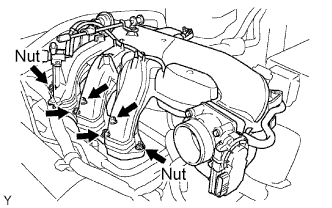 |
Install a new gasket to the intake air surge tank.
Using an 8 mm socket hexagon wrench, install the intake air surge tank with the 4 bolts and 2 nuts.
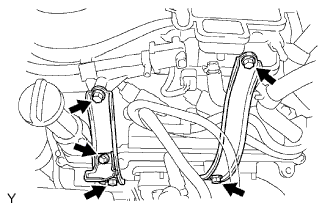 |
Install the 2 surge tank stays with the 4 bolts.
Install the oil baffle plate with the bolt.
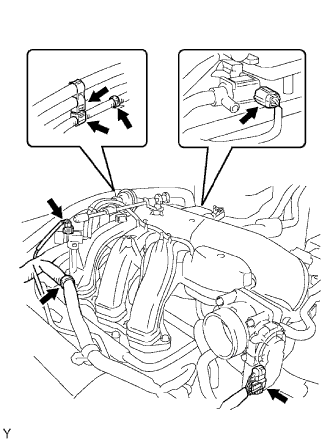 |
Install the throttle body bracket with the 2 bolts.
Install the 3 wire harness clamps and hose clamp.
Connect the throttle position sensor and control motor connector.
Connect the 2 VSV connectors.
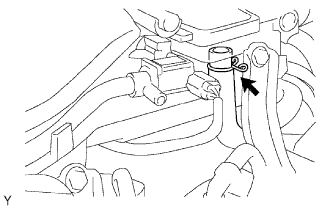 |
Connect the ventilation hose.
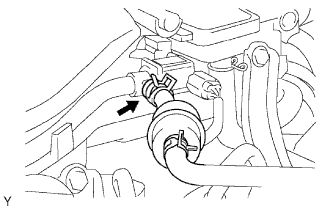 |
Connect the fuel vapor feed hose.
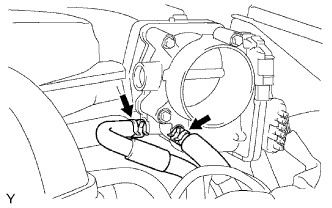 |
Connect the 2 water by-pass hoses.
| 12. INSTALL AIR CLEANER |
| 13. CONNECT NO. 2 VENTILATION HOSE |
| 14. CONNECT CABLE TO NEGATIVE BATTERY TERMINAL |
| 15. ADD ENGINE COOLANT |
Tighten all the plugs and fill the radiator with TOYOTA Super Long Life Coolant (SLLC).
| Item | Specified Condition |
| A/T | 9.8 liters (10.4 US qts, 8.6 Imp. qts) |
| M/T | 8.5 liters (9.0 US qts, 7.5 Imp. qts) |
Fill the radiator reservoir with TOYOTA Super Long Life Coolant (SLLC) to the F line.
Install the radiator cap.
Bleed air from the cooling system.
Warm up the engine until the thermostat opens.
While the thermostat is open, circulate the coolant for several minutes.
Maintain the engine speed at 2,500 to 3,000 rpm.
Press the inlet and outlet radiator hoses several times by hand to bleed air.
Stop the engine and wait until the coolant cools down to ambient temperature.
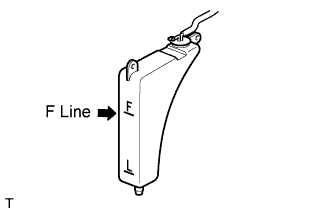 |
Check the coolant level in the radiator reservoir.
If the coolant level is below the L line, add SLLC to the reservoir F line.
| 16. CHECK FOR ENGINE COOLANT LEAKS |
Check for engine coolant leaks .
| 17. INSTALL V-BANK COVER |
Install the V-bank cover with the 2 nuts.
| 18. INSPECT IGNITION TIMING |
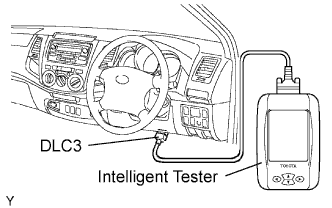 |
When using intelligent tester:
Check the ignition timing.
Connect the intelligent tester to the DLC3.
Disconnect the intelligent tester from the DLC3.
 |
When not using intelligent tester:
Check the ignition timing.
Remove the air cleaner cap.
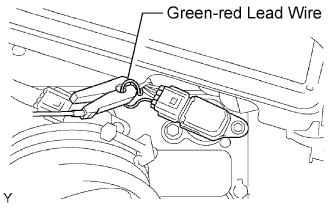
Connect the tester probe of a timing light to the green-red lead wire of the ignition coil connector of the No. 1 cylinder.
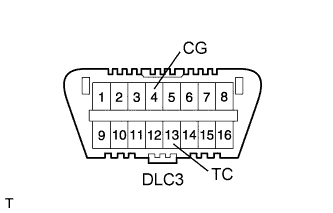 |
Using SST, connect terminals 13 (TC) and 4 (CG) of the DLC3.
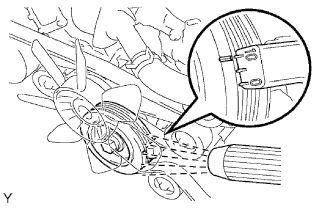 |
Using the timing light, check the ignition timing.
Remove SST from the DLC3.
Check the ignition timing.
Disconnect the timing light from the engine.
Install the air cleaner cap.