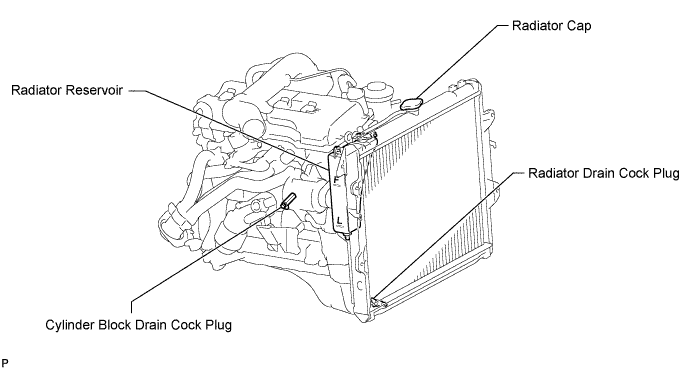
Loosen the cylinder block drain cock plug and radiator drain cock plug to drain the coolant.
- HINT:
- Collect the coolant in a container and dispose of it according to the regulations in your area.
ENGINE ASSEMBLY > REMOVAL |
| 1. DISCHARGE FUEL SYSTEM PRESSURE |
| 2. PRECAUTION |
| 3. DISCONNECT CABLE FROM NEGATIVE BATTERY TERMINAL |
| 4. REMOVE NO. 1 ENGINE UNDER COVER |
| 5. REMOVE NO. 2 ENGINE UNDER COVER |
| 6. DRAIN ENGINE COOLANT |
Remove the radiator cap.
Loosen the cylinder block drain cock plug and radiator drain cock plug to drain the coolant.
| 7. DRAIN ENGINE OIL |
Remove the oil filler cap.
Remove the oil drain plug and drain the oil into a container.
Clean and install the oil drain plug with a new gasket.
| 8. DRAIN MANUAL TRANSMISSION OIL (for Manual Transmission) |
Remove the drain plug and gasket to drain the oil.
Install a new gasket and the drain plug.
| 9. DRAIN AUTOMATIC TRANSMISSION FLUID (for Automatic Transmission) |
Remove the drain plug and gasket, and drain ATF.
Install a new gasket and the drain plug.
| 10. REMOVE INTAKE AIR CONNECTOR AND AIR CLEANER ASSEMBLY |
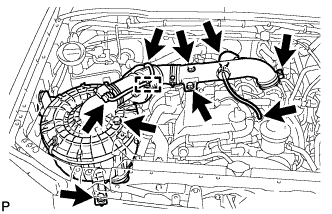 |
Disconnect the vacuum hose.
Disconnect the No. 2 PCV hose.
Disconnect the mass air flow meter connector and wire harness clamps.
Loosen the hose clamp and remove the 4 bolts, air cleaner and intake air connector assembly.
| 11. REMOVE RADIATOR GRILLE |
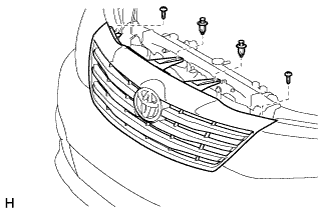 |
Remove the 2 clips and 2 screws.
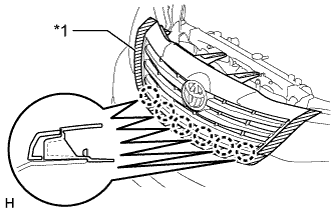 |
Put protective tape around the radiator grille.
| *1 | Protective Tape |
Detach the 6 claws and remove the radiator grille.
| 12. DISCONNECT RADIATOR HOSE INLET |
Disconnect the radiator hose inlet from the radiator.
| 13. DISCONNECT RADIATOR HOSE OUTLET |
Disconnect the radiator hose outlet from the radiator.
| 14. REMOVE DRIVE BELT |
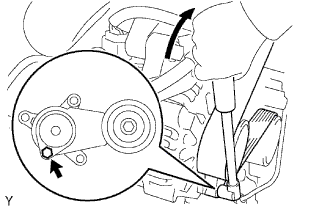 |
Use the hexagon-shaped part indicated by the arrow in the illustration to move the tensioner pulley downward and decrease the tension in the drive belt. Then remove the drive belt.
| 15. REMOVE AIR PUMP INLET |
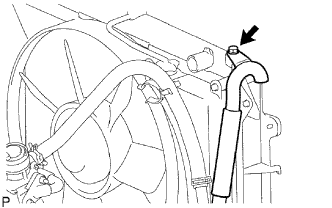 |
Remove the bolt and disconnect the air pump inlet from the radiator.
| 16. REMOVE FAN SHROUD |
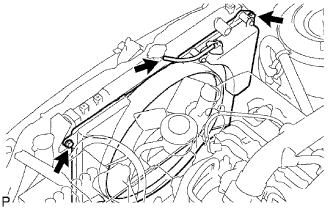 |
Disconnect the reservoir hose from the radiator.
Loosen the 4 nuts holding the fluid coupling fan.
Remove the drive belt (Click here).
Remove the 2 bolts holding the fan shroud.
Remove the 4 nuts holding the fluid coupling fan, and then remove the fan shroud together with the fluid coupling fan.
Remove the fan pulley from the engine water pump.
| 17. REMOVE FAN PULLEY |
| 18. DISCONNECT OIL COOLER INLET HOSE (for Automatic Transmission) |
Disconnect the oil cooler inlet hose from the radiator.
| 19. DISCONNECT OIL COOLER OUTLET HOSE (for Automatic Transmission) |
Disconnect the oil cooler outlet hose from the radiator.
| 20. REMOVE RADIATOR ASSEMBLY |
 |
w/ Airbag System:
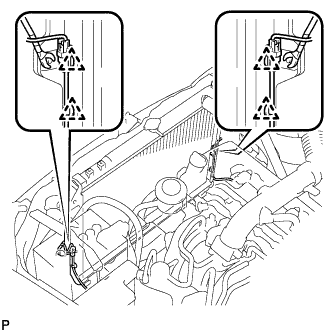
Using a clip remover, detach the 4 clamps from the radiator as shown in the illustration.
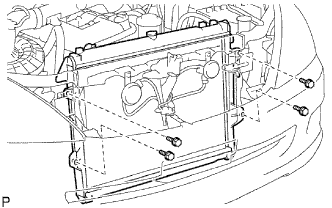 |
Remove the 4 bolts and radiator.
| 21. DISCONNECT HEATER WATER HOSE |
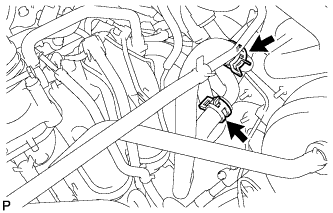 |
Disconnect the heater water inlet hose and heater water outlet hose from the heater pipe.
| 22. DISCONNECT HOSE |
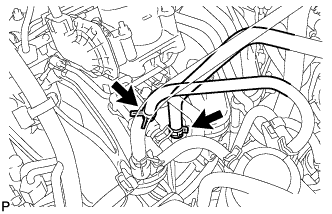 |
Disconnect the vacuum hose (from brake master cylinder).
Disconnect the hose from the purge VSV.
| 23. DISCONNECT NO. 2 FUEL HOSE |
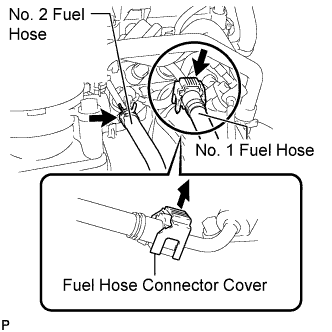 |
Disconnect the No. 2 fuel hose.
| 24. DISCONNECT NO. 1 FUEL HOSE |
Disconnect the No. 1 fuel hose (Click here).
| 25. DISCONNECT FUEL HOSE |
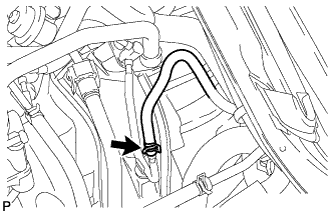 |
Disconnect the fuel hose.
| 26. DISCONNECT ENGINE WIRE |
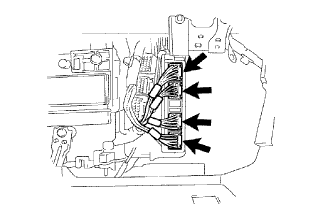 |
Disconnect the ECM connectors from the cabin.
Remove the glove compartment door.
Disconnect the 4 ECM connectors.
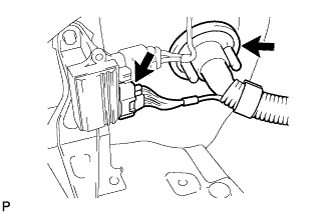 |
Disconnect the air injection driver connector.
Pull out the engine wire from the cabin.
Disconnect the air fuel ratio sensor connector.
Remove the bolt and disconnect the sensor bracket from the right side of the frame.
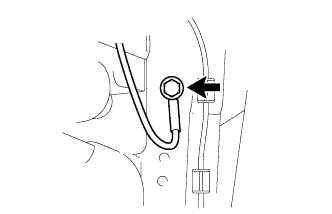 |
Remove the bolt and disconnect the ground wire from the left side of the frame.
Remove the nut and disconnect the ground wire from the body.
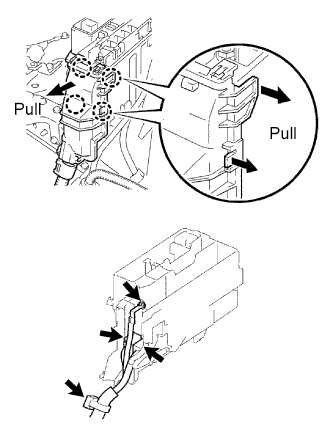 |
Remove the engine room relay block cover (upper).
Remove the engine room relay block cover (side).
Using a screwdriver, detach the 4 claws and remove the relay block cover.
Remove the nut and disconnect the cable from the engine room junction block.
Disconnect the 2 engine room junction block connectors and disconnect the wire clamp.
Remove the bolt and disconnect the wire clamp from the front engine mounting bracket LH.
| 27. DISCONNECT VANE PUMP ASSEMBLY |
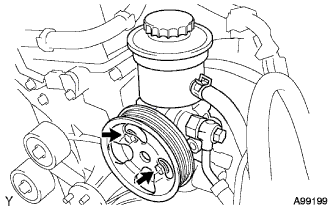 |
Disconnect the oil pressure switch connector.
Remove the 2 bolts and disconnect the vane pump from the engine.
Support the vane pump securely.
| 28. REMOVE ENGINE OIL LEVEL DIPSTICK |
| 29. REMOVE ENGINE OIL LEVEL DIPSTICK GUIDE |
Remove the bolt, engine oil level dipstick guide and O-ring.
| 30. DISCONNECT COOLER COMPRESSOR ASSEMBLY |
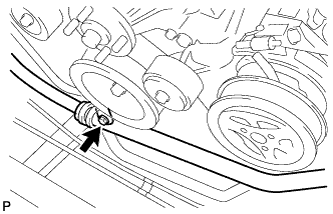 |
Remove the bolt and disconnect the suction hose from the engine.
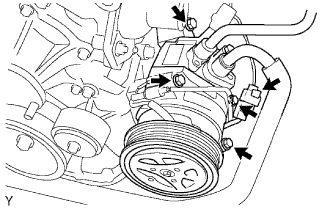 |
Disconnect the cooler compressor connector.
Remove the 4 bolts and disconnect the compressor from the engine.
Support the cooler compressor securely.
| 31. REMOVE HOOD ASSEMBLY |
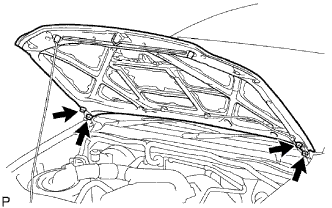 |
Disconnect the washer nozzle hose.
Remove the 4 bolts and hood.
| 32. REMOVE FRONT EXHAUST PIPE ASSEMBLY |
Remove the 2 bolts and 2 compression springs.
Disconnect the front pipe from the exhaust manifold and remove the gasket.
Remove the front pipe from the pipe support.
| 33. REMOVE PROPELLER SHAFT WITH CENTER BEARING ASSEMBLY |
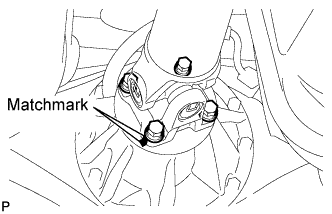 |
Place matchmarks on the propeller shaft flange and differential flange.
Remove the 4 nuts, 4 bolts and 4 washers, and disconnect the propeller shaft.
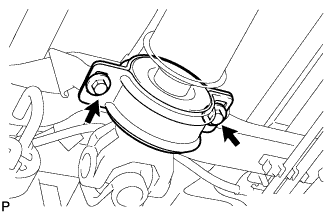 |
Remove the 2 bolts and 2 plates from the frame crossmember.
Remove the propeller shaft.
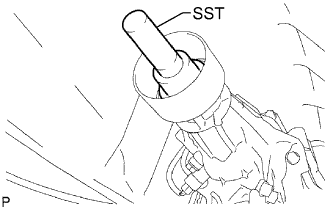 |
Install SST to the extension housing to prevent oil leakage.
| 34. REMOVE STARTER ASSEMBLY |
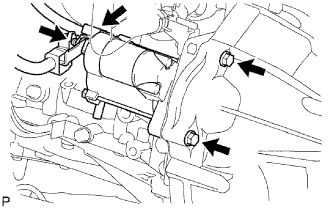 |
Disconnect the starter connector.
Disconnect the terminal cap.
Remove the nut and disconnect the starter wire.
Remove the 2 bolts and starter.
| 35. REMOVE CLUTCH RELEASE CYLINDER (for Manual Transmission) |
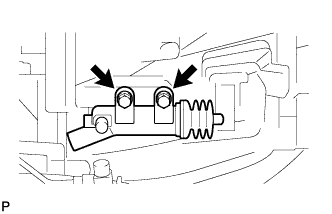 |
Remove the 2 bolts and clutch release cylinder.
| 36. REMOVE MANUAL TRANSMISSION UNIT (for Manual Transmission) |
| 37. REMOVE AUTOMATIC TRANSMISSION ASSEMBLY (for Automatic Transmission) |
| 38. REMOVE CLUTCH COVER ASSEMBLY (for Manual Transmission) |
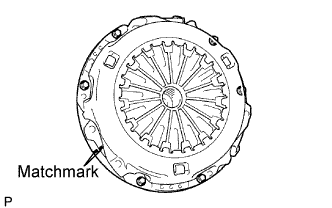 |
Place matchmarks on the clutch cover and flywheel.
Loosen each set bolt one turn at a time until spring tension is released.
Remove the 6 set bolts and pull off the clutch cover.
| 39. REMOVE CLUTCH DISC ASSEMBLY (for Manual Transmission) |
| 40. REMOVE FLYWHEEL SUB-ASSEMBLY (for Manual Transmission) |
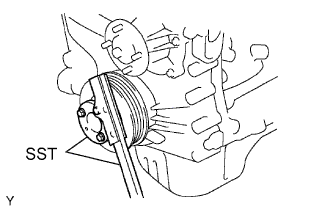 |
Fix the crankshaft in place with SST.
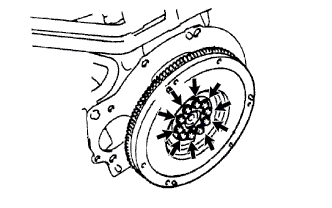 |
Remove the 10 bolts and flywheel.
| 41. REMOVE DRIVE PLATE AND RING GEAR SUB-ASSEMBLY (for Automatic Transmission) |
|
Fix the crankshaft in place with SST.
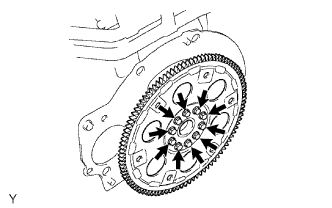 |
Remove the 10 bolts, rear spacer, drive plate and front spacer.
| 42. REMOVE REAR END PLATE |
Remove the bolt and disconnect the No. 1 water by-pass pipe from the rear end plate.
Remove the bolt and rear end plate.
| 43. REMOVE ENGINE ASSEMBLY |
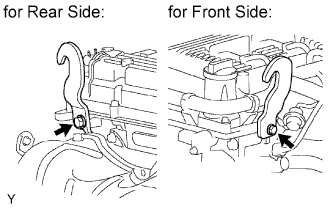 |
Install the 2 engine hangers as shown in the illustration.
| Item | Part No. |
| Engine hanger | 12281-0C010 |
| Bolt | 90105-T0129 |
Attach the engine sling device and chain block to the engine hangers.
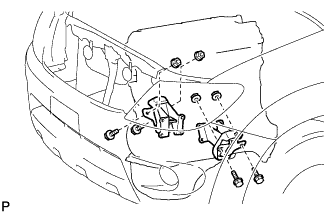 |
Remove the 4 bolts and 4 nuts holding the engine mounting bracket and frame.
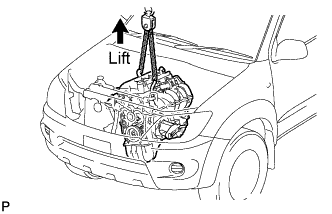 |
Lift the engine out of the vehicle slowly and carefully.
| 44. INSTALL ENGINE TO ENGINE STAND |
Install the engine to an engine stand with bolts.
| 45. REMOVE IGNITION COIL ASSEMBLY |
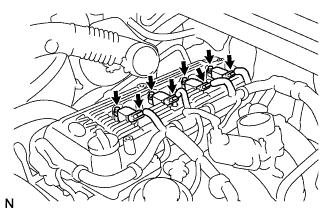 |
Disconnect the 4 ignition coil connectors.
Remove the 4 bolts and pull out the 4 ignition coils.
| 46. REMOVE SPARK PLUG |
Using a 16 mm plug wrench, remove the 4 spark plugs.
| 47. REMOVE PCV PIPE |
Remove the bolt and PCV pipe.
| 48. REMOVE GENERATOR ASSEMBLY |
Detach the terminal cap.
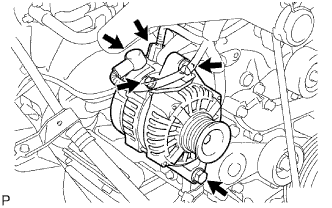 |
Remove the nut, bolt and disconnect the generator wire.
Disconnect the generator connector.
Remove the 2 bolts and generator.
| 49. REMOVE ENGINE WIRE |
Disconnect the oil pressure sensor connector.
Disconnect the noise filter connector
Disconnect the camshaft position sensor connector.
Disconnect the 4 injector connectors.
Disconnect the crankshaft position sensor connector.
Disconnect the oil control valve connector.
Disconnect the throttle body connector.
Disconnect the engine coolant temperature sensor connector.
Disconnect the knock sensor connector.
Disconnect the wire harness from the clamps.
Remove the 2 bolts and wire harness from the engine.
| 50. REMOVE THROTTLE BODY WITH MOTOR ASSEMBLY |
Disconnect the throttle position sensor and control motor connector.
Disconnect the 2 water by-pass hoses.
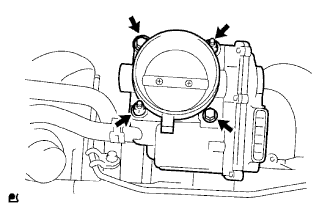 |
Remove the 2 bolts, 2 nuts and throttle body with motor.
Remove the gasket from the intake manifold.
| 51. REMOVE FUEL DELIVERY PIPE SUB-ASSEMBLY |
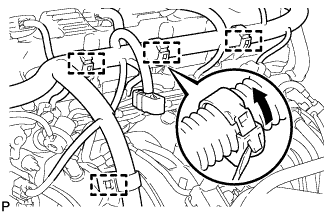 |
Disconnect the 4 clamps and wire harness from the delivery pipe.
Disconnect the vacuum hose.
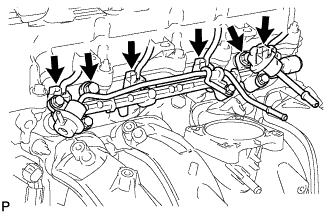 |
Disconnect the 4 injector connectors.
Remove the 2 bolts and fuel delivery pipe together with the fuel injectors.
Remove the 2 No. 1 delivery pipe spacers.
Remove the 4 injector vibration insulators.
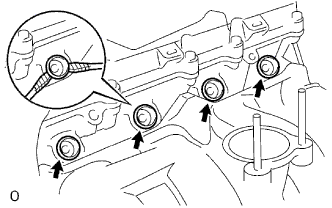 |
Using 2 screwdrivers, pry out the 4 spacers from the cylinder head.
Remove the 4 O-rings.
| 52. REMOVE FUEL INJECTOR ASSEMBLY |
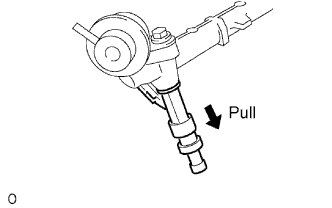 |
Pull out the 4 fuel injectors from the delivery pipe.
Remove the 4 O-rings from the 4 fuel injectors.
| 53. REMOVE INTAKE MANIFOLD |
Disconnect the crankshaft position sensor from the clamp.
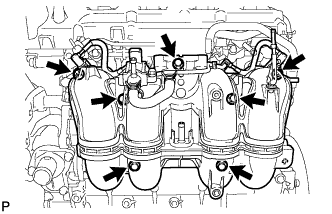 |
Remove the 5 bolts, 2 nuts, intake manifold and gasket.
| 54. REMOVE NO. 1 EXHAUST MANIFOLD HEAT INSULATOR |
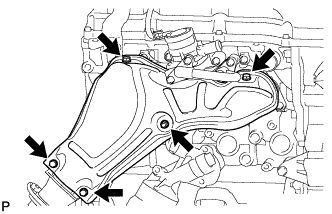 |
Remove the 5 bolts and heat insulator.
| 55. REMOVE NO. 4 INTAKE PIPE |
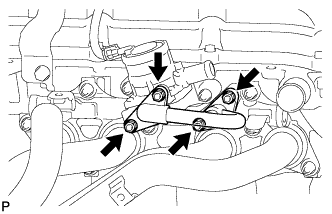 |
Remove the 4 nuts, No. 4 intake pipe and 2 gaskets.
| 56. REMOVE AIR SWITCHING VALVE ASSEMBLY |
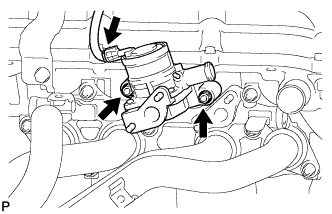 |
Disconnect the air switching valve connector.
Remove the 2 nuts and air switching valve assembly.
| 57. REMOVE EXHAUST MANIFOLD |
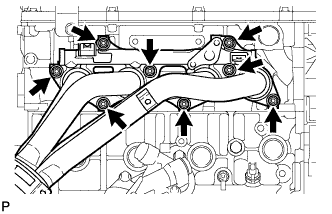 |
Remove the 8 nuts, exhaust manifold and gasket.
| 58. REMOVE IDLE PULLEY ASSEMBLY |
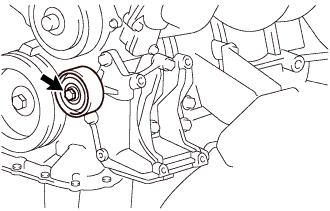 |
Loosen the bolt, and then remove the idle pulley assembly.
| 59. REMOVE NO. 1 COMPRESSOR MOUNTING BRACKET |
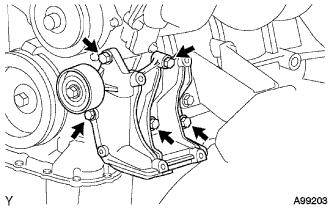 |
Remove the 5 bolts and No. 1 compressor mounting bracket.
| 60. REMOVE V-RIBBED BELT TENSIONER ASSEMBLY |
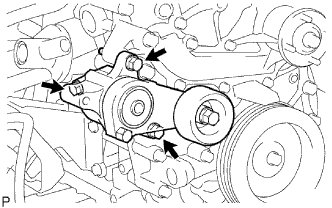 |
Remove the 3 bolts and tensioner.
| 61. REMOVE WATER INLET |
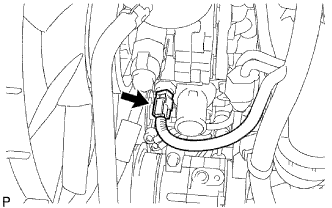 |
Disconnect the power steering pump connector.
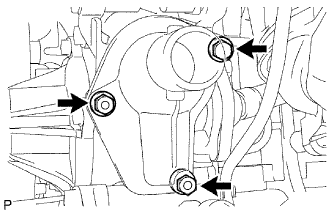 |
Remove the 2 nuts, bolt and water inlet.
Remove the gasket from the timing chain cover.
| 62. REMOVE THERMOSTAT |
Remove the thermostat from the timing chain cover.
Remove the gasket from the thermostat.
| 63. REMOVE NO. 1 IDLER PULLEY SUB-ASSEMBLY |
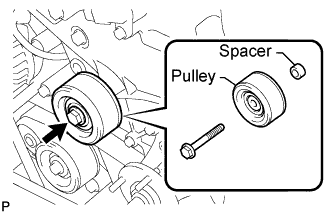 |
Remove the bolt, pulley and spacer.
| 64. REMOVE ENGINE OIL PRESSURE SWITCH ASSEMBLY |
Using a 24 mm deep socket wrench, remove the engine oil pressure switch assembly.
| 65. REMOVE HEATER WATER INLET HOSE |
| 66. REMOVE HEATER WATER OUTLET HOSE |
| 67. REMOVE NO. 1 WATER BY-PASS PIPE |
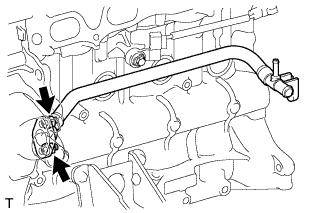 |
Remove the 2 nuts, water by-pass pipe and gasket.
| 68. REMOVE KNOCK SENSOR |
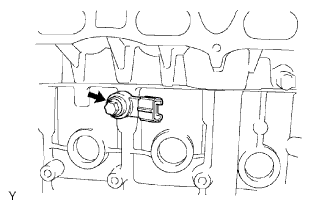 |
Disconnect the sensor connector.
Remove the bolt and sensor.
| 69. REMOVE ENGINE COOLANT TEMPERATURE SENSOR |
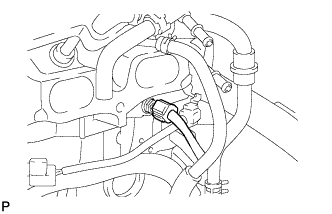 |
Disconnect the sensor connector.
Remove the sensor.
Remove the gasket from the sensor.
| 70. REMOVE CAMSHAFT POSITION SENSOR |
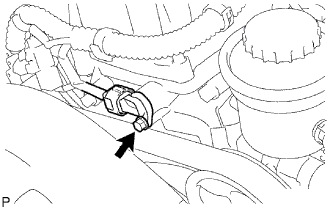 |
Disconnect the sensor connector.
Remove the bolt and sensor.
| 71. REMOVE CRANKSHAFT POSITION SENSOR |
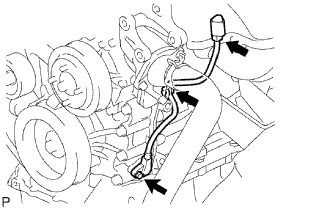 |
Disconnect the sensor connector.
Disconnect the connector from the connector bracket.
Detach the harness clamp.
Remove the bolt and sensor.
| 72. REMOVE CAMSHAFT TIMING OIL CONTROL VALVE ASSEMBLY |
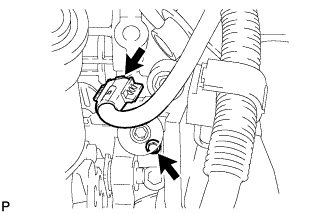 |
Disconnect the oil control valve connector.
Remove the bolt and oil control valve.
Remove the O-ring from the oil control valve.
| 73. REMOVE FRONT ENGINE MOUNTING BRACKET RH |
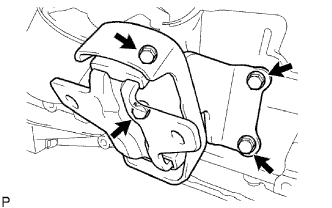 |
Remove the 4 bolts and mounting bracket.
| 74. REMOVE FRONT ENGINE MOUNTING BRACKET LH |
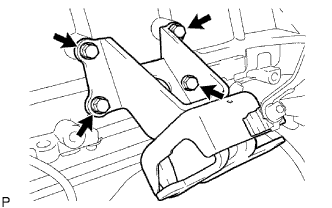 |
Remove the 4 bolts and mounting bracket.