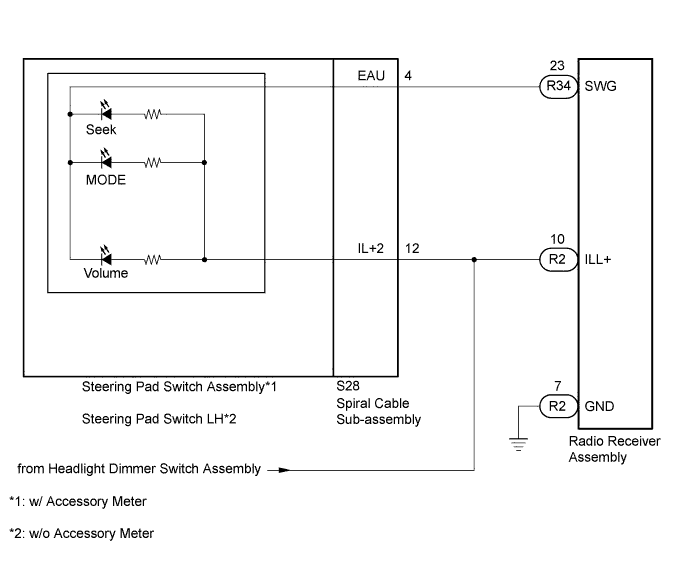
AUDIO AND VISUAL SYSTEM (for Radio Receiver Type) > Illumination Circuit |
| 1.CHECK ILLUMINATION |
Check if the illumination for the radio receiver assembly, steering pad switch assembly*1 or steering pad switch LH*2, glove box or other parts (hazard switch, transmission control switch, etc.) comes on when the head light dimmer switch assembly is turned to the head or tail position.
| Result | Proceed to |
| Illumination comes on for all components except steering pad switch assembly. | A |
| Illumination comes on for all components except radio receiver assembly. | B |
| No illumination comes on (radio receiver assembly, hazard switch, glove box, etc.). | C |
|
| ||||
|
| ||||
| A | |
 |
| 2.CHECK HARNESS AND CONNECTOR (SPIRAL CABLE SUB-ASSEMBLY - BATTERY) |
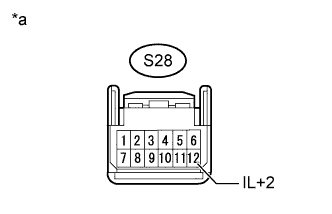 |
Disconnect the spiral cable sub-assembly connector.
Measure the voltage according to the value(s) in the table below.
| Tester Connection | Switch Condition | Specified Condition |
| S28-12 (IL+2) - Body ground | Headlight dimmer switch assembly tail or head position | 11 to 14 V |
| *a | Front view of wire harness connector (to Spiral Cable Sub-assembly) |
|
| ||||
| OK | |
|
| 3.INSPECT STEERING PAD SWITCH |
Remove the steering pad switch assembly*1 or steering pad switch LH*2 (Click here).
Inspect the steering pad switch assembly*1 or steering pad switch LH*2 (Click here).
| Result | Proceed to |
| OK | A |
| NG (w/ Accessory Meter) | B |
| NG (w/o Accessory Meter) | C |
|
| ||||
|
| ||||
| A | |
|
| 4.INSPECT SPIRAL CABLE SUB-ASSEMBLY |
Remove the spiral cable sub-assembly (Click here).
Inspect the spiral cable sub-assembly (Click here).
|
| ||||
| OK | |
|
| 5.CHECK HARNESS AND CONNECTOR (RADIO RECEIVER ASSEMBLY - SPIRAL CABLE SUB-ASSEMBLY) |
Disconnect the R34 radio receiver assembly connector.
Disconnect the S28 spiral cable sub-assembly connector.
Measure the resistance according to the value(s) in the table below.
| Tester Connection | Condition | Specified Condition |
| R34-23 (SWG) - S28-4 (EAU) | Always | Below 1 Ω |
| R34-23 (SWG) - Body ground | Always | 10 kΩ or higher |
|
| ||||
| OK | ||
 | ||
| ||
| 6.CHECK HARNESS AND CONNECTOR (RADIO RECEIVER ASSEMBLY - BATTERY AND BODY GROUND) |
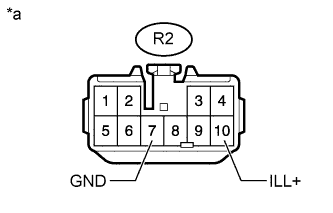 |
Disconnect the radio receiver assembly connector.
Measure the resistance according to the value(s) in the table below.
| Tester Connection | Condition | Specified Condition |
| R2-7 (GND) - Body ground | Always | Below 1 Ω |
Measure the voltage according to the value(s) in the table below.
| Tester Connection | Switch Condition | Specified Condition |
| R2-10 (ILL+) - Body ground | Headlight dimmer switch assembly tail or head position | 11 to 14 V |
| *a | Front view of wire harness connector (to Radio Receiver Assembly) |
|
| ||||
| OK | ||
| ||
| ||

