 |
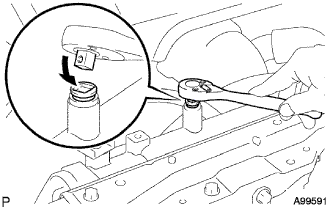
Drain the coolant by removing the radiator reservoir cap and, using a wrench, remove the vent plug.
OIL PUMP > REMOVAL |
| 1. PRECAUTION |
| 2. DISCONNECT CABLE FROM NEGATIVE BATTERY TERMINAL |
| 3. DRAIN ENGINE OIL |
Remove the oil filler cap.
Remove the oil pan drain plug and gasket, and then drain the engine oil into a container.
Wipe the oil pan and drain plug.
Install a new gasket and the oil pan drain plug.
| 4. DRAIN ENGINE COOLANT |
Loosen the radiator drain cock plug.
|
Drain the coolant by removing the radiator reservoir cap and, using a wrench, remove the vent plug.
Loosen the cylinder block drain cock plug.
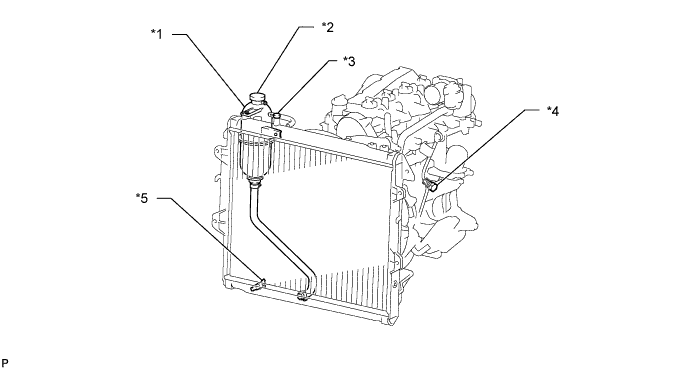
| *1 | Radiator Reservoir | *2 | Radiator Reservoir Cap |
| *3 | Vent Plug | *4 | Cylinder Block Drain Cock Plug |
| *5 | Radiator Drain Cock Plug | - | - |
| 5. REMOVE ENGINE ASSEMBLY |
| 6. REMOVE NO. 1 TIMING BELT COVER |
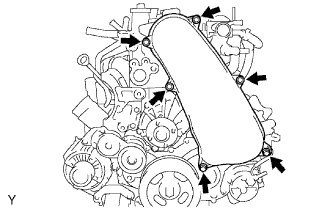 |
Remove the 6 bolts, 6 washers and timing belt cover.
| 7. REMOVE TIMING BELT |
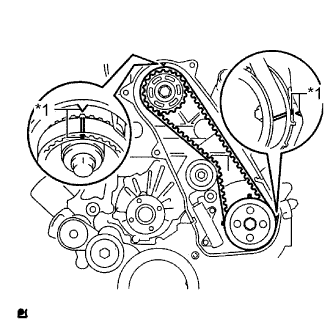 |
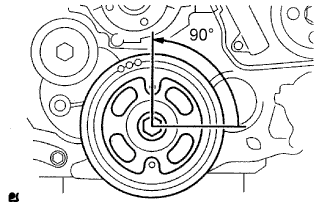
Turn the crankshaft clockwise and align the timing marks as shown in the illustration.
| *1 | Timing Mark |
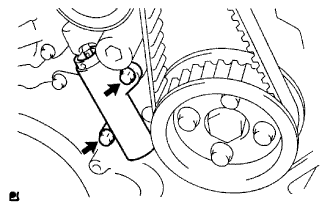 |
Uniformly loosen and remove the 2 bolts and No. 1 timing belt tensioner.
Remove the timing belt.
 |
| 8. REMOVE NO. 1 TIMING BELT IDLER SUB-ASSEMBLY |
Using a 10 mm hexagon wrench, remove the bolt, No. 1 timing belt idler and washer.
| 9. REMOVE NO. 2 IDLE PULLEY ASSEMBLY |
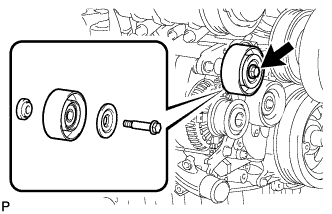 |
Remove the bolt, pulley plate, No. 2 idle pulley and spacer.
| 10. REMOVE GENERATOR ASSEMBLY |
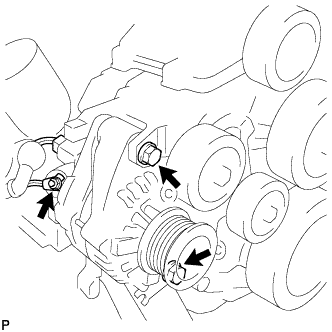 |
Remove the nut and generator wire.
Disconnect the generator connector.
Remove the 2 bolts and generator.
| 11. REMOVE GENERATOR BRACKET |
Remove the bolt and generator bracket.
| 12. REMOVE V-RIBBED BELT TENSIONER ASSEMBLY |
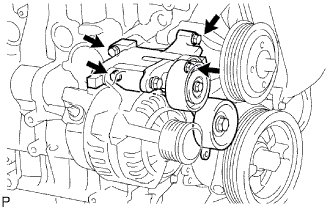 |
Remove the 4 bolts and V-ribbed belt tensioner.
| 13. REMOVE NO. 1 COMPRESSOR MOUNTING BRACKET |
Remove the 4 bolts and No. 1 compressor mounting bracket.
| 14. REMOVE MANIFOLD STAY |
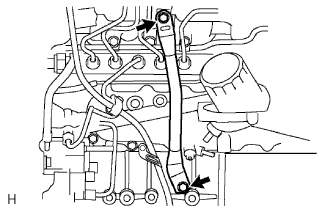 |
Remove the 2 bolts and manifold stay.
| 15. REMOVE NO. 1, NO. 2 AND NO. 3 INJECTION PIPE SUB-ASSEMBLY |
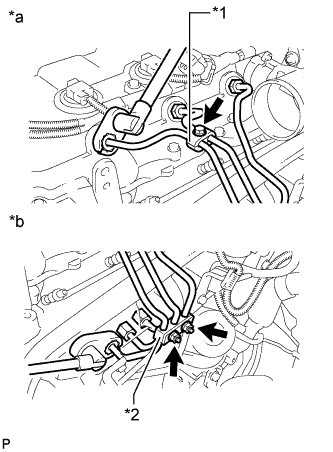 |
Remove the bolt and No. 2 injection pipe clamp.
| *1 | No. 2 Injection Pipe Clamp |
| *2 | No. 3 Injection Pipe Clamp |
| *a | Injector Side |
| *b | Common Rail Side |
Remove the 2 nuts and No. 3 injection pipe clamp.
Using a 17 mm union nut wrench, loosen the union nuts and remove the No. 1, No. 2 and No. 3 injection pipes.
| 16. REMOVE NO. 4 INJECTION PIPE SUB-ASSEMBLY |
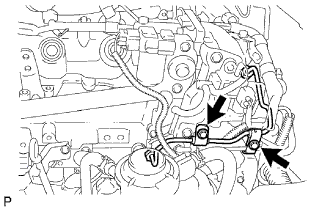 |
Remove the 2 bolts and disconnect the 2 injection pipe clamps.
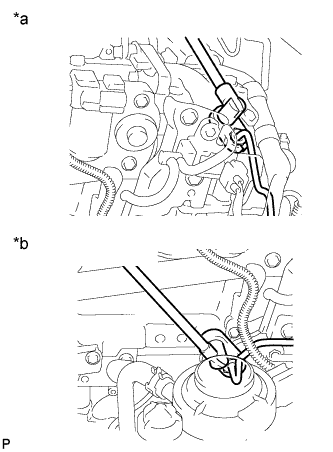 |
Using a 17 mm union nut wrench, loosen the union nuts and remove the No. 4 injection pipe.
| *a | Injector Side |
| *b | Common Rail Side |
| 17. REMOVE ENGINE OIL LEVEL DIPSTICK GUIDE |
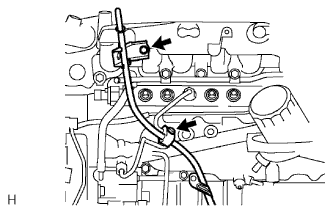 |
Remove the engine oil level dipstick.
Remove the bolt and injection pipe clamp.
Remove the bolt and engine oil level dipstick guide.
Remove the O-ring from the engine oil level dipstick guide.
| 18. REMOVE FUEL INLET PIPE SUB-ASSEMBLY |
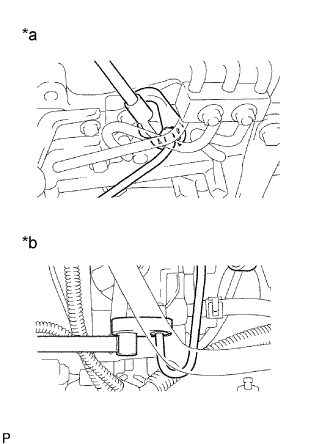 |
Using a 17 mm union nut wrench, loosen the union nuts and remove the fuel inlet pipe.
| *a | Common Rail Side |
| *b | Fuel Supply Pump Side |
| 19. REMOVE NO. 2 NOZZLE LEAKAGE PIPE ASSEMBLY |
Disconnect the 3 fuel hoses.
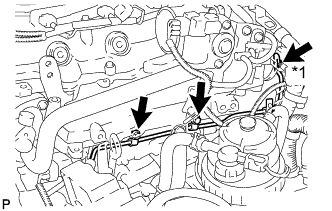 |
Remove the union bolt, 2 bolts, No. 2 nozzle leakage pipe and gasket.
| *1 | Union Bolt |
| 20. REMOVE CYLINDER HEAD COVER SUB-ASSEMBLY |
Remove the 3 bolts and disconnect the 4 injector connectors.
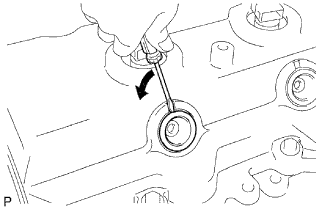 |
Using a small screwdriver, remove the nozzle holder seal by prying between the nozzle holder seal and the cutout part of the cylinder head cover.
Disconnect the ventilation hose.
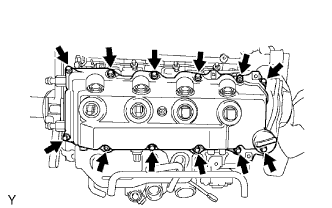 |
Remove the 10 bolts, 2 nuts, cylinder head cover and cylinder head cover gasket.
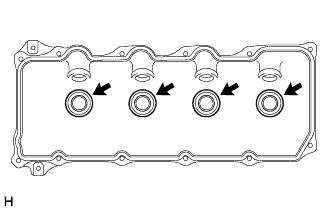 |
Remove the 4 No. 3 cylinder head cover gaskets from the cylinder head cover.
| 21. REMOVE CAMSHAFT TIMING PULLEY |
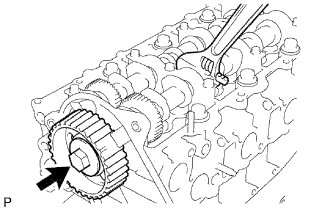 |
Remove the bolt of the camshaft timing pulley while holding the camshaft with a wrench.
Remove the camshaft timing pulley.
| 22. REMOVE NO. 2 TIMING BELT COVER |
Remove the 4 bolts, nut and timing belt cover.
| 23. REMOVE WATER PUMP ASSEMBLY |
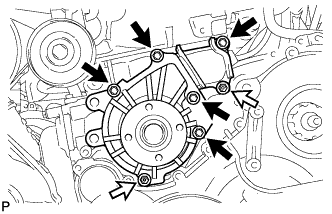 |
Remove the 5 bolts, 2 nuts, engine water pump and gasket.
 | Bolt |
 | Nut |
| 24. REMOVE VACUUM PUMP ASSEMBLY |
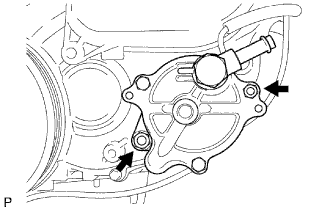 |
Remove the 2 nuts, vacuum pump and 2 O-rings.
| 25. REMOVE VANE PUMP ASSEMBLY |
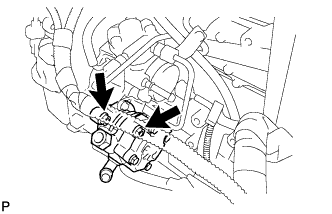 |
Remove the 2 nuts, vane pump and O-ring.
| 26. REMOVE CAMSHAFT POSITION SENSOR |
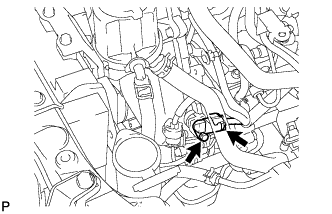 |
Disconnect the camshaft position sensor connector.
Remove the bolt and camshaft position sensor.
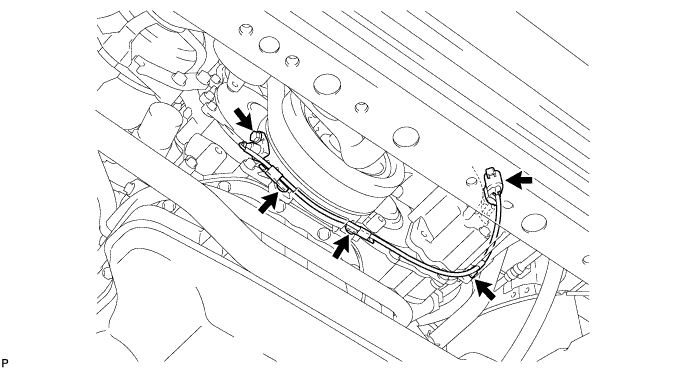
| 27. REMOVE CRANKSHAFT POSITION SENSOR |
Disconnect the crankshaft position sensor connector.
Remove the 3 clips, bolt and crankshaft position sensor.
| 28. REMOVE PUMP DRIVE SHAFT PULLEY |
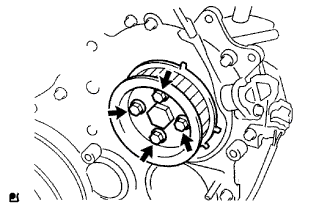 |
Remove the 4 bolts, No. 2 camshaft timing pulley flange and pump drive shaft pulley.
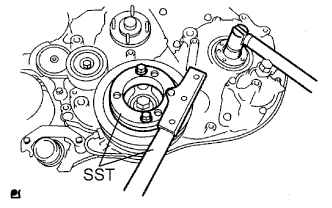 |
Using SST, hold the crankshaft pulley and remove the nut and O-ring.
| 29. REMOVE CRANKSHAFT PULLEY |
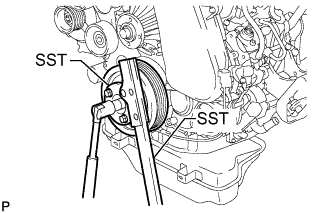 |
Using SST, hold the crankshaft pulley and loosen the pulley bolt.
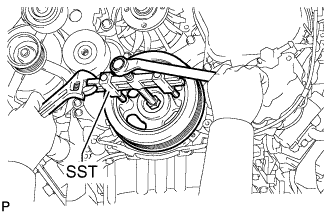 |
Using SST, remove the pulley bolt and crankshaft pulley.
| 30. REMOVE TIMING GEAR COVER |
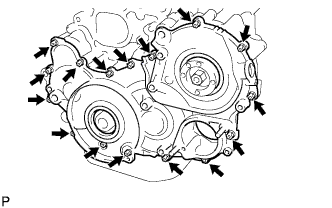 |
Remove the 14 bolts and 2 nuts.
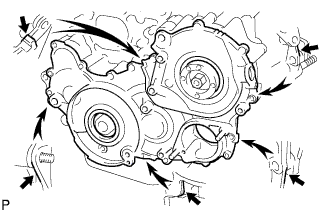 |
Pry the timing gear cover at the locations shown in the illustration and remove the timing gear cover.
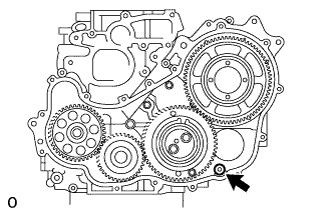 |
Remove the O-ring from the timing gear case.
| 31. REMOVE INJECTION GEAR |
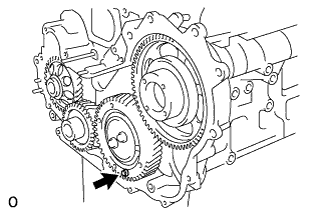 |
Secure the No. 2 idle sub gear to the No. 1 idle gear with a service bolt.
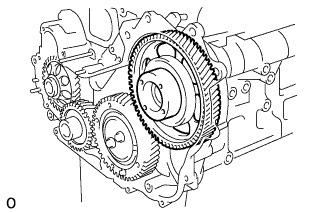 |
Remove the injection gear.
| 32. REMOVE NO. 1 CRANKSHAFT POSITION SENSOR PLATE |
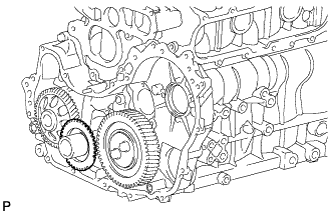 |
Remove the No. 1 crankshaft position sensor plate.
| 33. REMOVE CRANKSHAFT TIMING GEAR |
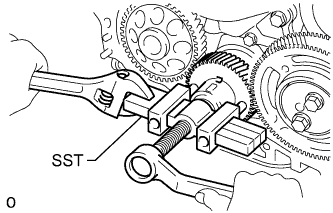 |
Using SST, remove the crankshaft timing gear.
| 34. REMOVE IDLE GEAR THRUST PLATE |
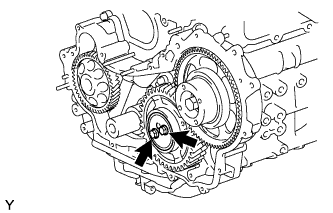 |
Remove the 2 bolts and idle gear thrust plate.
| 35. REMOVE NO. 1 IDLE GEAR |
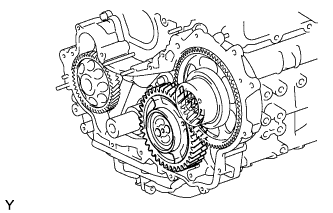 |
Remove the No. 1 idle gear together with the No. 2 idle sub gear.
| 36. REMOVE NO. 1 IDLE GEAR SHAFT |
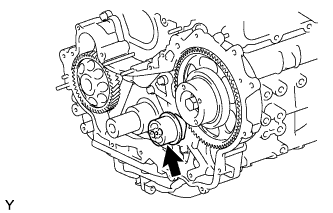 |
Remove the No. 1 idle gear shaft.
| 37. REMOVE FUEL SUPPLY PUMP ASSEMBLY |
Disconnect the 2 fuel hoses.
Disconnect the fuel temperature sensor connector and suction control valve connector from the fuel supply pump.
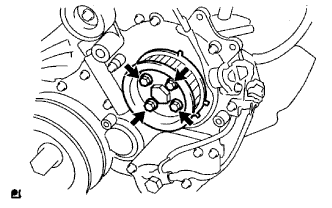 |
Remove the 4 bolts indicated by the arrows in the illustration.
Remove the No. 2 camshaft timing pulley flange and pump drive shaft pulley.
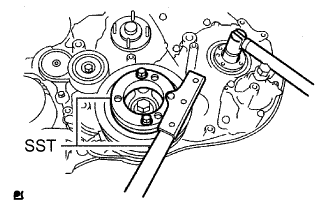 |
Remove the set nut and O-ring while holding the crankshaft pulley using SST.
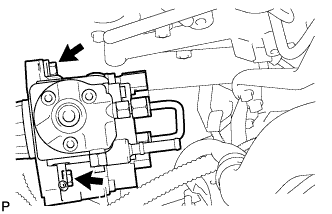 |
Loosen the 2 nuts.
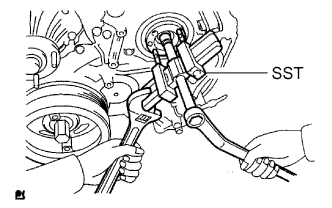 |
Using SST, disconnect the fuel supply pump from the injection gear.
Remove the 2 nuts and fuel supply pump.
Remove the O-ring.
| 38. REMOVE OIL PAN SUB-ASSEMBLY |
Remove the 22 bolts and 2 nuts.
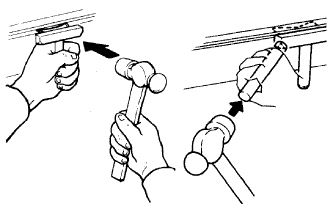 |
Insert the blade of an oil pan seal cutter between the oil pan and cylinder block, cut through the applied sealer and remove the oil pan.
| 39. REMOVE OIL STRAINER SUB-ASSEMBLY |
Remove the 2 bolts, 2 nuts, oil strainer and gasket.
| 40. REMOVE TIMING GEAR CASE ASSEMBLY |
Remove the bolt and No. 1 vacuum transmitting pipe.
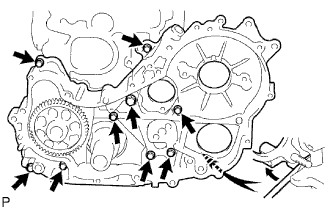 |
Remove the union bolt and 8 bolts.
Pry the timing gear case at the location shown in the illustration and remove the gear case and gasket.
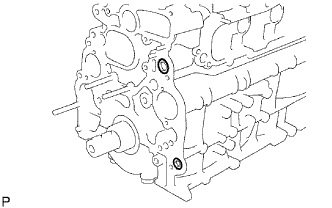 |
Remove the 2 O-rings.