Home › ENGINE ยท 1KD-FTV › LUBRICATION › ENGINE OIL COOLER

ENGINE OIL COOLER > INSTALLATION

for Preparation Click here


NOTICE:
  1. When replacing the injectors (including shuffling the injectors between the cylinders), common rail or cylinder head, it is necessary to replace the injection pipes with new ones.
  2. When replacing the fuel supply pump, common rail, cylinder block, cylinder head, cylinder head gasket or timing gear case, it is necessary to replace the fuel inlet pipe with a new one.
  3. After removing the injection pipes, clean them with a brush and compressed air.


1. INSTALL OIL COOLER ASSEMBLY
  1. Install 2 new gaskets to the oil cooler.

  1. Install the oil cooler to the oil cooler cover with the 4 nuts.

    Torque:
    16 N*m{ 163 kgf*cm , 12 ft.*lbf }


2. INSTALL OIL COOLER COVER SUB-ASSEMBLY
  1. Install a new gasket and the oil cooler cover with the 13 bolts and 2 nuts.

    Torque:
    13 N*m{ 133 kgf*cm , 10 ft.*lbf }

  1. Connect the oil pressure connector and install the wire harness.


3. INSTALL STARTER ASSEMBLY
  1. for 2.2 kW Type Denso Made: (Click here)
  2. for 2.2 kW Type Bosch Made: (Click here)


4. INSTALL FUEL SUPPLY PUMP ASSEMBLY
  1. w/ Glow Plug Controller: (Click here)
  2. w/o Glow Plug Controller: (Click here)


5. INSTALL COMMON RAIL ASSEMBLY
  1. w/ Glow Plug Controller: (Click here)
  2. w/o Glow Plug Controller: (Click here)


6. INSTALL OIL FILTER SUB-ASSEMBLY
  1. Check and clean the oil filter installation surface.

  1. Apply clean engine oil to the gasket of a new oil filter.

  1. Lightly screw the oil filter into place by hand. Tighten it until the gasket contacts the seat.


    A060101E02
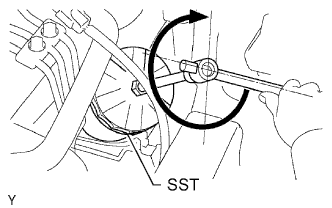
  1. Using SST, tighten the oil filter. Depending on the space available, choose from the following.

    SST
    09228-07501  

    1. If enough space is available, use a torque wrench to tighten the oil filter.

      Torque:
      12 N*m{ 122 kgf*cm , 9 ft.*lbf }

    2. If enough space is not available to use a torque wrench, tighten the oil filter 3/4 of a turn by hand or with a common wrench.
7. ADD ENGINE OIL
  1. Add new engine oil.

    Standard Oil Grade:

    Item
    Oil Grade
    Oil Viscosity (SAE)
    w/ Glow Plug Controller
    API CF-4, CF or ACEA B1
    - 5W-30
    - 10W-30
    - 15W-40
    - 20W-50
    (5W-30 is best choice for fuel economy and good starting in cold winter.)
    w/o Glow Plug Controller
    G-DLD1, API CF-4, CF or ACEA B1
    - 5W-30
    - 10W-30
    - 15W-40
    - 20W-50


    Standard Capacity:

    Item
    Specified Condition
    Drain and refill without oil filter change
    6.6 liters (7.0 US qts, 5.8 Imp. qts)
    Drain and refill with oil filter change
    6.9 liters (7.3 US qts, 6.1 Imp. qts)
    Dry fill
    7.4 liters (7.8 US qts, 6.5 Imp. qts)

  1. Install the oil filler cap.


8. BLEED AIR FROM FUEL SYSTEM
  1. w/ Glow Plug Controller:
  2. w/o Glow Plug Controller:


9. ADD ENGINE COOLANT
  1. Tighten the radiator drain cock plug by hand.

  1. Tighten the cylinder block drain cock plug.

    Torque:
    8.0 N*m{ 82 kgf*cm , 71 in.*lbf }


    A098989E01
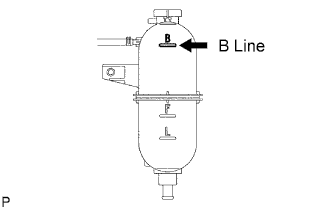
  1. Fill the radiator with TOYOTA Super Long Life Coolant (SLLC) to the reservoir tank's B line.

    Standard capacity:
    Item
    Specified Condition
    A/T
    11.1 liters (11.7 US qts, 9.8 Imp. qts)
    M/T
    9.8 liters (10.4 US qts, 8.6 Imp. qts)

    HINT:
    1. TOYOTA vehicles are filled with TOYOTA SLLC at the factory. In order to avoid damage to the engine cooling system and other technical problems, only use TOYOTA SLLC or similar high quality ethylene glycol based non-silicate, non-amine, non-nitrite, non-borate coolant with long-life hybrid organic acid technology (coolant with long-life hybrid organic acid technology consists of a combination of low phosphates and organic acids).
    1. Please contact your TOYOTA dealer for further details.

    NOTICE:
    Never use water as a substitute for engine coolant.

  1. Press the inlet and outlet radiator hoses several times by hand, and then check the level of the coolant.
    If the coolant level drops below the B line, add TOYOTA SLLC to the B line.

  1. Install the radiator reservoir cap.


    A099591E01
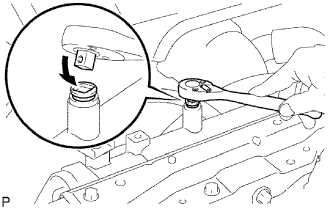
  1. Using a wrench, install the vent plug.

    Torque:
    2.0 N*m{ 20 kgf*cm , 18 in.*lbf }

  1. Bleed air from the cooling system.

    1. Warm up the engine until the thermostat opens. While the thermostat is open, circulate the coolant for several minutes.

    2. Maintain the engine speed at 2,500 to 3,000 rpm.

    3. Press the inlet and outlet radiator hoses several times by hand to bleed air.

      CAUTION:
      When pressing the radiator hoses:
      1. Wear protective gloves.
      1. Be careful as the radiator hoses are hot.
      1. Keep your hands away from the radiator fan.

    4. Stop the engine and wait until the coolant cools down to ambient temperature.

      CAUTION:
      Do not remove the radiator reservoir cap while the engine and radiator are still hot. Pressurized, hot engine coolant and steam may be released and cause serious burns.


    G036768E01
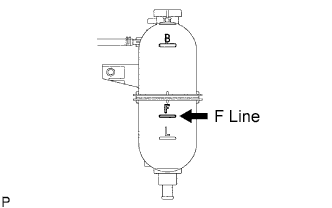
  1. After the coolant cools down, check that the coolant level is at the F line.
    If the coolant level is below the F line, add TOYOTA SLLC to the F line.


10. INSPECT FOR COOLANT LEAK
  1. Check for engine coolant leaks (Click here).


11. INSPECT FOR FUEL LEAK
  1. w/ Glow Plug Controller:
  2. w/o Glow Plug Controller:


12. INSPECT FOR OIL LEAK
  1. Start the engine. Make sure that there are no oil leaks from the areas that were worked on.


13. INSTALL NO. 1 ENGINE UNDER COVER

Torque:
28 N*m{ 286 kgf*cm , 21 ft.*lbf }