 |
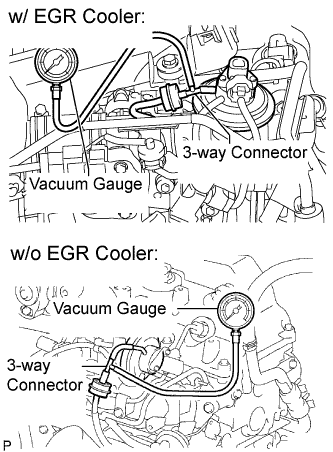
Using a 3-way connector, connect a vacuum gauge to the hose between the electric EGR control valve and E-VRV.
EMISSION CONTROL SYSTEM (w/o Glow Plug Controller) > ON-VEHICLE INSPECTION |
| 1. INSPECT ELECTRIC EGR CONTROL VALVE ASSEMBLY |
|
Using a 3-way connector, connect a vacuum gauge to the hose between the electric EGR control valve and E-VRV.
Check the seating of the electric EGR control valve.
Start the engine. Check that the engine starts and then idles.
Check the output vacuum with a vacuum gauge.
Connect a vacuum gauge to the output pipe of the electric EGR control valve.
Warm up the engine and check that the vacuum gauge reading is above 28 kPa (210 mmHg, 8.27 in.Hg).
If the result is not as specified, check for leaks between the electric EGR control valve and vacuum pump, or check the electric EGR control valve.
Check "hot" engine condition.
Visually check the vacuum hose between the vacuum pump and electric EGR control valve for leaks.
Warm up the engine.
Check that the vacuum gauge indicator reading increases by more than 28 kPa (210 mmHg, 8.27 in.Hg) at 1500 rpm.
When the accelerator pedal is fully depressed quickly, check that the vacuum gauge indicator reading drops momentarily.
Keep the engine speed at more than 4000 rpm.
Check that the vacuum gauge reading is as specified.
When the accelerator pedal is released, check that the vacuum gauge indicator reading drops momentarily while the engine speed decreases from more than 4000 rpm to idle.
If the result is not as specified, refer to the inspection section (Click here).
Remove the vacuum gauge and connect the vacuum hose to the electric EGR control valve.
| 2. INSPECT NO. 2 EGR VALVE ASSEMBLY (w/ EGR Cooler) |
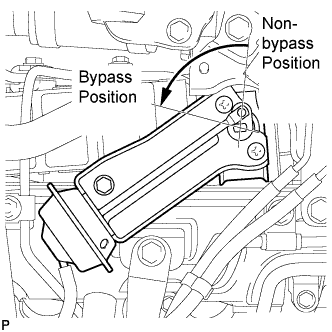 |
With the engine stopped, make sure the EGR cooler by-pass regulating link is in the Non-bypass Position as shown in the illustration.
Start the engine.
After the engine idle condition is stable and the engine coolant temperature is less than 70°C (158°F), make sure the EGR cooler by-pass regulating link is in the Bypass Position shown in the illustration.
When the engine coolant temperature is 75°C (167°F) or higher, make sure the EGR cooler by-pass valve actuating link is in the Non-bypass Position shown in the illustration.
| 3. CHECK FOR LEAKS |
Visually check that the hoses, connections and gaskets have no cracks, leaks or damage.
| 4. CHECK VACUUM PUMP ASSEMBLY |
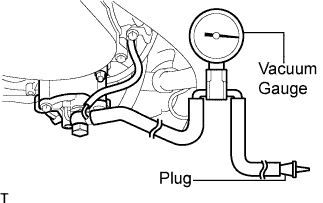 |
Disconnect the vacuum hose from the vacuum pump.
Connect the hose of a vacuum gauge to the pump.
Insert a plug into the other hose of the gauge.
Start the engine and warm it up for more than 2 minutes.
With the engine idling, check the negative pressure of the pump.
Remove the gauge from the pump.
Connect the hose to the pump with the clip.