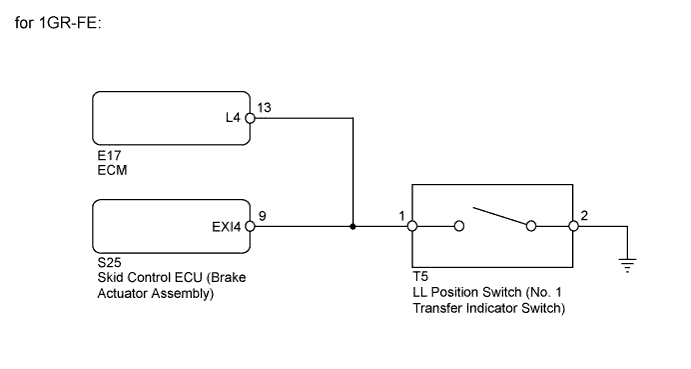
DTC C1268 Transfer L4 Position Switch Circuit |
| DTC Code | DTC Detection Condition | Trouble Area |
| C1268 | No signal is input to the EXI4 terminal of the skid control ECU. |
|
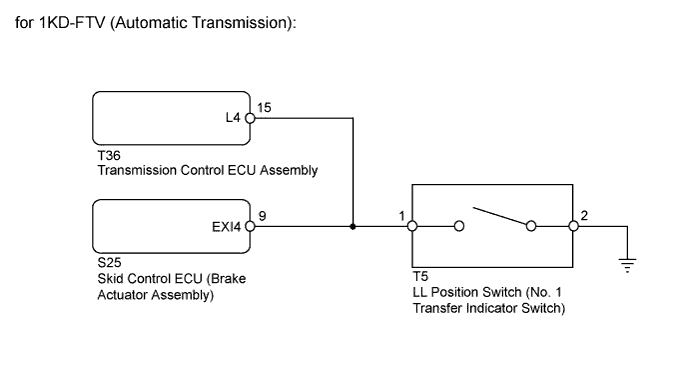
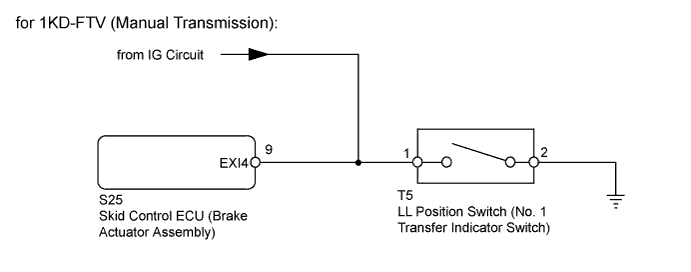
| 1.CHECK TERMINAL VOLTAGE (EXI4 TERMINAL) |
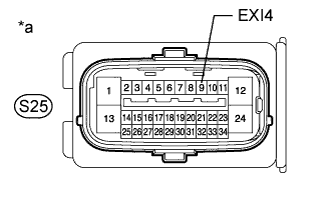 |
Connect the skid control ECU (brake actuator assembly) connector.
Set the vehicle to the HL or H state using the transfer shift lever.
Disconnect the skid control ECU (brake actuator assembly) connector.
Measure the voltage according to the value(s) in the table below.
| Tester Connection | Condition | Specified Condition |
| S25-9 (EXI4) - Body ground |
| 11 to 14 V |
Connect the skid control ECU (brake actuator assembly) connector.
Set the vehicle to the LL state using the transfer shift lever.
Disconnect the skid control ECU (brake actuator assembly) connector.
Measure the voltage according to the value(s) in the table below.
| Tester Connection | Condition | Specified Condition |
| S25-9 (EXI4) - Body ground |
| Below 1.5 V |
| *a | Front view of wire harness connector (to Skid Control ECU [Brake Actuator Assembly]) |
|
| ||||
| OK | |
 |
| 2.RECONFIRM DTC |
Clear the DTC (Click here).
Turn the ignition switch off.
Check if the same DTC is output.
| Result | Proceed to |
| DTC is output | A |
| DTC is not output | B |
|
| ||||
| A | ||
 | ||
| ||
| 3.CHECK HARNESS AND CONNECTOR (EXI4 CIRCUIT) |
Turn the ignition switch off.
Disconnect the skid control ECU (brake actuator assembly) connector.
for 1GR-FE:
Disconnect the E17 ECM connector.
for 1KD-FTV (Automatic Transmission):
Disconnect the T36 transmission control ECU connector.
Disconnect the LL position switch (No. 1 transfer indicator switch) connector.
Measure the resistance according to the value(s) in the table below.
| Tester Connection | Condition | Specified Condition |
| S25-9 (EXI4) - T5-1 | Always | Below 1 Ω |
| S25-9 (EXI4) - Body ground | Always | 10 kΩ or higher |
| T5-2 - Body ground | Always | Below 1 Ω |
|
| ||||
| OK | |
|
| 4.INSPECT LL POSITION SWITCH |
Turn the ignition switch off.
Remove the LL position switch (No. 1 transfer indicator switch) (Click here).
Inspect the LL position switch (No. 1 transfer indicator switch) (Click here).
|
| ||||
| OK | |
|
| 5.CHECK TERMINAL VOLTAGE (LL POSITION SWITCH POWER SOURCE CIRCUIT) |
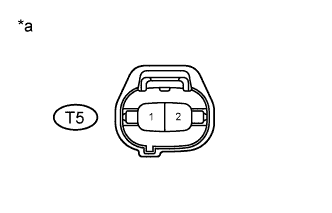 |
Turn the ignition switch off.
Disconnect the LL position switch (No. 1 transfer indicator switch) connector.
Disconnect the skid control ECU (brake actuator assembly) connector.
for 1GR-FE:
Connect the ECM connector.
for 1KD-FTV (Automatic Transmission):
Connect the transmission control ECU connector.
Measure the voltage according to the value(s) in the table below.
| Tester Connection | Switch Condition | Specified Condition |
| 1 - 2 | Ignition switch ON | 11 to 14 V |
| *a | Front view of wire harness connector (to LL Position Switch [No. 1 Transfer Indicator Switch]) |
| Result | Proceed to | |
| OK | A | |
| NG | for 1GR-FE | B |
| for 1KD-FTV (Automatic Transmission) | C | |
| for 1KD-FTV (Manual Transmission) | D | |
|
| ||||
|
| ||||
|
| ||||
| A | ||
| ||
| ||
| 6.CHECK HARNESS AND CONNECTOR (SKID CONTROL ECU - ECM) |
Turn the ignition switch off.
Disconnect the skid control ECU (brake actuator assembly) connector.
Disconnect the E17 ECM connector.
Disconnect the LL position switch (No. 1 transfer indicator switch) connector.
Measure the resistance according to the value(s) in the table below.
| Tester Connection | Condition | Specified Condition |
| S25-9 (EXI4) - E17-13 (L4) | Always | Below 1 Ω |
| S25-9 (EXI4) - Body ground | Always | 10 kΩ or higher |
|
| ||||
| OK | ||
| ||
| ||
| 7.CHECK HARNESS AND CONNECTOR (SKID CONTROL ECU - TRANSMISSION CONTROL ECU) |
Turn the ignition switch off.
Disconnect the skid control ECU (brake actuator assembly) connector.
Disconnect the T36 transmission control ECU connector.
Disconnect the LL position switch (No. 1 transfer indicator switch) connector.
Measure the resistance according to the value(s) in the table below.
| Tester Connection | Condition | Specified Condition |
| S25-9 (EXI4) - T36-15 (L4) | Always | Below 1 Ω |
| S25-9 (EXI4) - Body ground | Always | 10 kΩ or higher |
|
| ||||
| OK | ||
| ||
| ||

