Home › Audio / Visual / Telematics › AUDIO / VIDEO › AUDIO AND VISUAL SYSTEM(for Radio Receiver Type)
RM33K0E _56 Audio / Visual / Telematics _043541 AUDIO / VIDEO _0218827 AUDIO AND VISUAL SYSTEM(for Radio Receiver Type) J

AUDIO / VIDEO  AUDIO AND VISUAL SYSTEM(for Radio Receiver Type)  Speaker Circuit  


DESCRIPTION

If there is a short in a speaker circuit, the radio receiver assembly detects it and stops output to the speakers.

As a result, sound cannot be heard from the speakers even if there is no malfunction in the radio receiver assembly or speakers.

WIRING DIAGRAM
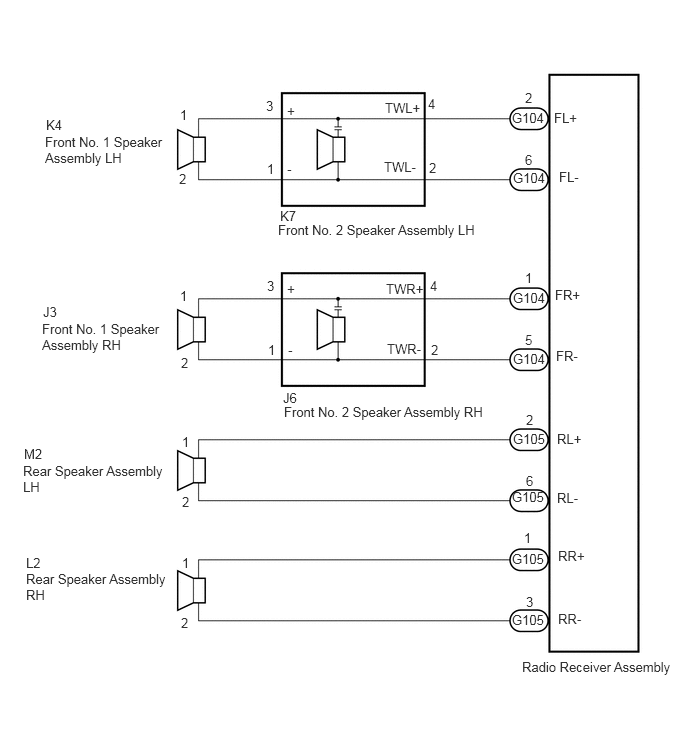
E321038E02
1.865,1.781 2.021,1.979 0.156,0.198 10 false 2 0.479,1.219 0.781,1.417 0.302,0.198 10 false K4 0.469,1.396 1.76,1.75 1.292,0.354 10 false Front No. 1 Speaker Assembly LH 2.792,3.563 2.948,3.76 0.156,0.198 10 false 1 2.99,1.073 3.146,1.271 0.156,0.198 10 false + 2.99,1.677 3.146,1.875 0.156,0.198 10 false - 2.771,1.021 2.927,1.219 0.156,0.198 10 false 3 4.01,1.042 4.563,1.24 0.552,0.198 10 false TWL+ 4,1.656 4.552,1.854 0.552,0.198 10 false TWL- 4.469,1.667 4.625,1.865 0.156,0.198 10 false 2 4.458,1 4.615,1.198 0.156,0.198 10 false 4 2.917,2.167 3.219,2.365 0.302,0.198 10 false K7 2.896,2.313 5.125,2.49 2.229,0.177 10 false Front No. 2 Speaker Assembly LH 0.438,3.344 1.708,3.688 1.271,0.344 10 false Front No. 1 Speaker Assembly RH 0.448,3.167 0.75,3.365 0.302,0.198 10 false J3 1.875,1.115 2.031,1.313 0.156,0.198 10 false 1 1.875,3 2.031,3.198 0.156,0.198 10 false 1 2.948,4.063 3.385,4.292 0.438,0.229 10 false J6 1.885,3.698 2.042,3.896 0.156,0.198 10 false 2 2.958,4.208 5.292,4.406 2.333,0.198 10 false Front No. 2 Speaker Assembly RH 2.781,1.677 2.938,1.875 0.156,0.198 10 false 1 2.781,2.896 2.938,3.094 0.156,0.198 10 false 3 3,3.563 3.156,3.76 0.156,0.198 10 false - 2.99,2.927 3.146,3.125 0.156,0.198 10 false + 0.25,4.646 0.552,4.844 0.302,0.198 10 false M2 0.24,4.823 1.75,5.167 1.51,0.344 10 false Rear Speaker Assembly LH 1.896,4.521 2.313,5.042 0.417,0.521 10 false 1 1.896,5.146 2.052,5.344 0.156,0.198 10 false 2 5.479,6.188 5.635,6.385 0.156,0.198 10 false 3 1.885,6.406 2.042,6.604 0.156,0.198 10 false 2 1.896,5.781 2.313,6.302 0.417,0.521 10 false 1 4.479,2.896 4.635,3.094 0.156,0.198 10 false 4 4.49,3.563 4.646,3.76 0.156,0.198 10 false 2 4.021,2.927 4.573,3.125 0.552,0.198 10 false TWR+ 4.031,3.552 4.583,3.75 0.552,0.198 10 false TWR- 5.469,0.938 5.625,1.135 0.156,0.198 10 false 2 5.469,1.583 5.625,1.781 0.156,0.198 10 false 6 5.469,2.813 5.625,3.01 0.156,0.198 10 false 1 5.469,3.458 5.625,3.656 0.156,0.198 10 false 5 5.479,4.292 5.635,4.49 0.156,0.198 10 false 2 5.479,4.927 5.635,5.125 0.156,0.198 10 false 6 5.458,5.521 5.604,5.719 0.146,0.198 10 false 1 5.333,1.146 5.885,1.344 0.552,0.198 10 false G104 5.344,1.771 5.896,1.969 0.552,0.198 10 false G104 5.344,3.021 5.896,3.219 0.552,0.198 10 false G104 5.344,3.656 5.896,3.854 0.552,0.198 10 false G104 5.344,4.49 5.896,4.688 0.552,0.198 10 false G105 5.333,5.094 5.885,5.292 0.552,0.198 10 false G105 5.333,5.74 5.885,5.938 0.552,0.198 10 false G105 5.333,6.375 5.885,6.573 0.552,0.198 10 false G105 0.271,5.781 0.573,5.979 0.302,0.198 10 false L2 0.271,5.948 1.781,6.292 1.51,0.344 10 false Rear Speaker Assembly RH 5.438,6.865 7.042,7.042 1.604,0.177 10 false Radio Receiver Assembly 5.823,1.76 6.375,1.958 0.552,0.198 10 false FL- 5.771,1.146 6.323,1.344 0.552,0.198 10 false FL+ 5.792,3.625 6.344,3.823 0.552,0.198 10 false FR- 5.781,2.99 6.333,3.188 0.552,0.198 10 false FR+ 5.813,5.708 6.365,5.906 0.552,0.198 10 false RR+ 5.813,6.365 6.365,6.563 0.552,0.198 10 false RR- 5.802,4.49 6.354,4.688 0.552,0.198 10 false RL+ 5.802,5.104 6.354,5.302 0.552,0.198 10 false RL-

PROCEDURE

1.CHECK HARNESS AND CONNECTOR (SPEAKER CIRCUIT)

*1: for LH Side

*2: for RH Side


a.

Disconnect the G104 and G105 radio receiver assembly connectors.


b.

Disconnect the K4*1 and/or J3*2 front No. 1 speaker assembly connector.


c.

Disconnect the K7*1 and/or J6*2 front No. 2 speaker assembly connector.


d.

Disconnect the M2*1 and/or L2*2 rear speaker assembly connector.


e.

Measure the resistance according to the value(s) in the table below.

Standard Resistance:
for LH Side
Tester Connection Condition Specified Condition
G104-2 (FL+) - K7-4 (TWL+) Always Below 1 Ω
G104-6 (FL-) - K7-2 (TWL-) Always Below 1 Ω
K7-3 (+) - K4-1 Always Below 1 Ω
K7-1 (-) - K4-2 Always Below 1 Ω
G105-2 (RL+) - M2-1 Always Below 1 Ω
G105-6 (RL-) - M2-2 Always Below 1 Ω
G104-2 (FL+) or K7-4 (TWL+) - Body ground Always 10 kΩ or higher
G104-6 (FL-) or K7-2 (TWL-) - Body ground Always 10 kΩ or higher
K7-3 (+) or K4-1 - Body ground Always 10 kΩ or higher
K7-1 (-) or K4-2 - Body ground Always 10 kΩ or higher
G105-2 (RL+) or M2-1 - Body ground Always 10 kΩ or higher
G105-6 (RL-) or M2-2 - Body ground Always 10 kΩ or higher

for RH Side
Tester Connection Condition Specified Condition
G104-1 (FR+) - J6-4 (TWR+) Always Below 1 Ω
G104-5 (FR-) - J6-2 (TWR-) Always Below 1 Ω
J6-3 (+) - J3-1 Always Below 1 Ω
J6-1 (-) - J3-2 Always Below 1 Ω
G105-1 (RR+) - L2-1 Always Below 1 Ω
G105-3 (RR-) - L2-2 Always Below 1 Ω
G104-1 (FR+) or J6-4 (TWR+) - Body ground Always 10 kΩ or higher
G104-5 (FR-) or J6-2 (TWR-) - Body ground Always 10 kΩ or higher
J6-3 (+) or J3-1- Body ground Always 10 kΩ or higher
J6-1 (-) or J3-2 - Body ground Always 10 kΩ or higher
G105-1 (RR+) or L2-1 - Body ground Always 10 kΩ or higher
G105-3 (RR-) or L2-2 - Body ground Always 10 kΩ or higher


Result:
Proceed to
OK
NG


OK

2.INSPECT FRONT NO. 1 SPEAKER ASSEMBLY

NG

REPAIR OR REPLACE HARNESS OR CONNECTOR

2.INSPECT FRONT NO. 1 SPEAKER ASSEMBLY
a.

Remove the front No. 1 speaker assembly.

Click hereAudio / Visual / Telematics>AUDIO / VIDEO>FRONT DOOR SPEAKER>REMOVAL


b.

Inspect the front No. 1 speaker assembly.

Click hereAudio / Visual / Telematics>AUDIO / VIDEO>FRONT DOOR SPEAKER>INSPECTION


Result:
Proceed to
OK
NG


OK

3.INSPECT REAR SPEAKER ASSEMBLY

NG

REPLACE FRONT NO. 1 SPEAKER ASSEMBLY

3.INSPECT REAR SPEAKER ASSEMBLY
a.

Remove the rear speaker assembly.

Click hereAudio / Visual / Telematics>AUDIO / VIDEO>REAR DOOR SPEAKER>REMOVAL


b.

Inspect the rear speaker assembly.

Click hereAudio / Visual / Telematics>AUDIO / VIDEO>REAR DOOR SPEAKER>INSPECTION


Result:
Proceed to
OK
NG


OK

4.CHECK FRONT NO. 2 SPEAKER ASSEMBLY

NG

4.CHECK FRONT NO. 2 SPEAKER ASSEMBLY
a.

Replace the front No. 2 speaker assembly.

Click hereAudio / Visual / Telematics>AUDIO / VIDEO>FRONT DOOR SPEAKER>REMOVAL


b.

Check the malfunction disappears.

OK:

Malfunction disappears.


HINT:
·

Connect all the connectors to the rear No. 2 speaker assemblies that were disconnected.

·

When there is a possibility that either the right or left front speaker is defective, inspect by interchanging the right one with the left one.

·

Perform the above inspection on both the LH and RH sides.


Result:
Proceed to
OK
NG


OK

END (FRONT NO. 2 SPEAKER ASSEMBLY IS DEFECTIVE)

NG