DOOR LOCK POWER DOOR LOCK CONTROL SYSTEM Only Back Door cannot be Opened
DESCRIPTION
The body ECU receives signals from the certification ECU (smart key ECU assembly). Then, the body ECU activates the back door lock motor.
WIRING DIAGRAM
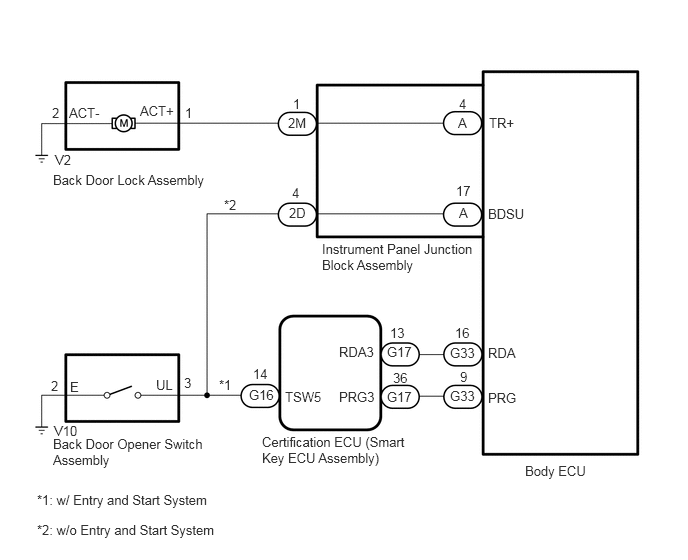
CAUTION / NOTICE / HINT
- NOTICE:
- ·
Inspect the fuses for circuits related to this system before performing the following procedure.
·If the body ECU has been replaced, it is necessary to initialize the body ECU.
Click hereGeneral>INTRODUCTION>REPAIR INSTRUCTION>INITIALIZATION
·As the door control battery is installed between the vehicle battery and body ECU, first perform the inspections to confirm that there are no malfunctions in the power source circuit for the body ECU before performing this troubleshooting procedure.
Click hereVehicle Interior>DOOR LOCK>POWER DOOR LOCK CONTROL SYSTEM>PRECAUTION
·Before performing the inspection, check that DTC B27B0 (Entry and Start System) is not output.
PROCEDURE
Check the vehicle specification.
- Result:
Proceed to w/o Entry and Start System w/ Entry and Start System
w/o Entry and Start System
w/ Entry and Start System
Remove the back door opener switch assembly.
Inspect the back door opener switch assembly.
- Result:
Proceed to OK NG
OK
NG
Disconnect the V2 back door lock assembly connector.
Disconnect the 2M instrument panel junction block assembly connector.
Measure the resistance according to the value(s) in the table below.
- Standard Resistance:
Tester Connection Condition Specified Condition V10-3 (UL) - 2D-4 Always Below 1 Ω V10-3 (UL) or 2D-4 - Body ground Always 10 kΩ or higher V10-2 (E) - Body ground Always Below 1 Ω
- Result:
Proceed to OK NG
OK
NG
Remove the instrument panel junction block assembly.
for LHD:Power Source / Network>POWER DISTRIBUTION>MAIN BODY ECU(for LHD)>REMOVAL
for RHD:Power Source / Network>POWER DISTRIBUTION>MAIN BODY ECU(for RHD)>REMOVAL
Remove the body ECU from the instrument panel junction block assembly.
for LHD:Power Source / Network>POWER DISTRIBUTION>MAIN BODY ECU(for LHD)>REMOVAL
for RHD:Power Source / Network>POWER DISTRIBUTION>MAIN BODY ECU(for RHD)>REMOVAL
Measure the resistance according to the value(s) in the table below.
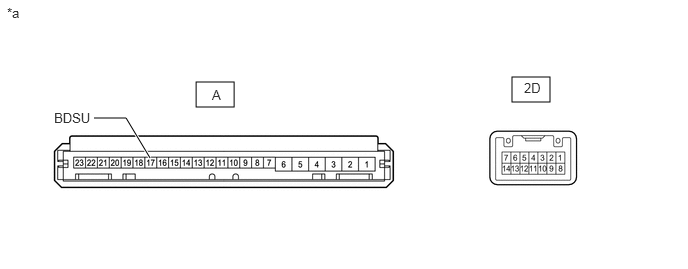
| *a | Component without harness connected
(Instrument Panel Junction Block Assembly) |
- | - |
- Standard Resistance:
Tester Connection Condition Specified Condition A-17 (BDSU) - 2D-4 Always Below 1 Ω
- Result:
Proceed to OK NG
OK
NG
for LHD:Power Source / Network>POWER DISTRIBUTION>MAIN BODY ECU(for LHD)>REMOVAL
for RHD:Power Source / Network>POWER DISTRIBUTION>MAIN BODY ECU(for RHD)>REMOVAL
Check the smart entry and start system (for Entry Function).
- OK:
Smart entry and start system (for Entry Function) operates normally.
- Result:
Proceed to OK NG
OK
NG
Remove the back door lock assembly.
Inspect the back door lock assembly.
Click hereVehicle Interior>DOOR LOCK>BACK DOOR LOCK>INSPECTION
- Result:
Proceed to OK NG
OK
NG
Disconnect the V2 back door lock assembly connector.
Disconnect the 2M instrument panel junction block assembly connector.
Measure the resistance according to the value(s) in the table below.
- Standard Resistance:
Tester Connection Condition Specified Condition V2-1 (ACT+) - 2M-1 Always Below 1 Ω V2-1 (ACT+) or 2M-1 - Body ground Always 10 kΩ or higher V2-2 (ACT-) - Body ground Always Below 1 Ω
- Result:
Proceed to OK NG
OK
NG
Remove the instrument panel junction block assembly.
for LHD:Power Source / Network>POWER DISTRIBUTION>MAIN BODY ECU(for LHD)>REMOVAL
for RHD:Power Source / Network>POWER DISTRIBUTION>MAIN BODY ECU(for RHD)>REMOVAL
Remove the body ECU from the instrument panel junction block assembly.
for LHD:Power Source / Network>POWER DISTRIBUTION>MAIN BODY ECU(for LHD)>REMOVAL
for RHD:Power Source / Network>POWER DISTRIBUTION>MAIN BODY ECU(for RHD)>REMOVAL
Measure the resistance according to the value(s) in the table below.
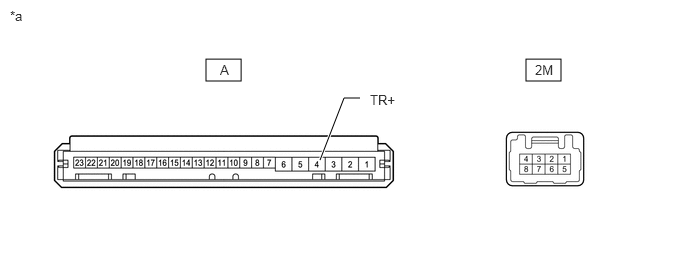
| *a | Component without harness connected
(Instrument Panel Junction Block Assembly) |
- | - |
- Standard Resistance:
Tester Connection Condition Specified Condition A-4 (TR+) - 2M-1 Always Below 1 Ω
- Result:
Proceed to OK NG
OK
for LHD:Power Source / Network>POWER DISTRIBUTION>MAIN BODY ECU(for LHD)>REMOVAL
for RHD:Power Source / Network>POWER DISTRIBUTION>MAIN BODY ECU(for RHD)>REMOVAL
NG
for LHD:Power Source / Network>POWER DISTRIBUTION>MAIN BODY ECU(for LHD)>REMOVAL
for RHD:Power Source / Network>POWER DISTRIBUTION>MAIN BODY ECU(for RHD)>REMOVAL