INTERIOR PANELS / TRIM UPPER INSTRUMENT PANEL REMOVAL
CAUTION / NOTICE / HINT
- HINT:
- ·
Use the same procedure for RHD and LHD vehicles.
·The procedure listed below is for LHD vehicles.
The necessary procedures (adjustment, calibration, initialization or registration) that must be performed after parts are removed, installed or replaced during the upper instrument panel removal/installation are shown below.
| Replacement Part or Procedure | Necessary Procedures | Effects / Inoperative when not Performed | Link |
|---|---|---|---|
| Disconnect cable from negative battery terminal | w/ Power Back Door System:
Reset back door close position |
Power door lock control system | ( ) |
- CAUTION:
-
-
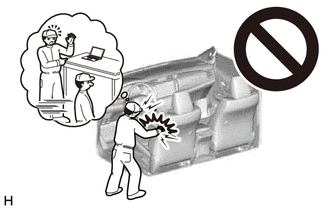
Some of these service operations affect the SRS airbag system. Read the precautionary notices concerning the SRS airbag system before servicing.
-
Click hereVehicle Interior>SUPPLEMENTAL RESTRAINT SYSTEMS>AIRBAG SYSTEM(for Type B)>PRECAUTION
PROCEDURE

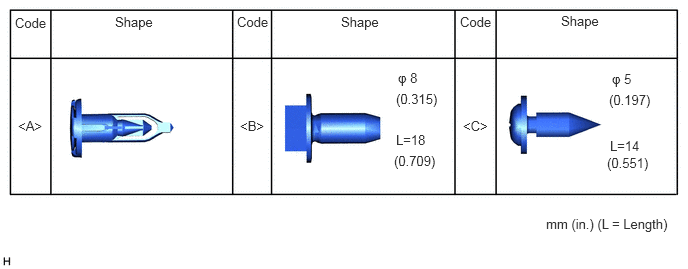
 1. TABLE OF BOLT, SCREW, NUT AND CLIP
- HINT:
-
All bolts, screws and clips relevant to installing and removing the instrument panel are shown along with their alphabetic code in the table below.
2. PRECAUTION
- NOTICE:
-
After turning the ignition switch off, waiting time may be required before disconnecting the cable from the battery terminal. Therefore, make sure to read the disconnecting the cable from the battery terminal notice before proceeding with work.
-
Click hereGeneral>INTRODUCTION>REPAIR INSTRUCTION>PRECAUTION
3.DISCONNECT CABLE FROM NEGATIVE BATTERY TERMINAL
- CAUTION:
-
Wait at least 90 seconds after disconnecting the cable from the negative (-) battery terminal to disable the SRS system.
- NOTICE:
-
When disconnecting the cable, some systems need to be initialized after the cable is reconnected.
-
Click hereGeneral>INTRODUCTION>REPAIR INSTRUCTION>INITIALIZATION
45100
4.REMOVE STEERING WHEEL ASSEMBLY
55667
5.REMOVE INSTRUMENT PANEL REGISTER BEZEL GARNISH
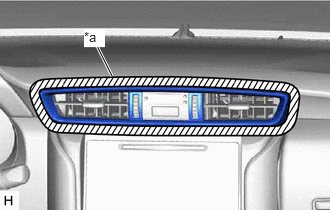
| *a | Protective Tape |
Put protective tape around the instrument panel register bezel garnish.
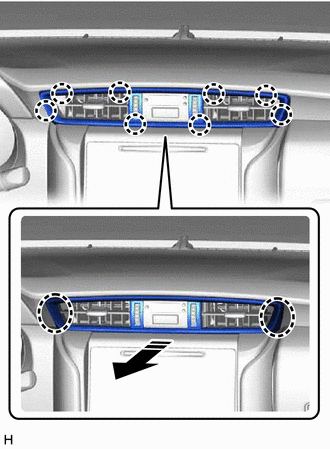

|
Place Hands Here |

|
Remove in this Direction |
Place your hands at the position shown in the illustration and pull as shown to detach the claw and remove the instrument panel register bezel garnish.
55012A
6.REMOVE NO. 2 INSTRUMENT PANEL GARNISH SUB-ASSEMBLY
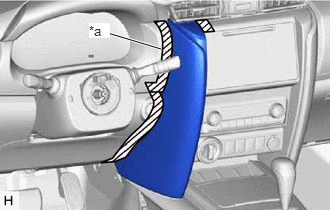
| *a | Protective Tape |
Put protective tape around the No. 2 instrument panel garnish sub-assembly.
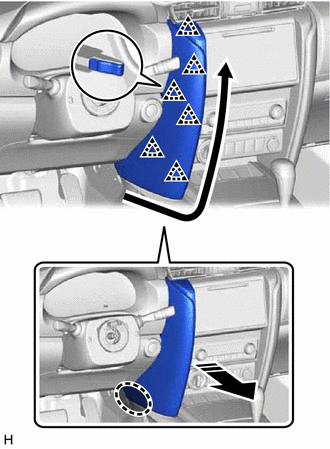
|
|
Place Hands Here |
|
|
Remove in this Direction |

|
Order of Removal |
Place your hands at the position shown in the illustration and pull as shown to detach the clip and remove the No. 2 instrument panel garnish sub-assembly.
55011A
7.REMOVE NO. 1 INSTRUMENT PANEL GARNISH SUB-ASSEMBLY
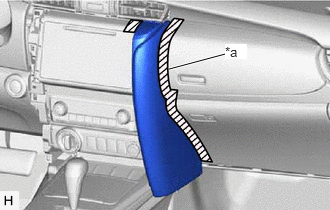
| *a | Protective Tape |
Put protective tape around the No. 1 instrument panel garnish sub-assembly.
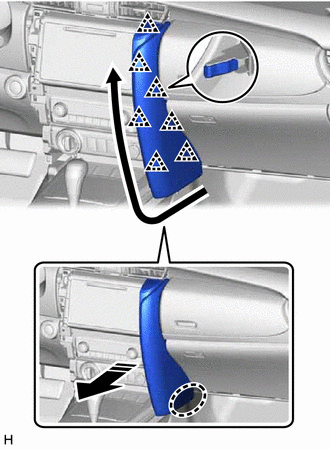
|
|
Place Hands Here |
|
|
Remove in this Direction |
|
|
Order of Removal |
Place your hands at the position shown in the illustration and pull as shown to detach the clip and remove the No. 1 instrument panel garnish sub-assembly.
55410C
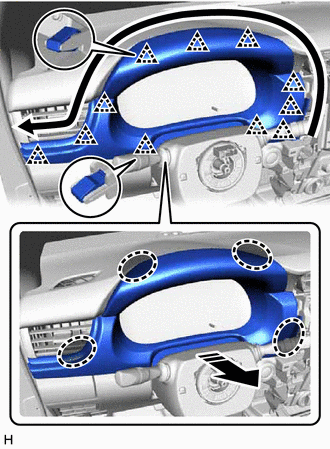
8.REMOVE INSTRUMENT CLUSTER FINISH PANEL ASSEMBLY
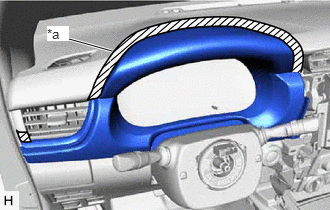
| *a | Protective Tape |
Put protective tape around the instrument cluster finish panel assembly.
|
|
Place Hands Here |
|
|
Remove in this Direction |
|
|
Order of Removal |
Place your hands at the position shown in the illustration and pull as shown to detach the clip and remove the instrument cluster finish panel assembly.
83100
9.REMOVE COMBINATION METER ASSEMBLY
55041B
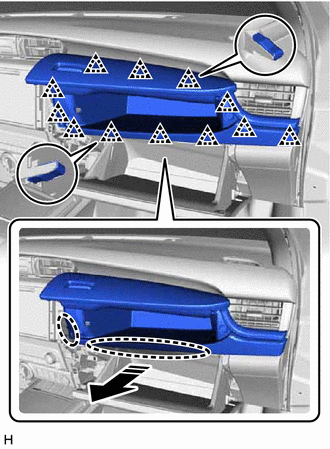
10.REMOVE NO. 1 INSTRUMENT PANEL BOX DOOR SUB-ASSEMBLY
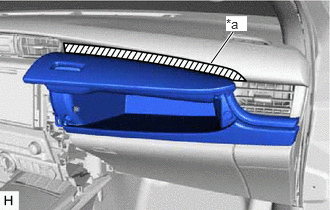
| *a | Protective Tape |
Put protective tape around the No. 1 instrument panel box door sub-assembly.
Open the glove compartment door assembly.
|
|
Place Hands Here |
|
|
Remove in this Direction |
Place your hands at the position shown in the illustration and pull as shown to detach the clip and remove the No. 1 instrument panel box door sub-assembly.
55405B
11.REMOVE CENTER INSTRUMENT CLUSTER FINISH PANEL SUB-ASSEMBLY
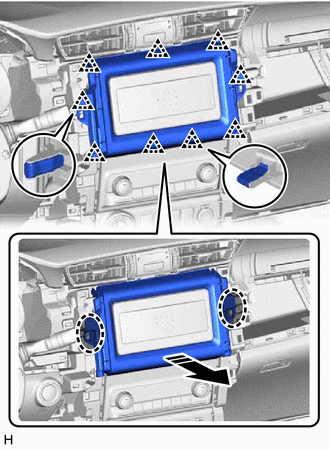
|
|
Place Hands Here |
|
|
Remove in this Direction |
w/o Audio:
Place your hands at the position shown in the illustration and pull as shown to detach the clip and remove the center instrument cluster finish panel sub-assembly.
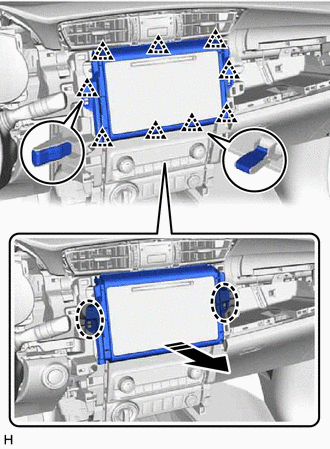
|
|
Place Hands Here |
|
|
Remove in this Direction |
w/ Audio:
Place your hands at the position shown in the illustration and pull as shown to detach the clip and remove the center instrument cluster finish panel sub-assembly.
67914B
12.REMOVE FRONT DOOR SCUFF PLATE LH
62112
13.REMOVE COWL SIDE TRIM BOARD LH
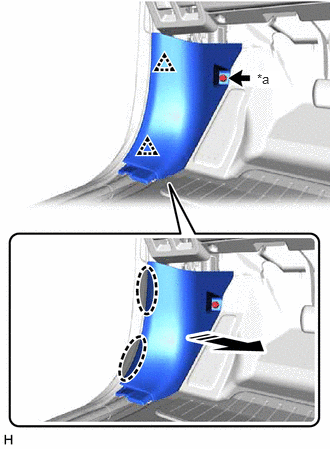
| *a | Cap Nut |
|
|
Place Hands Here |
|
|
Remove in this Direction |
Remove the cap nut.
Place your hands at the position shown in the illustration and pull as shown to detach the clip and remove the cowl side trim board LH.
55318C
14.REMOVE INSTRUMENT SIDE PANEL LH
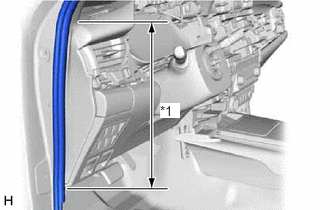
| *1 | Front Door Opening Trim Weatherstrip LH |
Disconnect the front door opening trim weatherstrip LH in the range shown in the illustration.
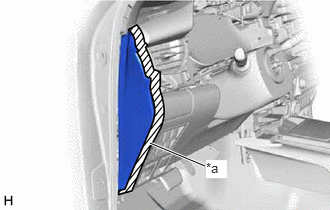
| *a | Protective Tape |
Put protective tape around the instrument side panel LH.
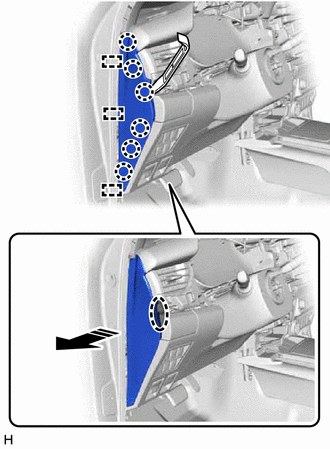
|
|
Insert Moulding Remover A Here |
|
|
Remove in this Direction |
Insert moulding remover A at the position shown in the illustration and pull as shown to detach the claw and guide and remove the instrument side panel LH.
67913B
15.REMOVE FRONT DOOR SCUFF PLATE RH
62111C
16.REMOVE COWL SIDE TRIM BOARD RH
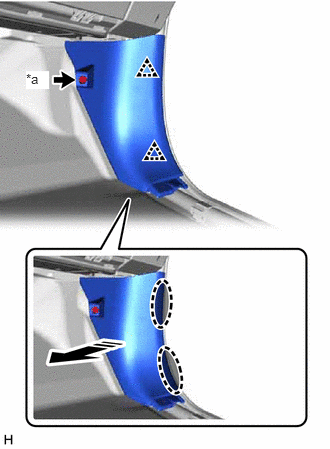
| *a | Cap Nut |
|
|
Place Hands Here |
|
|
Remove in this Direction |
Remove the cap nut.
Place your hands at the position shown in the illustration and pull as shown to detach the clip and remove the cowl side trim board RH.
55317A
17.REMOVE INSTRUMENT SIDE PANEL RH
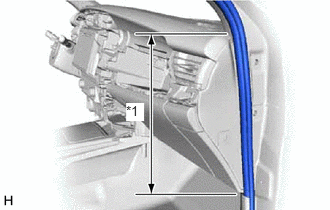
| *1 | Front Door Opening Trim Weatherstrip RH |
Disconnect the front door opening trim weatherstrip RH in the range shown in the illustration.
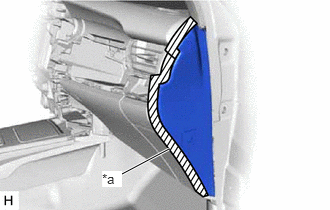
| *a | Protective Tape |
Put protective tape around the instrument side panel RH.
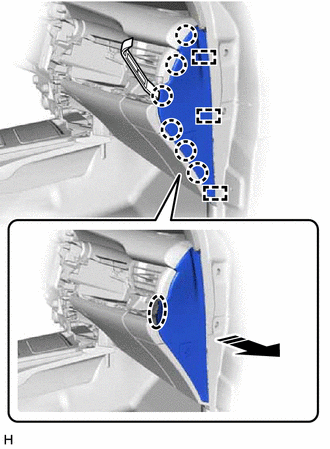
|
|
Insert Moulding Remover A Here |
|
|
Remove in this Direction |
Insert moulding remover A at the position shown in the illustration and pull as shown to detach the claw and guide.
Disconnect the connector and remove the instrument side panel RH.
74603
18.REMOVE FRONT ASSIST GRIP SUB-ASSEMBLY
- HINT:
-
Use the same procedure for both front assist grip assemblies.
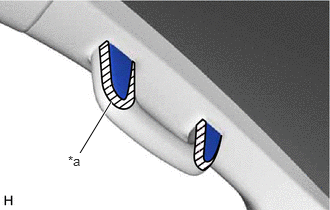
| *a | Protective Tape |
Put protective tape around the assist grip covers.
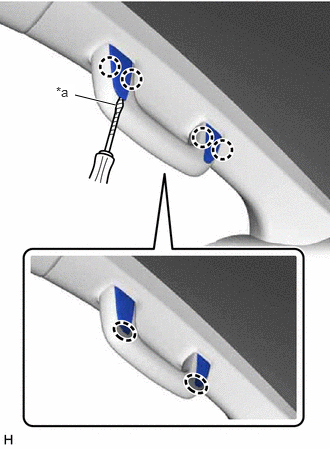
| *a | Protective Tape |
|
|
Insert Thin-bladed Screwdriver Here |
Insert a thin-bladed screwdriver at the position shown in the illustration and detach the claw and open the assist grip covers.
- HINT:
-
Tape the thin-bladed screwdriver tip before use.
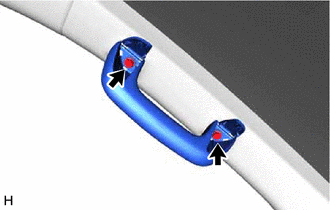
Remove the 2 bolts and front assist grip sub-assembly.
62212
19.REMOVE FRONT PILLAR GARNISH LH
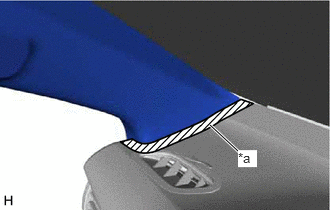
| *a | Protective Tape |
Put protective tape around the front pillar garnish LH.
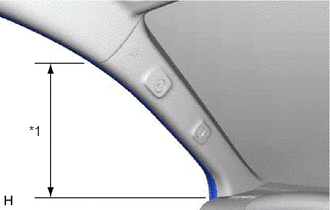
| *1 | Front Door Opening Trim Weatherstrip LH |
Disconnect the front door opening trim weatherstrip LH in the range shown in the illustration.
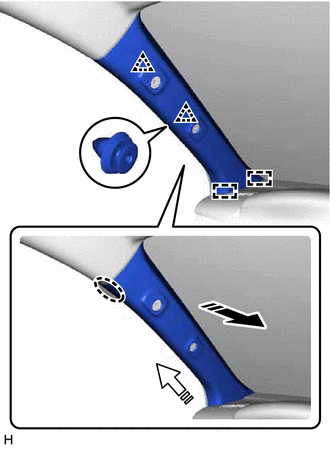
|
|
Place Hands Here |
|
|
Remove in this Direction (1) |

|
Remove in this Direction (2) |
Place your hands at the position shown in the illustration and pull as shown to detach the clip and guide and remove the front pillar garnish LH.
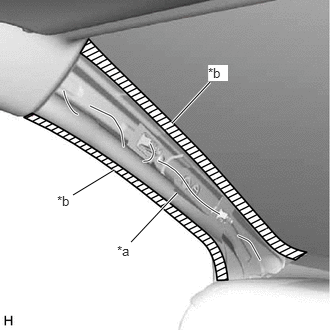
| *a | Protective Cover |
| *b | Adhesive Tape |
w/ Curtain Shield Airbag:
Protect the curtain shield airbag assembly LH.
Completely cover the curtain shield airbag assembly LH with a cloth or nylon sheet and secure the ends of the cover with adhesive tape as shown in the illustration.
- NOTICE:
-
Cover the curtain shield airbag assembly LH with a protective cover as soon as the front pillar garnish LH is removed.
62211
20.REMOVE FRONT PILLAR GARNISH RH
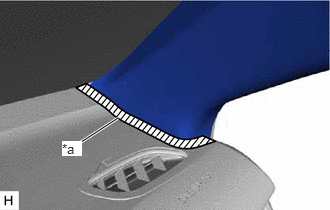
| *a | Protective Tape |
Put protective tape around the front pillar garnish RH.
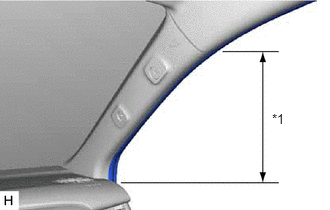
| *1 | Front Door Opening Trim Weatherstrip RH |
Disconnect the front door opening trim weatherstrip RH in the range shown in the illustration.
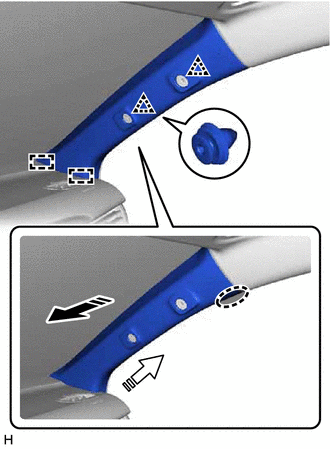
|
|
Place Hands Here |
|
|
Remove in this Direction (1) |
|
|
Remove in this Direction (2) |
Place your hands at the position shown in the illustration and pull as shown to detach the clip and guide and remove the front pillar garnish RH.
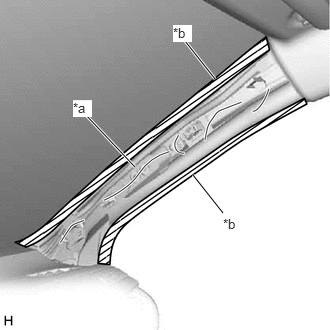
| *a | Protective Cover |
| *b | Adhesive Tape |
w/ Curtain Shield Airbag:
Protect the curtain shield airbag assembly RH.
Completely cover the curtain shield airbag assembly RH with a cloth or nylon sheet and secure the ends of the cover with adhesive tape as shown in the illustration.
- NOTICE:
-
Cover the curtain shield airbag assembly RH with a protective cover as soon as the front pillar garnish RH is removed.
55302A
21.REMOVE UPPER INSTRUMENT PANEL SUB-ASSEMBLY
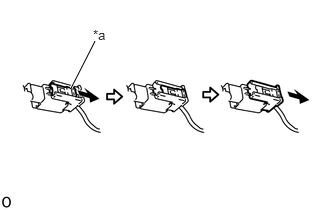
| *a | Lock Slider |
Pull and slide the lock slider as shown to release the connector lock and disconnect the passenger airbag connector.
- NOTICE:
-
When handling the passenger airbag connector, take care not to damage the airbag wire harness.
Disconnect the connector and detach the clamp.
Remove the 2 clips <A>.
Remove the passenger airbag installation bolt <B>.
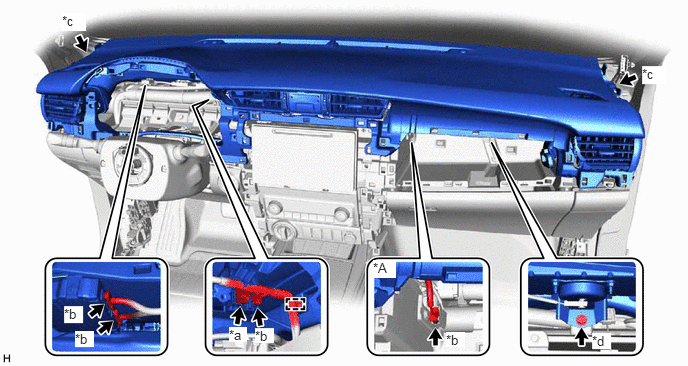
| *A | w/ Navigation System | - | - |
| *a | Passenger Airbag Connector | *b | Connector |
| *c | Clip <A> | *d | Passenger Airbag Installation Bolt <B> |
Place your hands at the position shown in the illustration and pull as shown to detach the clip.
Detach the guide and remove the upper instrument panel sub-assembly.
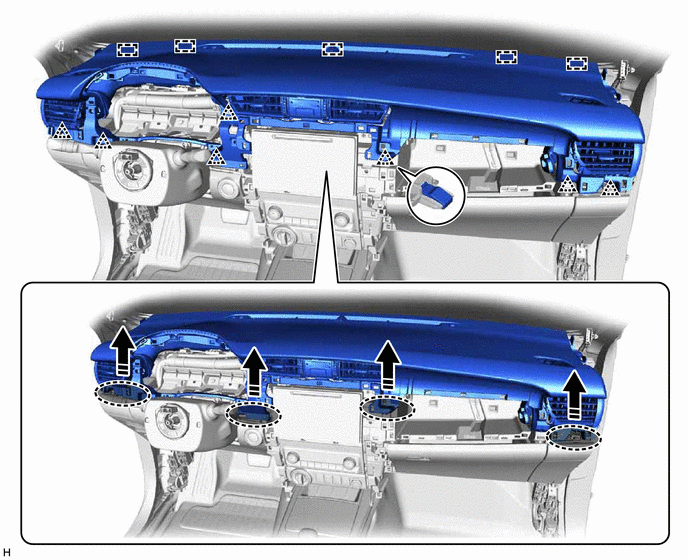
|
|
Place Hands Here |
|
Remove in this Direction |