DOOR LOCK WIRELESS DOOR LOCK CONTROL SYSTEM(w/ Entry and Start System) No Answer-Back
DESCRIPTION
In some cases, wireless door lock control functions are normal but the hazard warning light and wireless door lock buzzer answer-back function* does not operate. In such cases, hazard warning light and wireless door lock buzzer* signal outputs from the body ECU may be malfunctioning.
*: w/ Wireless Door Lock Buzzer Answer-back Function
WIRING DIAGRAM
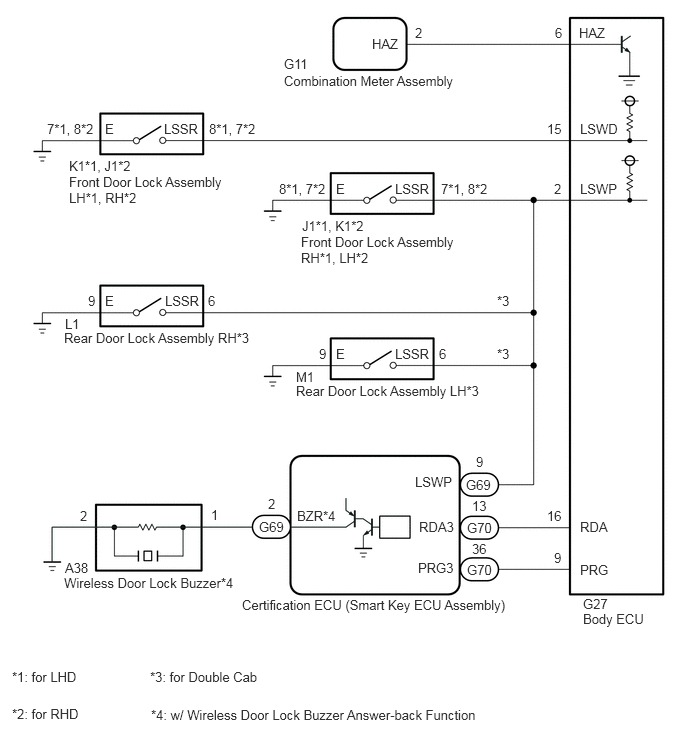
CAUTION / NOTICE / HINT
- NOTICE:
- ·
When replacing the certification ECU (smart key ECU assembly), refer to the Service Bulletin.
·The wireless door lock buzzer answer-back function can be customized. Make sure that this function is ON before performing this.*1
·Before performing the inspection, check that DTC B27B0 (Entry and Start System) is not output.
·If the body ECU has been replaced, it is necessary to initialize the body ECU.*2
Click hereGeneral>INTRODUCTION>REPAIR INSTRUCTION>INITIALIZATION
·As the door control battery is installed between the vehicle battery and body ECU, first perform the inspections to confirm that there are no malfunctions in the power source circuit for the body ECU before performing this troubleshooting procedure.*3
Click hereVehicle Interior>DOOR LOCK>POWER DOOR LOCK CONTROL SYSTEM>PRECAUTION
*1: w/ Wireless Door Lock Buzzer Answer-back Function
*2: w/ Automatic Light Control System
*3: w/ Door Control Battery
PROCEDURE
Check the wireless answer-back operation using the electrical key transmitter sub-assembly.
- Result:
Result Proceed to Neither wireless door lock buzzer answer-back nor hazard warning light answer-back occur (w/ Wireless Door Lock Buzzer Answer-back Function) A Only wireless door lock buzzer answer-back does not occur (w/ Wireless Door Lock Buzzer Answer-back Function) B Only hazard warning light answer-back does not occur (w/ Wireless Door Lock Buzzer Answer-back Function) C Hazard warning light answer-back does not occur (w/o Wireless Door Lock Buzzer Answer-back Function) D
A
B
C
D
*: for Double Cab
for Front Side:
Remove the front door lock assembly.
Click hereVehicle Interior>DOOR LOCK>FRONT DOOR LOCK>REMOVAL
Inspect the front door lock assembly.
Click hereVehicle Interior>DOOR LOCK>FRONT DOOR LOCK>INSPECTION
for Rear Side*:
Remove the rear door lock assembly.
Click hereVehicle Interior>DOOR LOCK>REAR DOOR LOCK(for Double Cab)>REMOVAL
Inspect the rear door lock assembly.
Click hereVehicle Interior>DOOR LOCK>REAR DOOR LOCK(for Double Cab)>INSPECTION
- Result:
Result Proceed to OK A NG (for Front Side) B NG (for Rear Side) C
A
B
C
*1: for LHD
*2: for RHD
*3: for Double Cab
for Driver Side:
Disconnect the K1*1 or J1*2 front door lock assembly LH*1 or RH*2 connector.
Disconnect the G27 body ECU connector.
Measure the resistance according to the value(s) in the table below.
- Standard Resistance:
- for LHD:
Tester Connection Condition Specified Condition K1-8 (LSSR) - G27-15 (LSWD) Always Below 1 Ω K1-7 (E) - Body ground Always Below 1 Ω K1-8 (LSSR) or G27-15 (LSWD) - Body ground Always 10 kΩ or higher
- for RHD:
Tester Connection Condition Specified Condition J1-7 (LSSR) - G27-15 (LSWD) Always Below 1 Ω J1-8 (E) - Body ground Always Below 1 Ω J1-7 (LSSR) or G27-15 (LSWD) - Body ground Always 10 kΩ or higher
except Driver Side:
Disconnect the J1*1 or K1*2 front door lock assembly RH*1 or LH*2 connector.
Disconnect the L1 rear door lock assembly RH connector*3.
Disconnect the M1 rear door lock assembly LH connector*3.
Disconnect the G27 body ECU connector.
Disconnect the G69 certification ECU (smart key ECU assembly) connector.
Measure the resistance according to the value(s) in the table below.
- Standard Resistance:
- for LHD:
Tester Connection Condition Specified Condition J1-7 (LSSR) - G27-2 (LSWP) Always Below 1 Ω J1-7 (LSSR) - G69-9 (LSWP) Always Below 1 Ω J1-8 (E) - Body ground Always Below 1 Ω J1-7 (LSSR) or G27-2 (LSWP) - Body ground Always 10 kΩ or higher J1-7 (LSSR) or G69-9 (LSWP) - Body ground Always 10 kΩ or higher L1-6 (LSSR) - G27-2 (LSWP) Always Below 1 Ω L1-6 (LSSR) - G69-9 (LSWP) Always Below 1 Ω L1-9 (E) - Body ground Always Below 1 Ω L1-6 (LSSR) - G27-2 (LSWP) - Body ground Always 10 kΩ or higher L1-6 (LSSR) - G69-9 (LSWP) - Body ground Always 10 kΩ or higher M1-6 (LSSR) - G27-2 (LSWP) Always Below 1 Ω M1-6 (LSSR) - G69-9 (LSWP) Always Below 1 Ω M1-9 (E) - Body ground Always Below 1 Ω M1-6 (LSSR) - G27-2 (LSWP) - Body ground Always 10 kΩ or higher M1-6 (LSSR) - G69-9 (LSWP) - Body ground Always 10 kΩ or higher
- for RHD:
Tester Connection Condition Specified Condition K1-8 (LSSR) - G27-2 (LSWP) Always Below 1 Ω K1-8 (LSSR) - G69-9 (LSWP) Always Below 1 Ω K1-7 (E) - Body ground Always Below 1 Ω K1-8 (LSSR) or G27-2 (LSWP) - Body ground Always 10 kΩ or higher K1-8 (LSSR) or G69-9 (LSWP) - Body ground Always 10 kΩ or higher L1-6 (LSSR) - G27-2 (LSWP)*3 Always Below 1 Ω L1-6 (LSSR) - G69-9 (LSWP)*3 Always Below 1 Ω L1-9 (E) - Body ground*3 Always Below 1 Ω L1-6 (LSSR) - G27-2 (LSWP) - Body ground*3 Always 10 kΩ or higher L1-6 (LSSR) - G69-9 (LSWP) - Body ground*3 Always 10 kΩ or higher M1-6 (LSSR) - G27-2 (LSWP)*3 Always Below 1 Ω M1-6 (LSSR) - G69-9 (LSWP)*3 Always Below 1 Ω M1-9 (E) - Body ground*3 Always Below 1 Ω M1-6 (LSSR) - G27-2 (LSWP) - Body ground*3 Always 10 kΩ or higher M1-6 (LSSR) - G69-9 (LSWP) - Body ground*3 Always 10 kΩ or higher
- Result:
Proceed to OK NG
OK
for LHD:Power Source / Network>POWER DISTRIBUTION>MAIN BODY ECU(for LHD)>REMOVAL
for RHD:Power Source / Network>POWER DISTRIBUTION>MAIN BODY ECU(for RHD)>REMOVAL
NG
Connect the GTS to the DLC3.
Turn the engine switch on (IG).
Turn the GTS on.
Enter the following menus: Body Electrical / Entry&Start / Active Test.
Perform the Active Test according to the display on the GTS.
- Body Electrical > Entry&Start > Active Test
-
Tester Display Measurement Item Control Range Diagnostic Note Wireless Buzzer Operation Wireless door lock buzzer OFF/ON -
- Body Electrical > Entry&Start > Active Test
-
Tester Display Wireless Buzzer Operation - 50004 125 31
- Result:
Result Proceed to Wireless door lock buzzer does not turn on/off A Wireless door lock buzzer turns on/off B
A
B
Disconnect the A38 wireless door lock buzzer connector.
Disconnect the G69 certification ECU (smart key ECU assembly) connector.
Measure the resistance according to the value(s) in the table below.
- Standard Resistance:
Tester Connection Condition Specified Condition A38-1 - G69-2 (BZR) Always Below 1 Ω A38-2 - Body ground Always Below 1 Ω A38-1 or G69-2 (BZR) - Body ground Always 10 kΩ or higher
- Result:
Proceed to OK NG
OK
NG
Replace the wireless door lock buzzer with a new or known good one.
for LHD:Vehicle Interior>DOOR LOCK>WIRELESS DOOR LOCK BUZZER(for LHD)>REMOVAL
for RHD:Vehicle Interior>DOOR LOCK>WIRELESS DOOR LOCK BUZZER(for RHD)>REMOVAL
- Result:
Proceed to NEXT
NEXT
Connect the GTS to the DLC3.
Turn the engine switch on (IG).
Turn the GTS on.
Enter the following menus: Body Electrical / Entry&Start / Active Test.
Perform the Active Test according to the display on the GTS.
- Body Electrical > Entry&Start > Active Test
-
Tester Display Measurement Item Control Range Diagnostic Note Wireless Buzzer Operation Wireless door lock buzzer OFF/ON -
- Body Electrical > Entry&Start > Active Test
-
Tester Display Wireless Buzzer Operation - 50004 125 31
- Result:
Result Proceed to Wireless door lock buzzer does not turn on/off A Wireless door lock buzzer turns on/off B
A
B
Check that the hazard warning lights blink when the hazard warning signal switch is pressed.
- OK:
Hazard warning lights blink.
- Result:
Proceed to OK NG
OK
NG
Disconnect the G11 combination meter assembly connector.
Disconnect the G27 body ECU connector.
Measure the resistance according to the value(s) in the table below.
- Standard Resistance:
Tester Connection Condition Specified Condition G11-2 (HAZ) - G27-6 (HAZ) Always Below 1 Ω G11-2 (HAZ) or G27-6 (HAZ) - Body ground Always 10 kΩ or higher
- Result:
Proceed to OK NG
OK
for LHD:Power Source / Network>POWER DISTRIBUTION>MAIN BODY ECU(for LHD)>REMOVAL
for RHD:Power Source / Network>POWER DISTRIBUTION>MAIN BODY ECU(for RHD)>REMOVAL
NG
Check that the hazard warning lights blink when the hazard warning signal switch is pressed.
- OK:
Hazard warning lights blink.
- Result:
Proceed to OK NG
OK
NG
Disconnect the G11 combination meter assembly connector.
Disconnect the G27 body ECU connector.
Measure the resistance according to the value(s) in the table below.
- Standard Resistance:
Tester Connection Condition Specified Condition G11-2 (HAZ) - G27-6 (HAZ) Always Below 1 Ω G11-2 (HAZ) or G27-6 (HAZ) - Body ground Always 10 kΩ or higher
- Result:
Proceed to OK NG
OK
NG