MIRROR (EXT) OUTER REAR VIEW MIRROR INSTALLATION
CAUTION / NOTICE / HINT
- HINT:
- ·
Use the same procedure for RHD and LHD vehicles.
·The procedure listed below is for LHD vehicles.
·Use the same procedure for the RH and LH sides.
·The procedure listed below is for the LH side.
PROCEDURE

 87940
1.INSTALL OUTER REAR VIEW MIRROR ASSEMBLY LH
w/o Power Mirror Control System:
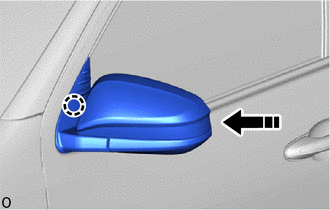

|
Install in this Direction |
Attach the claw and temporarily install the outer rear view mirror assembly LH.
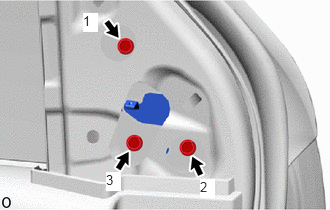
Install the outer rear view mirror assembly LH with the 3 bolts in the order indicated in the illustration.
- Torque:
- 10.5 N*m (107 kgf*cm, 8 ft.*lbf)
- NOTICE:
- ·
When reusing the outer rear view mirror, be sure to temporarily install the screws by hand so that the threads of the mirror are threaded correctly.
·As the threads of the mirror may become stripped, causing the mirror to fall off, do not tighten the screws with more than the specified torque.
·When retightening the screws, do not retighten a screw more than 2 times. However, if the screw is being installed in the same location it was removed from, it is acceptable to retighten it 3 times.
w/ Power Mirror Control System:
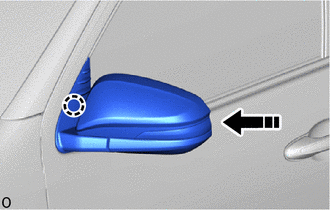
|
|
Install in this Direction |
Attach the claw and temporarily install the outer rear view mirror assembly LH.
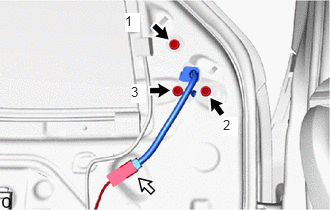

|
Bolt |

|
Connector |
Install the outer rear view mirror assembly LH with the 3 bolts in the order indicated in the illustration.
- Torque:
- 10.5 N*m (107 kgf*cm, 8 ft.*lbf)
- NOTICE:
- ·
When reusing the outer rear view mirror, be sure to temporarily install the screws by hand so that the threads of the mirror are threaded correctly.
·As the threads of the mirror may become stripped, causing the mirror to fall off, do not tighten the screws with more than the specified torque.
·When retightening the screws, do not retighten a screw more than 2 times. However, if the screw is being installed in the same location it was removed from, it is acceptable to retighten it 3 times.
Connect the connector.
67602
2.INSTALL FRONT DOOR TRIM BOARD SUB-ASSEMBLY LH (w/ Power Mirror Control System)
69284C
3.INSTALL FRONT DOOR INSIDE HANDLE BEZEL PLUG LH (w/ Power Mirror Control System)
4.INSTALL POWER WINDOW REGULATOR MASTER SWITCH ASSEMBLY WITH FRONT DOOR ARMREST BASE PANEL (w/ Power Mirror Control System, for Driver Side)
5.INSTALL POWER WINDOW REGULATOR SWITCH ASSEMBLY WITH FRONT DOOR ARMREST BASE PANEL (w/ Power Mirror Control System, for Front Passenger Side)
74220
6.INSTALL FRONT ARMREST ASSEMBLY LH (w/ Power Mirror Control System)
67492A
7.INSTALL FRONT DOOR LOWER FRAME BRACKET GARNISH LH
8.INSPECT POWER MIRROR CONTROL SYSTEM (w/ Power Mirror Control System)