RM3250E
_56
Audio / Visual / Telematics
_057181
TELEMATICS
_0279977
TELEMATICS TRANSCEIVER
A
TELEMATICS TELEMATICS TRANSCEIVER INSTALLATION
PROCEDURE

 86740
1.INSTALL TELEMATICS TRANSCEIVER
a.
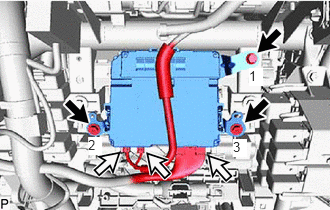
2.594,0.708 2.74,0.896
0.146,0.188
10
true
1
0.917,1.427 1.063,1.615
0.146,0.188
10
true
2
2.427,1.448 2.573,1.635
0.146,0.188
10
true
3
Connect the connectors.
b.
Install the telematics transceiver with the screws.
- HINT:
-
Tighten the screws in the order shown in the illustration.
- Torque:
- 12.5 N*m (127 kgf*cm, 9 ft.*lbf)
55302A
2.INSTALL UPPER INSTRUMENT PANEL SUB-ASSEMBLY
55303B
3.INSTALL LOWER INSTRUMENT PANEL SUB-ASSEMBLY
4.CONNECT CABLE TO NEGATIVE BATTERY TERMINAL
- NOTICE:
-
When disconnecting the cable, some systems need to be initialized after the cable is reconnected (See page General>INTRODUCTION>REPAIR INSTRUCTION>INITIALIZATION).
5.CHECK SRS WARNING LIGHT