1KD-FTV FUEL FUEL INJECTOR INSTALLATION
CAUTION / NOTICE / HINT
- NOTICE:
- ·
When replacing the parts in the following chart (A), replace the No. 1 injection pipe sub-assembly, No. 2 injection pipe sub-assembly, No. 3 injection pipe sub-assembly, No. 4 injection pipe sub-assembly and/or fuel inlet pipe sub-assembly with new ones.
Replaced Parts (A) Pipes Requiring New Replacement ·Injector assembly (including shuffling the injector assemblies between the cylinders)
·Common rail assembly
·Cylinder head sub-assembly
·No. 1 injection pipe sub-assembly
·No. 2 injection pipe sub-assembly
·No. 3 injection pipe sub-assembly
·No. 4 injection pipe sub-assembly
·Supply pump assembly
·Common rail assembly
·Cylinder block sub-assembly
·Cylinder head sub-assembly
·Cylinder head gasket
·Timing Gear Case Assembly
Fuel inlet pipe sub-assembly
·After removing the No. 1 injection pipe sub-assembly, No. 2 injection pipe sub-assembly, No. 3 injection pipe sub-assembly, No. 4 injection pipe sub-assembly and fuel inlet pipe sub-assembly, clean them with a brush and compressed air.
PROCEDURE

 23670
1.INSTALL INJECTOR ASSEMBLY
- NOTICE:
-
Be sure to install each injector assembly, No. 1 nozzle holder clamp and bolt in its original position.
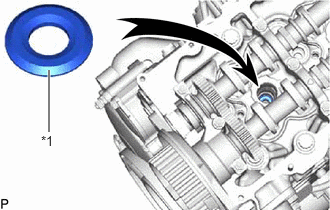
| *1 | Injection Nozzle Seat |
Install 4 new injection nozzle seats to the cylinder head sub-assembly.
Apply a small amount of clean engine oil to 4 new O-rings.
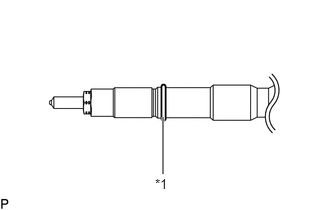
| *1 | O-Ring |
Install an O-ring to each injector assembly as shown in the illustration.
Insert the 4 injector assemblies into the cylinder head sub-assembly.
- NOTICE:
- ·
Insert the injector assembly until it touches the injection nozzle seat surface.
·After installing the injector assembly to the cylinder head sub-assembly, the O-ring may prevent the injector assembly from fully seating. If so, pull out the injector assembly and reinstall it.
·Always return an injector assembly to the same place it was removed from.
For an injector assembly that has been replaced with a new injector assembly, register the injector compensation code.
Click hereEngine / Hybrid System>1KD-FTV ENGINE CONTROL>ECD SYSTEM>REGISTRATION
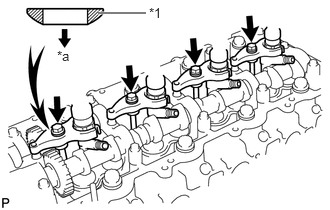
| *1 | Washer |
| *a | Downward |
Temporarily install 4 new washers and the 4 No. 1 nozzle holder clamps to the cylinder head sub-assembly with the 4 bolts.
- NOTICE:
-
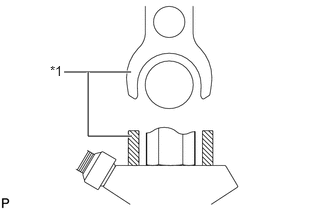 0.667,0.75 1.365,0.75 true 0.917,0.75 0.917,1.417 0.917,1.417 1.375,1.417 true 0.521,0.656 0.833,0.813 0.313,0.156 10 false *1
*1 No. 1 Nozzle Holder Clamp
- ·
The fork portion of the No. 1 nozzle holder clamp must be set on the injector assembly.
·Before tightening the bolts, check that the No. 1 nozzle holder clamps are set properly.
·To fasten the bolts, first tighten them by hand until they cannot be turned further. Then, tighten the bolts to the specified torque in a following step.
·When tightening the bolts, pay attention so as not to tilt the bolt or No. 1 nozzle holder clamp.
·Do not reuse the washer.
·If the nozzle leakage pipe assembly is accidentally tightened beyond the torque specification, it must be replaced.
- HINT:
-
Apply a small amount of engine oil to the threads and under the heads of the bolts.
Temporarily install the 4 injection pipe sub-assemblies to the common rail assembly and injector assembly with the union nuts.
- HINT:
-
To position the injector assemblies, loosely tighten the union nuts.
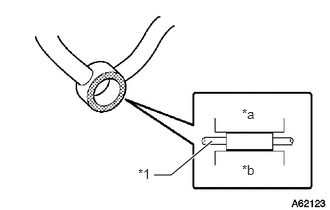
| *1 | Nozzle Leakage Pipe Assembly |
| *a | Union Bolt or Injector Hollow Screw Side |
| *b | Cylinder Head Sub-assembly or Injector Assembly Side |
Check the nozzle leakage pipe assembly. Check that there are no scratches or dents on the 5 union seal surfaces.
If scratches or dents are present, replace the nozzle leakage pipe assembly.
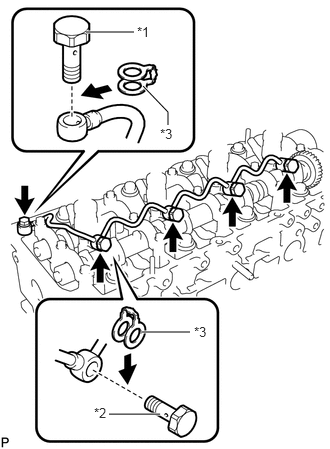
| *1 | Union Bolt |
| *2 | Injector Hollow Screw |
| *3 | Gasket |
Set the nozzle leakage pipe assembly and 5 new gaskets in place.
Apply a small amount of oil to the 4 injector hollow screws and union bolt.
Temporarily install the nozzle leakage pipe assembly to the injector assembly and cylinder head sub-assembly with the 4 injector hollow screws and union bolt.
Tighten the 4 bolts.
- Torque:
- 21.6 N*m (220 kgf*cm, 16 ft.*lbf)
Remove the 4 injection pipe sub-assemblies from the common rail assembly and injector assembly.
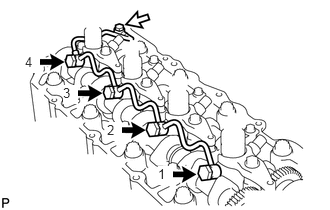
Tighten the 4 injector hollow screws in order from 1 to 4.
- Torque:
- 16 N*m (163 kgf*cm, 12 ft.*lbf)
- NOTICE:
-
If an injector hollow screw is accidentally tightened beyond the torque specification, it must be replaced.
Tighten the union bolt.
- Torque:
- 12.5 N*m (127 kgf*cm, 9 ft.*lbf)
- NOTICE:
-
If the union bolt is accidentally tightened beyond the torque specification, it must be replaced.
2.INSPECT FOR FUEL LEAK
Check that there are no fuel leaks from the nozzle leakage pipe assembly connection.
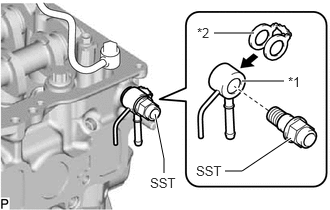
| *1 | No. 2 Nozzle Leakage Pipe |
| *2 | Gasket |
Install the gasket and No. 2 nozzle leakage pipe to the cylinder head sub-assembly with SST (check valve).
- SST
- 09280-00010
- Part No.:
23762-27010 (No. 2 nozzle leakage pipe)
90904-30012 (Gasket)
- Torque:
- 21 N*m (214 kgf*cm, 15 ft.*lbf)
Apply a small amount of soapy water (or other fluid for detecting fuel leakage) on the nozzle leakage pipe assembly connection.
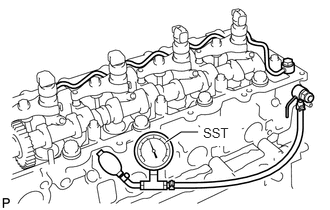
Install SST (turbocharger pressure gauge) to the fuel return side of the No. 2 nozzle leakage pipe and maintain 100 kPa (1.0 kgf/cm2, 15 psi) of pressure for 60 seconds to check that no bubbles form.
- SST
- 09992-00242
- NOTICE:
-
Before checking for leakage, be sure to remove the ball and spring in the check valve.
After checking for fuel leaks, wipe off the soapy water from the No. 2 nozzle leakage pipe connection.
Remove SST, the No. 2 nozzle leakage pipe and gasket.
- NOTICE:
-
Never reinstall the disassembled check valve to the engine.
11201
3.INSTALL CYLINDER HEAD COVER SUB-ASSEMBLY
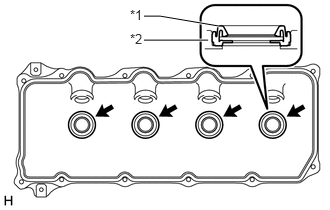
| *1 | No. 3 Cylinder Head Cover Gasket |
| *2 | Cylinder Head Cover Sub-assembly |
Install 4 new No. 3 cylinder head cover gaskets to the cylinder head cover sub-assembly in the directions shown in the illustration.
- NOTICE:
- ·
Do not install the No. 3 cylinder head cover gaskets at an angle.
·Check that there is no foreign matter at the installation location of the No. 3 cylinder head cover gaskets.
Clean and degrease the contact surfaces of the cylinder head cover sub-assembly and cylinder head sub-assembly.
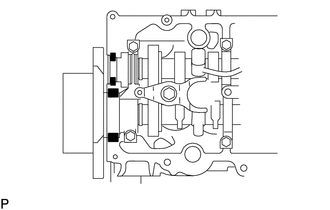

|
Seal Packing |
Apply seal packing to the specific areas shown in the illustration.
- Seal packing:
Toyota Genuine Seal Packing Black, Three Bond 1207B or equivalent
- NOTICE:
- ·
Remove any oil from the contact surface.
·Install the cylinder head cover sub-assembly within 3 minutes after applying seal packing.
·Do not start the engine for at least 2 hours after installing the seal packing.
Install a new cylinder head cover gasket and the cylinder head cover sub-assembly to the cylinder head sub-assembly with the 10 bolts and 2 nuts.
- Torque:
- 9.0 N*m (92 kgf*cm, 80 in.*lbf)
Install 4 new nozzle holder seals to the cylinder head cover sub-assembly.
Connect the PCV hose to the cylinder head cover sub-assembly.
4.CONNECT ENGINE WIRE
for LHD:
Attach the 3 clamps and connect the engine wire to the cylinder head cover sub-assembly.
Install the 3 bolts.
- Torque:
- 13 N*m (133 kgf*cm, 10 ft.*lbf)
Connect the connector to the compressor assembly.
Connect the connector to the engine coolant temperature sensor.
Connect the 4 connectors to the 4 injector assemblies.
Connect the connector to the diesel throttle body assembly.
for RHD:
Attach the clamp and connect the engine wire to the cylinder head cover sub-assembly.
Install the 3 bolts.
- Torque:
- 13 N*m (133 kgf*cm, 10 ft.*lbf)
Connect the connector to the compressor assembly.
Connect the connector to the engine coolant temperature sensor.
Connect the 4 connectors to the 4 injector assemblies.
Connect the connector to the diesel throttle body assembly.
23770
5.INSTALL NO. 2 NOZZLE LEAKAGE PIPE ASSEMBLY
Temporarily install the No. 2 nozzle leakage pipe assembly to the intake manifold with the 2 bolts.
Temporarily install a new gasket and the union bolt to the cylinder head sub-assembly.
Tighten the 2 bolts and union bolt.
- Torque:
- for bolt : 12.7 N*m (130 kgf*cm, 9 ft.*lbf)
- for union bolt : 21 N*m (214 kgf*cm, 15 ft.*lbf)
Connect the fuel hose, No. 1 fuel hose and No. 2 fuel hose to the No. 2 nozzle leakage pipe assembly, and slide the 3 clamps to secure the hoses.
23704
6.INSTALL NO. 4 INJECTION PIPE SUB-ASSEMBLY
- NOTICE:
- ·
When replacing an injector assemblies, it is necessary to replace the No. 1 injection pipe sub-assembly, No. 2 injection pipe sub-assembly, No. 3 injection pipe sub-assembly, No. 4 injection pipe sub-assembly with new ones.
·Keep the joints of the injection pipe sub-assemblies clean.
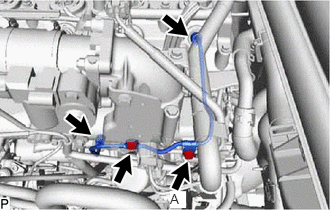
Temporarily install the No. 4 injection pipe sub-assembly to the common rail assembly and injector assembly with the union nuts.
Install the 2 injection pipe clamps to the intake manifold with the 2 bolts.
- Torque:
- 12.7 N*m (130 kgf*cm, 9 ft.*lbf)
- NOTICE:
- ·
If an injection pipe clamp is removed from the No. 4 injection pipe sub-assembly, replace the injection pipe clamp with a new one.
·Make sure that the inner rubbers of the No. 4 injection pipe sub-assembly fit inside the injection pipe clamps.
·When installing the No. 4 injection pipe sub-assembly, check that the inner rubbers and the injection pipe clamps are in their proper positions.
- HINT:
-
Bolt A shown in the illustration secures both the No. 4 injection pipe sub-assembly and No. 2 nozzle leakage pipe assembly.
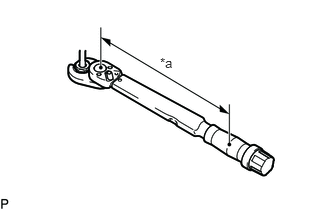
| *a | Torque Wrench Fulcrum Length |
Using a 17 mm union nut wrench, tighten the No. 4 injection pipe sub-assembly union nut on the common rail assembly side.
- Torque:
- Specified tightening torque : 35 N*m (357 kgf*cm, 26 ft.*lbf)
- HINT:
- ·
Calculate the torque wrench reading when changing the fulcrum length of the torque wrench.
Click hereGeneral>INTRODUCTION>REPAIR INSTRUCTION>PRECAUTION
·When using a union nut wrench (fulcrum length of 30 mm (1.18 in.)) + torque wrench (fulcrum length of 180 mm (7.09 in.)): 30 N*m (306 kgf*cm, 22 ft.*lbf)
| *a | Torque Wrench Fulcrum Length |
Using a 17 mm union nut wrench, tighten the No. 4 injection pipe sub-assembly union nuts on the injector assembly side.
- Torque:
- Specified tightening torque : 35 N*m (357 kgf*cm, 26 ft.*lbf)
- HINT:
- ·
Calculate the torque wrench reading when changing the fulcrum length of the torque wrench.
Click hereGeneral>INTRODUCTION>REPAIR INSTRUCTION>PRECAUTION
·When using a union nut wrench (fulcrum length of 30 mm (1.18 in.)) + torque wrench (fulcrum length of 180 mm (7.09 in.)): 30 N*m (306 kgf*cm, 22 ft.*lbf)
23701
7.INSTALL NO. 1, NO. 2 AND NO. 3 INJECTION PIPE SUB-ASSEMBLY
- NOTICE:
- ·
When replacing an injector assemblies, it is necessary to replace the No. 1 injection pipe sub-assembly, No. 2 injection pipe sub-assembly, No. 3 injection pipe sub-assembly, No. 4 injection pipe sub-assembly with new ones.
·Keep the joints of the injection pipe sub-assemblies clean.
Temporarily install the No. 1 injection pipe sub-assembly, No. 2 injection pipe sub-assembly and No. 3 injection pipe sub-assembly to the common rail assembly and injector assembly with the union nuts.
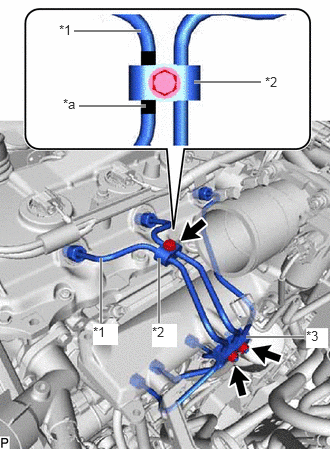
| *1 | No. 1 Injection Pipe Sub-assembly |
| *2 | No. 2 Injection Pipe Clamp |
| *3 | No. 3 Injection Pipe Clamp |
| *a | Painted Mark |
Install the No. 2 injection pipe clamp and No. 3 injection pipe clamp to the No. 1 injection pipe sub-assembly, No. 2 injection pipe sub-assembly and No. 3 injection pipe sub-assembly as shown in the illustration with the bolt and 2 nuts.
- Torque:
- 5.0 N*m (51 kgf*cm, 44 in.*lbf)
- HINT:
-
If the painted mark on the No. 1 injection pipe sub-assembly has disappeared, use the illustration as a reference to install the No. 2 injection pipe clamp.
| *a | Torque Wrench Fulcrum Length |
Using a 17 mm union nut wrench, tighten the injection pipe sub-assembly union nuts on the common rail assembly side.
- Torque:
- Specified tightening torque : 35 N*m (357 kgf*cm, 26 ft.*lbf)
- HINT:
- ·
Calculate the torque wrench reading when changing the fulcrum length of the torque wrench.
Click hereGeneral>INTRODUCTION>REPAIR INSTRUCTION>PRECAUTION
·When using a union nut wrench (fulcrum length of 30 mm (1.18 in.)) + torque wrench (fulcrum length of 180 mm (7.09 in.)): 30 N*m (306 kgf*cm, 22 ft.*lbf)
| *a | Torque Wrench Fulcrum Length |
Using a 17 mm union nut wrench, tighten the injection pipe sub-assembly union nuts on the injector assembly side.
- Torque:
- Specified tightening torque : 35 N*m (357 kgf*cm, 26 ft.*lbf)
- HINT:
- ·
Calculate the torque wrench reading when changing the fulcrum length of the torque wrench.
Click hereGeneral>INTRODUCTION>REPAIR INSTRUCTION>PRECAUTION
·When using a union nut wrench (fulcrum length of 30 mm (1.18 in.)) + torque wrench (fulcrum length of 180 mm (7.09 in.)): 30 N*m (306 kgf*cm, 22 ft.*lbf)
17940D
8.INSTALL INTERCOOLER ASSEMBLY
9.CONNECT CABLE TO NEGATIVE BATTERY TERMINAL
- NOTICE:
-
When disconnecting the cable, some systems need to be initialized after the cable is reconnected.
-
Click hereGeneral>INTRODUCTION>REPAIR INSTRUCTION>INITIALIZATION
10.BLEED AIR FROM FUEL SYSTEM
11.PERFORM REGISTRATION
Perform registration of injector compensation codes.
Click hereEngine / Hybrid System>1KD-FTV ENGINE CONTROL>ECD SYSTEM>REGISTRATION
Perform registration of pilot quantity learning.
Click hereEngine / Hybrid System>1KD-FTV ENGINE CONTROL>ECD SYSTEM>REGISTRATION
12.INSPECT FOR FUEL LEAK
13.INSPECT FOR OIL LEAK
14.INSPECT ENGINE OIL LEVEL