STEERING GEAR / LINKAGE STEERING GEAR INSTALLATION
PROCEDURE

 1.ADJUST TIE ROD END SUB-ASSEMBLY
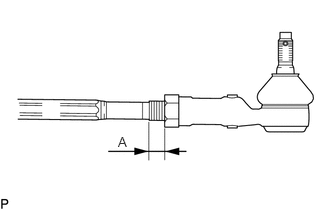
Adjust the tie rod end sub-assembly LH and RH so that distance A is within the specified ranges.
- Standard Length (A):
17 mm (0.6693 in.) or less
- CAUTION:
-
Make sure to tighten the nut in the alignment adjustment procedure.
- NOTICE:
-
Make sure that the boots are not twisted.
- HINT:
- ·
The values listed above are reference values.
·The toe-in is adjusted in another step.
2.INSTALL POWER STEERING LINK ASSEMBLY
Install the power steering link assembly with the 2 bolts, 2 washers and 2 nuts.
- Torque:
- 130 N*m (1326 kgf*cm, 96 ft.*lbf)
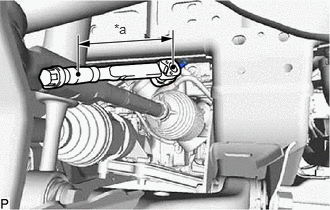
| *a | Torque Wrench Fulcrum Length |
Using a union nut wrench, connect the steering gear outlet return tube.
- Torque:
- Specified tightening torque : 25 N*m (255 kgf*cm, 18 ft.*lbf)
- HINT:
- ·
Calculate the torque wrench reading when changing the fulcrum length of the torque wrench.
Click hereGeneral>INTRODUCTION>REPAIR INSTRUCTION>PRECAUTION
·When using a union nut wrench (fulcrum length of 30 mm (1.1811 in.)) + torque wrench (fulcrum length of 180 mm (7.0866 in.)): 21.4 N*m (218 kgf*cm, 16 ft.*lbf)
Install the hose with the clip.
Install the pressure feed tube assembly bracket to the power steering link assembly with the bolt.
- Torque:
- 28 N*m (286 kgf*cm, 21 ft.*lbf)
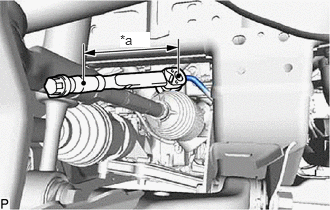
| *a | Torque Wrench Fulcrum Length |
Using a union nut wrench, tighten the flare nut and connect the pressure feed tube assembly.
- Torque:
- Specified tightening torque : 25 N*m (255 kgf*cm, 18 ft.*lbf)
- HINT:
- ·
Calculate the torque wrench reading when changing the fulcrum length of the torque wrench.
Click hereGeneral>INTRODUCTION>REPAIR INSTRUCTION>PRECAUTION
·When using a union nut wrench (fulcrum length of 30 mm (1.1811 in.)) + torque wrench (fulcrum length of 180 mm (7.0866 in.)): 21.4 N*m (218 kgf*cm, 16 ft.*lbf)
41110F
3.INSTALL FRONT DIFFERENTIAL CARRIER ASSEMBLY
45203
4.CONNECT NO. 2 STEERING INTERMEDIATE SHAFT SUB-ASSEMBLY
Align the matchmarks on the No. 2 steering intermediate shaft sub-assembly and power steering link assembly.
Install the bolt.
- Torque:
- 35 N*m (357 kgf*cm, 26 ft.*lbf)
45219
5.CONNECT STEERING SLIDING YOKE
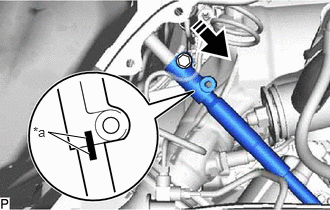
| *a | Matchmark |

|
Install in this Direction |
Align the matchmarks on the steering sliding yoke and No. 2 steering intermediate shaft, and connect the steering sliding yoke to the No. 2 steering intermediate shaft sub-assembly.
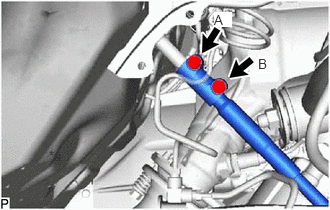
Install the bolt labeled B.
- Torque:
- 35 N*m (357 kgf*cm, 26 ft.*lbf)
Tighten the bolt labeled A.
- Torque:
- 35 N*m (357 kgf*cm, 26 ft.*lbf)
45047
6.CONNECT TIE ROD END SUB-ASSEMBLY LH
Connect the tie rod end sub-assembly LH to the front axle hub assembly with a new nut.
- Torque:
- 91 N*m (928 kgf*cm, 67 ft.*lbf)
Install a new cotter pin.
- NOTICE:
-
If the holes for the cotter pin are not aligned, tighten the nut an additional 60°.
45046
7.CONNECT TIE ROD END SUB-ASSEMBLY RH
- HINT:
-
Use the same procedure described for the LH side.
51442
8.INSTALL NO. 2 ENGINE UNDER COVER
51410
9.INSTALL NO. 1 NGINE UNDER COVER ASSEMBLY
10.INSTALL FRONT WHEELS
11.ADD POWER STEERING FLUID
12.ADJUST POWER STEERING FLUID
13.CHECK FOR POWER STEERING FLUID LEAK
14.ADJUST FRONT WHEEL ALIGNMENT