AUDIO / VIDEO RADIO RECEIVER REMOVAL
CAUTION / NOTICE / HINT
The necessary procedures (adjustment, calibration, initialization or registration) that must be performed after parts are removed, installed or replaced during the radio receiver removal/installation are shown below.
| Replacement Part or Procedure | Necessary Procedures | Effects/Inoperative when not Performed | Link |
|---|---|---|---|
| Disconnect cable from negative battery terminal | w/ Power Back Door System:
Reset back door close position |
Power back door system | ( ) |
- CAUTION:
-
-
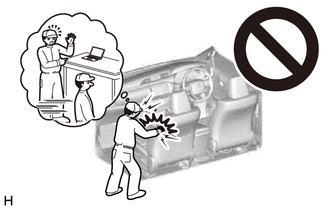
Some of these service operations affect the SRS airbag system. Read the precautionary notices concerning the SRS airbag system before servicing.
-
Click hereVehicle Exterior>DOOR / HATCH>POWER BACK DOOR SYSTEM>INITIALIZATION
PROCEDURE

 1. PRECAUTION
- NOTICE:
-
After turning the ignition switch off, waiting time may be required before disconnecting the cable from the battery terminal. Therefore, make sure to read the disconnecting the cable from the battery terminal notice before proceeding with work (Click here General>INTRODUCTION>REPAIR INSTRUCTION>PRECAUTION).
2.DISCONNECT CABLE FROM NEGATIVE BATTERY TERMINAL
- CAUTION:
-
Wait at least 90 seconds after disconnecting the cable from the negative (-) battery terminal to disable the SRS system.
- NOTICE:
-
When disconnecting the cable, some systems need to be initialized after the cable is reconnected (Click here General>INTRODUCTION>REPAIR INSTRUCTION>INITIALIZATION).
55667
3.REMOVE INSTRUMENT PANEL REGISTER BEZEL GARNISH
55011A
4.REMOVE NO. 1 INSTRUMENT PANEL GARNISH SUB-ASSEMBLY
55012A
5.REMOVE NO. 2 INSTRUMENT PANEL GARNISH SUB-ASSEMBLY
55405B
6.REMOVE CENTER INSTRUMENT CLUSTER FINISH PANEL SUB-ASSEMBLY
86120
7.REMOVE RADIO RECEIVER ASSEMBLY WITH BRACKET
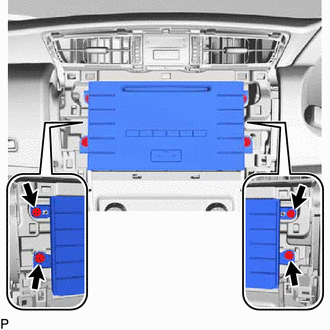
Remove the 4 screws.
Pull out the radio receiver assembly with bracket.
Disconnect all the connectors and remove the radio receiver assembly with bracket.
86211
8.REMOVE NO. 1 RADIO BRACKET
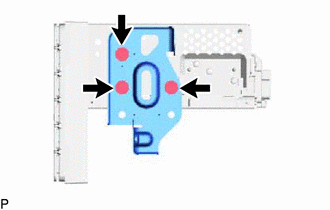
Remove the 3 screws and No. 1 radio bracket from the radio receiver assembly.
86212
9.REMOVE NO. 2 RADIO BRACKET
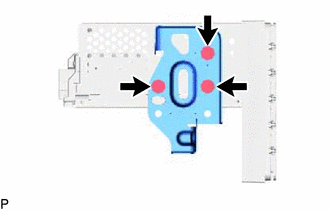
Remove the 3 screws and No. 2 radio bracket from the radio receiver assembly.
86120
10.REMOVE RADIO RECEIVER ASSEMBLY
86140A
11.REMOVE RADIO AND DISPLAY RECEIVER ASSEMBLY WITH BRACKET
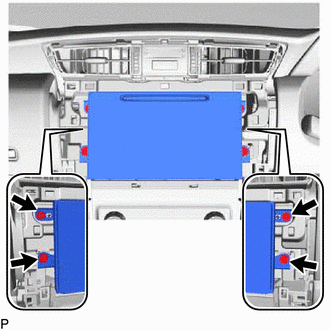
Remove the 4 screws.
Pull out the radio and display receiver assembly with bracket.
Disconnect all the connectors and remove the radio and display receiver assembly with bracket.
86211
12.REMOVE NO. 1 RADIO BRACKET
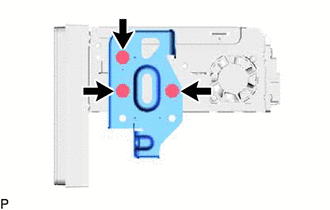
Remove the 3 screws and No. 1 radio bracket from the radio and display receiver assembly.
86212
13.REMOVE NO. 2 RADIO BRACKET
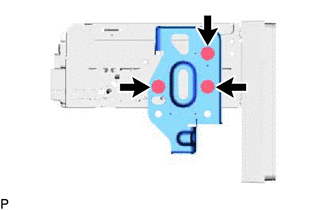
Remove the 3 screws and No. 2 radio bracket from the radio and display receiver assembly.
86140A
14.REMOVE RADIO AND DISPLAY RECEIVER ASSEMBLY