BRAKE CONTROL / DYNAMIC CONTROL SYSTEMS BRAKE ACTUATOR INSTALLATION
PROCEDURE

 44510
1.INSTALL BRAKE ACTUATOR ASSEMBLY
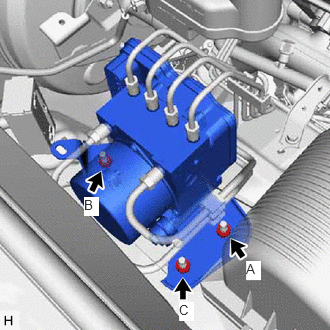
Install the brake actuator with bracket with the 3 nuts.
- Torque:
- 19.1 N*m (195 kgf*cm, 14 ft.*lbf)
- NOTICE:
- ·
Tighten the 3 nuts uniformly in alphabetical order.
·Be careful not to damage the brake tubes.
·Do not drop the actuator. If dropped, replace it.
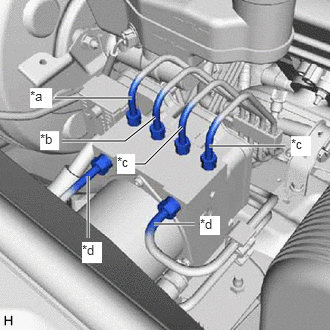
| *a | To Front Wheel Cylinder RH |
| *b | To Front Wheel Cylinder LH |
| *c | To Rear Wheel Cylinder |
| *d | From Master Cylinder |
Set each brake line in the correct position on the brake actuator as shown in the illustration.
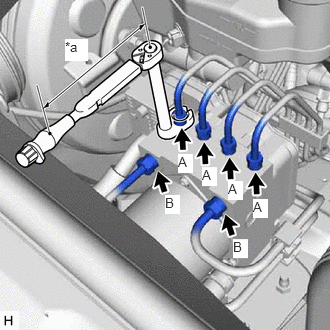
| *a | Torque Wrench Fulcrum Length |
Temporarily install the 6 brake lines to the correct position on the brake actuator assembly as shown in the illustration.
Using a union nut wrench, tighten each brake line.
- Specified tightening torque:
- for flare nut A:
15.2 N*m (155 kgf*cm, 11 ft.*lbf)
- for flare nut B:
19.5 N*m (199 kgf*cm, 14 ft.*lbf)
- HINT:
- ·
Calculate the torque wrench reading when changing the fulcrum length of the torque wrench.
Click hereGeneral>INTRODUCTION>REPAIR INSTRUCTION>PRECAUTION
·for flare nut A
When using a union nut wrench (fulcrum length of 22 mm (0.8661 in.)) + torque wrench (fulcrum length of 162 mm (6.3779 in.)): 13.4 N*m (137 kgf*cm, 10 ft.*lbf).
·for flare nut B
When using a union nut wrench (fulcrum length of 22 mm (0.8661 in.)) + torque wrench (fulcrum length of 162 mm (6.3779 in.)): 17.2 N*m (175 kgf*cm, 13 ft.*lbf)
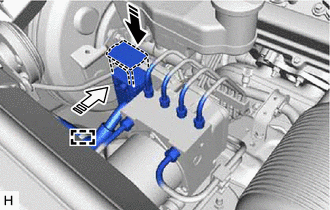

|
Connector Connected |

|
Lock Lever Locked |
Connect the connector to the brake actuator assembly and lock the lock lever.
- NOTICE:
- ·
Make sure that the connector is locked securely.
·Make sure that the actuator connector can be connected smoothly. Do not allow water, oil or dirt to enter the connector.
Attach the clamp to the brake actuator bracket assembly.
2.BLEED BRAKE SYSTEM
3.CONNECT CABLE TO NEGATIVE BATTERY TERMINAL
- NOTICE:
-
When disconnecting the cable, some systems need to be initialized after the cable is reconnected.
-
Click hereGeneral>INTRODUCTION>REPAIR INSTRUCTION>INITIALIZATION
4. YAW RATE AND ACCELERATION SENSOR ZERO POINT CALIBRATION AND STORE SYSTEM INFORMATION
5.CHECK BRAKE ACTUATOR WITH GTS