5L-E COOLING RADIATOR INSTALLATION
PROCEDURE

 16400B
1.INSTALL RADIATOR DRAIN COCK PLUG
Install a new O-ring to the radiator drain cock plug.
Install the radiator drain cock plug to the radiator assembly.
16400
2.INSTALL RADIATOR ASSEMBLY
Temporarily install the radiator assembly to the vehicle.
Attach the 2 guides and 2 claws to connect the cooler condenser assembly to the radiator assembly.
- NOTICE:
- ·
Do not apply any excessive force to the cooler condenser assembly and cooler pipe.
·Do not allow the radiator assembly to interfere with other parts.
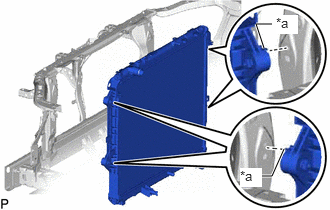
| *a | Claw |
Hook the claw of the radiator assembly as shown in the illustration.
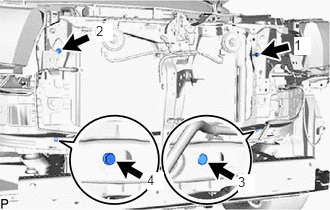
Install the radiator assembly with the 4 bolts in the order shown in the illustration.
- Torque:
- 22 N*m (224 kgf*cm, 16 ft.*lbf)
16572D
3.CONNECT NO. 2 RADIATOR HOSE
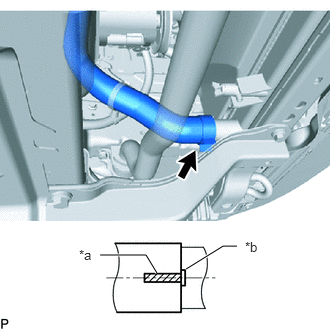
| *a | Paint Mark |
| *b | Protrusion |
Connect the No. 2 radiator hose to the radiator assembly and slide the hose clamp to secure the hose.
- NOTICE:
-
Connect the No. 2 radiator hose so that the paint mark on the No. 2 radiator hose is aligned with the protrusions of the radiator assembly as shown in the illustration.
16711
4.INSTALL FAN SHROUD
Install the fan pulley to the engine water pump assembly.
Place the fan shroud together with the fluid coupling assembly between the engine and radiator assembly.
- NOTICE:
-
Do not allow the radiator assembly to interfere with other parts.
Temporarily install the fluid coupling assembly to the engine water pump assembly with the 4 nuts.
- NOTICE:
- ·
Make sure to match the paint mark colors on the fan with fluid coupling assembly with the stud bolts of the same color on the engine water pump assembly.
·When installing the fan and generator V belt, make sure to securely tighten the nuts of the fan with fluid coupling assembly so that the fan pulley is properly aligned.
Attach the 2 guides and 2 claws to install the fan shroud to the radiator assembly.
Install the fan and generator V belt.
Click hereEngine / Hybrid System>5L-E ENGINE MECHANICAL>DRIVE BELT>INSTALLATION
Tighten the 4 nuts holding the fan with fluid coupling assembly.
- Torque:
- 18.5 N*m (189 kgf*cm, 14 ft.*lbf)
Attach the 2 wire harness clamps.
16470
5.INSTALL RADIATOR RESERVOIR
Install the radiator reservoir with the 2 bolts.
- Torque:
- 5.0 N*m (51 kgf*cm, 44 in.*lbf)
Connect the reservoir hose and attach the 2 clamps to the fan shroud.
44369A
6.INSTALL OIL RESERVOIR BRACKET
Temporarily install the oil reservoir bracket with the 3 bolts and tighten the 3 bolts.
- Torque:
- 4.5 N*m (46 kgf*cm, 40 in.*lbf)
44360
7.CONNECT VANE PUMP OIL RESERVOIR ASSEMBLY
Attach the claw to connect the vane pump oil reservoir assembly to the oil reservoir bracket.
Attach the clamp to connect the pressure feed tube assembly to the fan shroud.
16571C
8.INSTALL NO. 1 RADIATOR HOSE
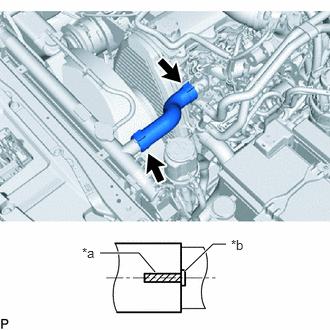
| *a | Paint Mark |
| *b | Protrusion |
Install the No. 1 radiator hose and slide the 2 hose clamps to secure the hose.
- NOTICE:
-
Connect the No. 1 radiator hose so that the paint mark on the No. 1 radiator hose is aligned with the protrusions of the radiator assembly and water outlet as shown in the illustration.
9.ADD ENGINE COOLANT
10.INSPECT FOR COOLANT LEAK
51410
11.INSTALL NO. 1 ENGINE UNDER COVER ASSEMBLY
53293C
12.INSTALL RADIATOR SIDE DEFLECTOR