2KD-FTV INTAKE / EXHAUST EXHAUST MANIFOLD W/ TURBOCHARGER INSTALLATION
PROCEDURE

 17141
1.TEMPORARILY INSTALL EXHAUST MANIFOLD
Install a new gasket and the turbocharger sub-assembly with 3 new nuts to the exhaust manifold.
- Torque:
- 52 N*m (530 kgf*cm, 38 ft.*lbf)
Temporarily install the exhaust manifold with turbocharger sub-assembly and the 8 plate washers to the cylinder head sub-assembly with 8 new nuts.
17141
2.INSTALL EXHAUST MANIFOLD
Temporarily install the turbo oil pipe sub-assembly and manifold stay.
- HINT:
-
Wash the oil pipe before installing it.
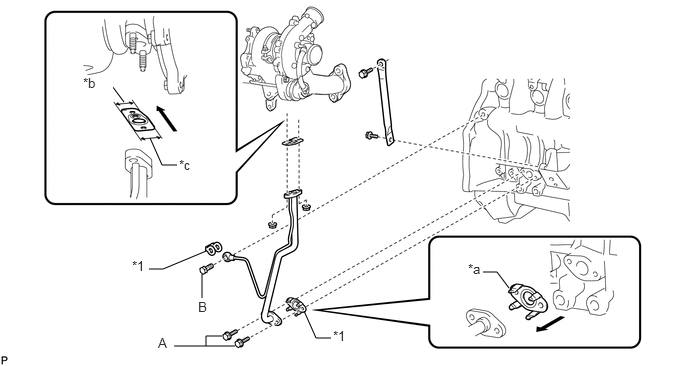
| *1 | Gasket | - | - |
| *a | Claw | *b | Narrow |
| *c | Wide | - | - |

|
Outside | - | - |
Temporarily install a new gasket and the turbo oil pipe sub-assembly with the 2 nuts, but only loosely install the nuts.
- NOTICE:
-
The notch (wide part) of the gasket must face the engine.
Temporarily install a new gasket and the turbo oil pipe sub-assembly with the 2 bolts (labeled: A), but only loosely install the bolts.
- NOTICE:
-
The claws of the gasket must face the turbo oil pipe sub-assembly.
Temporarily install a new gasket and the turbo oil pipe sub-assembly with the union bolt (labeled: B), but only loosely install the union bolt.
Temporarily install the manifold stay with the 2 bolts.
- HINT:
-
The manifold stay's indented area must face the turbocharger sub-assembly.
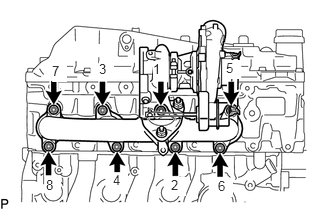
Tighten the exhaust manifold with turbocharger sub-assembly, to the cylinder head sub-assembly with 8 nuts.
- Torque:
- 40 N*m (408 kgf*cm, 30 ft.*lbf)
- HINT:
-
Tighten the nuts in the order shown in the illustration.
Tighten the 2 nuts and union bolt of the turbo oil inlet pipe sub-assembly, and the 2 bolts.
- Torque:
- for nut : 13 N*m (133 kgf*cm, 10 ft.*lbf)
- for union bolt : 26 N*m (265 kgf*cm, 19 ft.*lbf)
- for bolt : 12 N*m (122 kgf*cm, 9 ft.*lbf)
Tighten the 2 bolts and the manifold stay.
- Torque:
- 19 N*m (194 kgf*cm, 14 ft.*lbf)
17291
3.INSTALL TURBINE OUTLET ELBOW
Temporarily install the turbocharger stay to the turbine outlet elbow with the 2 bolts.
Temporarily install a new gasket and the turbine outlet elbow (with turbocharger stay) to the turbocharger sub-assembly with the 4 new nuts.
Temporarily install the turbocharger stay to the cylinder block sub-assembly with the 2 bolts.
Tighten the 4 nuts of the turbocharger sub-assembly.
- Torque:
- 25.5 N*m (260 kgf*cm, 19 ft.*lbf)
Tighten the 4 bolts of the turbocharger stay.
- Torque:
- 38 N*m (387 kgf*cm, 28 ft.*lbf)
17410
4.INSTALL FRONT EXHAUST PIPE ASSEMBLY
17113E
5.INSTALL NO. 1 INTAKE PIPE
12278
6.INSTALL PCV HOSE HEAT INSULATOR
Install the PCV hose heat insulator with the 2 bolts.
- Torque:
- 12 N*m (122 kgf*cm, 9 ft.*lbf)
17701
7.INSTALL AIR CLEANER CASE SUB-ASSEMBLY
Install the air cleaner case sub-assembly with the 3 bolts.
- Torque:
- 6.0 N*m (61 kgf*cm, 53 in.*lbf)
Connect the 3 wire harness clamps.
17801
8.INSTALL AIR CLEANER FILTER ELEMENT SUB-ASSEMBLY
Install the air cleaner filter element sub-assembly to the air cleaner case sub-assembly.
17705
9.INSTALL AIR CLEANER CAP SUB-ASSEMBLY WITH AIR CLEANER HOSE
Attach the 4 clips to install the air cleaner cap sub-assembly with air cleaner hose.
Tighten the hose clamp.
- Torque:
- 4.0 N*m (41 kgf*cm, 35 in.*lbf)
Attach the clamp and connect the intake air temperature sensor connector.
10.CONNECT CABLE TO NEGATIVE BATTERY TERMINAL
- NOTICE:
-
When disconnecting the cable, some systems need to be initialized after the cable is reconnected.
-
Click hereGeneral>INTRODUCTION>REPAIR INSTRUCTION>INITIALIZATION
11.INSPECT FOR OIL LEAK
12.INSPECT ENGINE OIL LEVEL
51442
13.INSTALL NO. 2 ENGINE UNDER COVER
51441
14.INSTALL NO. 1 ENGINE UNDER COVER