DRIVE SHAFT / PROPELLER SHAFT PROPELLER SHAFT ASSEMBLY(for TMEE (AAV) Made) REASSEMBLY
CAUTION / NOTICE / HINT
- NOTICE:
- ·
When using a vise, place aluminum plates between the part and vise.
·When using a vise, do not overtighten it.
PROCEDURE

 37230
1.INSTALL CENTER NO. 1 SUPPORT BEARING ASSEMBLY
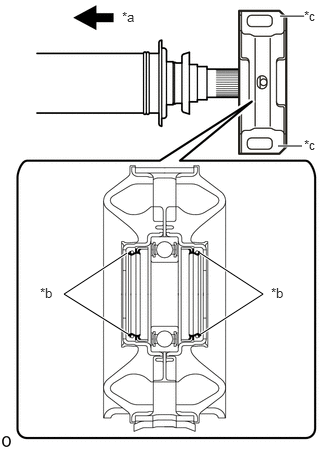
| *a | Front Side |
| *b | Seal |
| *c | Cutout |
Install the center No. 1 support bearing assembly to the intermediate shaft.
- NOTICE:
- ·
Carefully insert the part so that the seal does not invert.
·Make sure to install the part so that the cutouts face the rear of the vehicle.
Install the 2 washers.
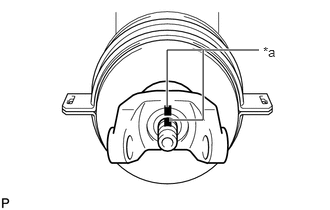
| *a | Matchmark |
Align the matchmarks on the center yoke and intermediate shaft, and then install the yoke to the shaft.
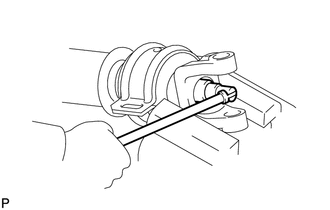
Install a new nut.
- Torque:
- 73.6 N*m (751 kgf*cm, 54 ft.*lbf)
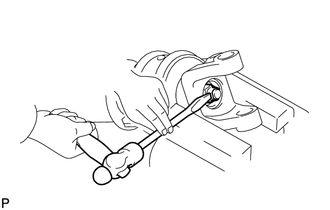
Using a chisel and hammer, stake the lock nut.
- NOTICE:
- ·
Fully stake the lock nut along the entire groove.
·Do not damage the threads of the intermediate shaft.
2.INSTALL SPIDER BEARING
- HINT:
-
Use the same procedure for all spiders.
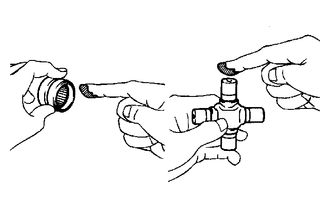
Apply grease to a new spider and new 4 spider bearings.
- Grease:
Lithium base chassis grease NLGI No. 2
- NOTICE:
-
Do not apply too much grease.
Install the spider to the flange yoke.
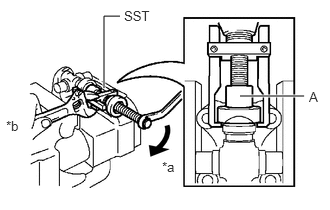
| *a | Turn |
| *b | Hold |
Using SST, install 2 of the spider bearings to the spider.
- SST
- 09332-25010
- HINT:
-
Before installing SST, sufficiently raise the part labeled A. If the part labeled A is too low, it may be difficult to install SST.
Using SST, adjust both spider bearings so that the snap ring grooves are as wide as possible and equal in width.
- SST
- 09332-25010
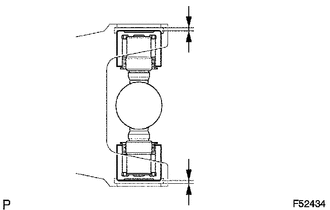
Install 2 new snap rings to the installed spider bearings. The snap rings must have equal thickness and allow 0 to 0.05 mm (0 to 0.00196 in.) of axial play.
- NOTICE:
-
While the installed snap rings should have equal thickness, if the axial play is greater than 0.05 mm (0.00196 in.), select 2 snap rings that have as close to the same thickness as possible.
- HINT:
-
Do not reuse the snap rings.
- Standard Snap Ring Thickness:
Part No. Mark Thickness 90520-T0007 F 2.18 to 2.20 mm (0.0859 to 0.0866 in.) 90520-T0008 G 2.20 to 2.22 mm (0.0867 to 0.0874 in.) 90520-T0009 H 2.22 to 2.24 mm (0.0875 to 0.0881 in.) 90520-T0010 J 2.24 to 2.26 mm (0.0882 to 0.0889 in.) 90520-T0011 K 2.26 to 2.28 mm (0.0890 to 0.0897 in.) 90520-T0012 1 2.28 to 2.30 mm (0.0898 to 0.0905 in.) 90520-T0013 2 2.30 to 2.32 mm (0.0906 to 0.0913 in.) 90520-T0014 3 2.32 to 2.34 mm (0.0914 to 0.0921 in.) 90520-T0015 4 2.34 to 2.36 mm (0.0922 to 0.0929 in.) 90520-T0016 5 2.36 to 2.38 mm (0.0930 to 0.0937 in.) 90520-T0017 6 2.38 to 2.40 mm (0.0938 to 0.0944 in.) 90520-T0018 7 2.40 to 2.42 mm (0.0945 to 0.0952 in.) 90520-T0019 8 2.42 to 2.44 mm (0.0953 to 0.0960 in.) 90520-T0020 N 2.44 to 2.46 mm (0.0961 to 0.0968 in.) 90520-T0021 10 2.46 to 2.48 mm (0.0969 to 0.0976 in.) 90520-T0022 A 2.48 to 2.50 mm (0.0977 to 0.0984 in.) 90520-T0023 B 2.50 to 2.52 mm (0.0985 to 0.0992 in.) 90520-T0024 C 2.52 to 2.54 mm (0.0993 to 0.0999 in.) 90520-T0025 D 2.54 to 2.56 mm (0.1000 to 0.1007 in.) 90520-T0026 E 2.56 to 2.58 mm (0.1008 to 0.1015 in.)
- NOTICE:
- ·
While the installed snap rings should have equal thickness, if the axial play is greater than 0.05 mm (0.00196 in.), select 2 snap rings that have as close to the same thickness as possible.
·Use a new snap ring.
·Use a snap ring with as close to the same thickness as possible on both ends.
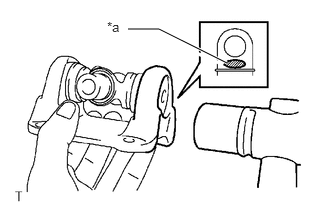
| *a | Hammering Point |
Using a hammer, tap the flange yoke until there is no clearance between the spider bearing outer race and snap ring.
- HINT:
-
Install the spider bearing on the sleeve side using the procedure described above.
Align the matchmarks on the flange yoke and propeller shaft.
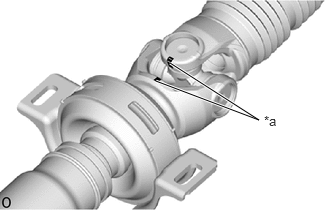
| *a | Matchmark |
Align the matchmarks on the center yoke and sleeve yoke.
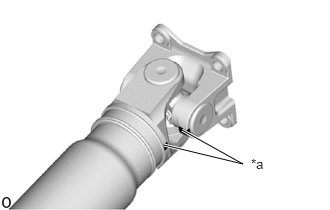
| *a | Matchmark |
Align the matchmarks on the flange yoke and intermediate shaft.
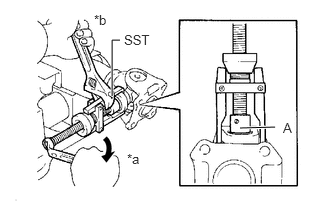
| *a | Turn |
| *b | Hold |
Using SST, install the 2 spider bearings to the spider.
- SST
- 09332-25010
- HINT:
-
Before installing SST, sufficiently raise the part labeled A. If the part labeled A is too low, it may be difficult to install SST.
Using SST, adjust both spider bearings so that the front propeller shaft joint spider bearing snap ring grooves are as wide as possible and equal in width.
- SST
- 09332-25010
Install 2 new snap rings to the installed spider bearings. The snap rings must have equal thickness and allow 0 to 0.05 mm (0 to 0.00196 in.) of axial play.
- NOTICE:
-
While the installed snap rings should have equal thickness, if the axial play is greater than 0.05 mm (0.00196 in.), select 2 snap rings that have as close to the same thickness as possible.
- HINT:
-
Do not reuse the snap rings.
- Standard Snap Ring Thickness:
Part No. Mark Thickness 90520-T0007 F 2.18 to 2.20 mm (0.0859 to 0.0866 in.) 90520-T0008 G 2.20 to 2.22 mm (0.0867 to 0.0874 in.) 90520-T0009 H 2.22 to 2.24 mm (0.0875 to 0.0881 in.) 90520-T0010 J 2.24 to 2.26 mm (0.0882 to 0.0889 in.) 90520-T0011 K 2.26 to 2.28 mm (0.0890 to 0.0897 in.) 90520-T0012 1 2.28 to 2.30 mm (0.0898 to 0.0905 in.) 90520-T0013 2 2.30 to 2.32 mm (0.0906 to 0.0913 in.) 90520-T0014 3 2.32 to 2.34 mm (0.0914 to 0.0921 in.) 90520-T0015 4 2.34 to 2.36 mm (0.0922 to 0.0929 in.) 90520-T0016 5 2.36 to 2.38 mm (0.0930 to 0.0937 in.) 90520-T0017 6 2.38 to 2.40 mm (0.0938 to 0.0944 in.) 90520-T0018 7 2.40 to 2.42 mm (0.0945 to 0.0952 in.) 90520-T0019 8 2.42 to 2.44 mm (0.0953 to 0.0960 in.) 90520-T0020 N 2.44 to 2.46 mm (0.0961 to 0.0968 in.) 90520-T0021 10 2.46 to 2.48 mm (0.0969 to 0.0976 in.) 90520-T0022 A 2.48 to 2.50 mm (0.0977 to 0.0984 in.) 90520-T0023 B 2.50 to 2.52 mm (0.0985 to 0.0992 in.) 90520-T0024 C 2.52 to 2.54 mm (0.0993 to 0.0999 in.) 90520-T0025 D 2.54 to 2.56 mm (0.1000 to 0.1007 in.) 90520-T0026 E 2.56 to 2.58 mm (0.1008 to 0.1015 in.)
- NOTICE:
- ·
While the installed snap rings should have equal thickness, if the axial play is greater than 0.05 mm (0.00196 in.), select 2 snap rings that have as close to the same thickness as possible.
·Use a new snap ring.
·Use a snap ring with as close to the same thickness as possible on both ends.
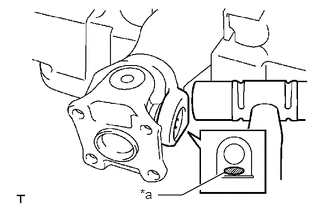
| *a | Hammering Point |
Using a hammer, tap the propeller shaft until there is no clearance between the spider bearing outer race and snap ring.
- HINT:
-
Install the spider bearing on the sleeve side using the procedure described above.
42345A
3.INSTALL REAR PROPELLER SHAFT BOOT CLAMP (for 4WD)
Temporarily install a new rear sliding shaft boot to the propeller shaft with 2 new rear propeller shaft boot clamps.
Coat the splines of the propeller shaft with MP grease.
- Standard grease capacity:
27.5 to 32.5 g (0.97 to 1.14 oz)
Align the matchmarks on the propeller shaft and sleeve yoke.
Install the sleeve yoke to the propeller shaft and connect the rear sliding shaft boot.
Align the matchmarks on the propeller shaft, sleeve yoke and the pinching portions of the 2 rear propeller shaft boot clamps.
- HINT:
-
Make sure to align the matchmarks of the propeller shaft boot clamp.
-
If the pinching portions are installed at different locations than where they were located before disassembly, the rotational balance of the propeller shaft cannot be ensured, which may result in vibrations and noise.
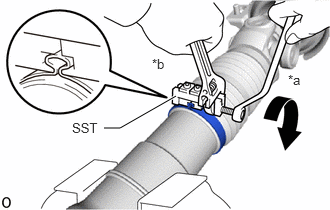
| *a | Turn |
| *b | Hold |
Secure one of the rear propeller shaft boot clamps to the rear sliding shaft boot.
- HINT:
- ·
Use the same procedure for each rear propeller shaft boot clamp.
·Make sure that the matchmarks of the pinching portion of the rear propeller shaft boot clamp are aligned.
Install SST to the rear propeller shaft boot clamp, and then while pressing the rear sliding shaft boot, slightly tighten the SST bolt.
- SST
- 09521-24010
- NOTICE:
- ·
Correctly set the rear propeller shaft boot clamp to the guide groove.
·Do not damage the rear sliding shaft boot.
Tighten SST so that the rear propeller shaft boot clamp is pinched.
- Standard clearance:
3.8 mm (0.150 in.) or less
- NOTICE:
- ·
When tightening SST, make sure the clearance of the rear propeller shaft boot clamp is within the standard clearance.
·Do not damage the rear sliding shaft boot.
Remove SST from the rear propeller shaft boot clamp.
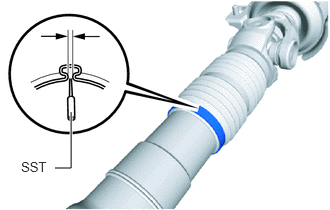
Using SST, measure the clearance of the rear propeller shaft boot clamp.
- SST
- 09240-00020
- Standard clearance:
3.8 mm (0.150 in.) or less
- NOTICE:
-
If the measured value exceeds the specified value, retighten the rear propeller shaft boot clamp.
4.INSPECT PROPELLER SHAFT GREASE FITTING DIRECTION
- HINT:
- ·
When replacing a spider bearing, be sure that the grease fitting hole is facing the direction shown in the illustration.
·Fill the grease fittings with grease.
- Grease:
Lithium base chassis grease NLGI No. 2
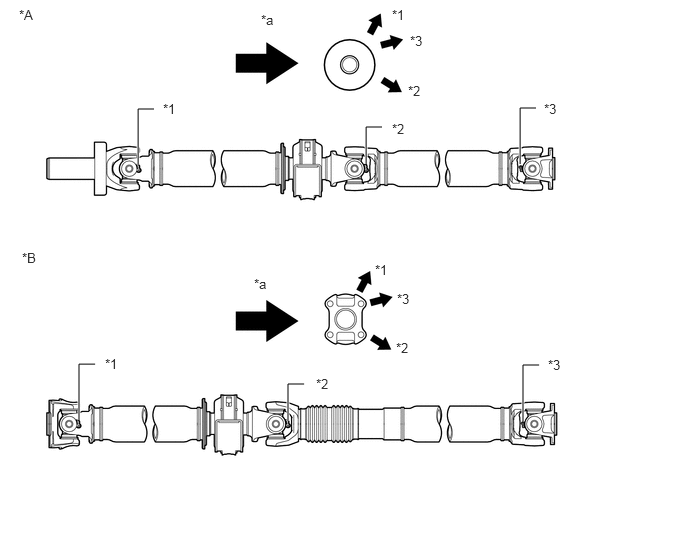
| *A | for Pre-Runner | *B | for 4WD |
| *1 | No. 1 Grease Fitting | *2 | No. 2 Grease Fitting |
| *3 | No. 3 Grease Fitting | - | - |
| *a | Rear Side | - | - |
5.INSPECT SPIDER