INSTALLATION
Removal / installation · Vehicles built from Aug 2014
Versions by build date: Aug 2013 – Jul 2014 from Aug 2014
| 1. INSTALL GENERATOR ASSEMBLY |

Install the generator with the 3 bolts.
- Torque:
- 43 N*m{ 438 kgf*cm , 32 ft.*lbf }
Install the generator wire to terminal B with the nut.
- Torque:
- 9.8 N*m{ 100 kgf*cm , 87 in.*lbf }
Install the terminal cap.
Connect the generator connector.
| 2. INSTALL FAN AND GENERATOR V BELT |
Install the V belt to all the pulleys except the drive belt tensioner pulley.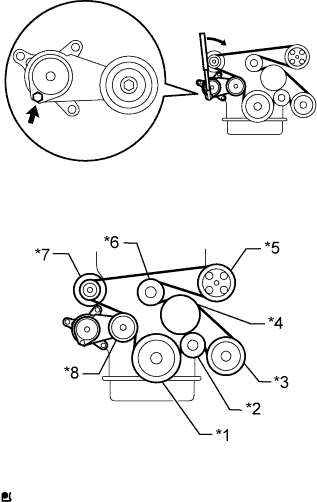

Text in Illustration *1
Crankshaft Pulley
*2
Idler Pulley
*3
Cooler Compressor
*4
Fan Pulley
*5
Vane Pump
*6
No. 1 Idler Pulley
*7
Generator
*8
Belt Tensioner
Use the hexagonal part indicated by the arrow in the illustration to move the tensioner pulley downward and install the V belt to the tensioner pulley.
- NOTICE:
- The backside of the V belt should face the tensioner pulley.
- Check that the V belt is properly set on each pulley.
- The backside of the V belt should face the tensioner pulley.
| 3. INSTALL AIR CLEANER AND HOSE |
Install the air cleaner and hose, align its matchmark with the matchmark of the air cleaner cap as shown in the illustration.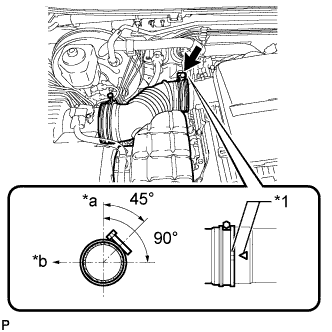
Text in Illustration *1
Matchmark
*a
Upper
*b
Front
Tighten the hose clamp.
- Torque:
- 5.0 N*m{ 51 kgf*cm , 44 in.*lbf }
Attach the 4 clamps.
Attach the 3 clamps and connect the mass air flow meter connector.
| 4. CONNECT CABLE TO NEGATIVE BATTERY TERMINAL |
- NOTICE:
- When disconnecting the cable, some systems need to be initialized after the cable is reconnected (Click here).