Tachometer Malfunction
Circuit diagnosis · Vehicles built from Aug 2014
Versions by build date: Aug 2013 – Jul 2014 from Aug 2014
DESCRIPTION
In this circuit, the meter CPU receives engine speed signals from the ECM. The meter CPU displays the engine speed calculated based on the data received from the ECM.WIRING DIAGRAM
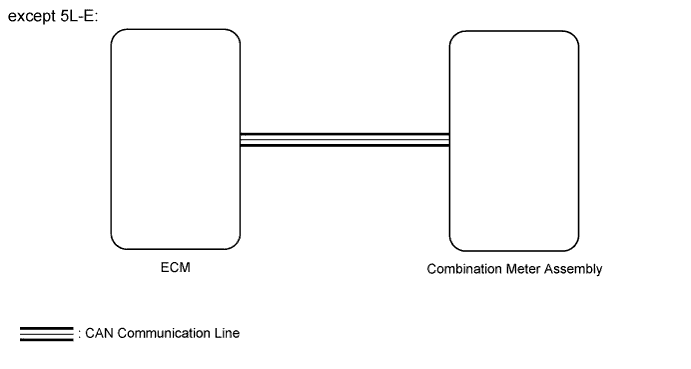

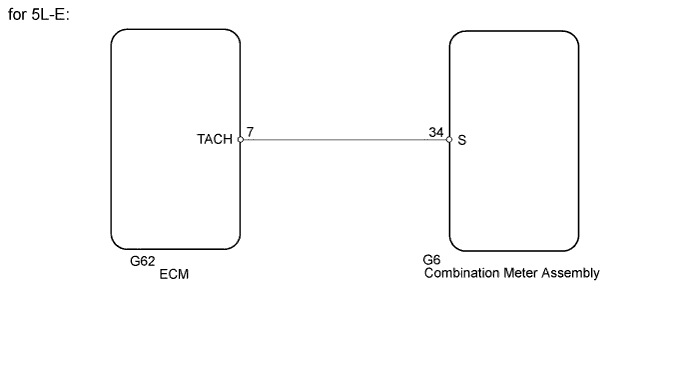
INSPECTION PROCEDURE
| 1. CHECK CAN COMMUNICATION SYSTEM |

Check if a CAN communication DTC is output.
for LHD with Entry and Start System (Click here).
for LHD without Entry and Start System (Click here).
for RHD with Entry and Start System (Click here).
for RHD without Entry and Start System (Click here).
Result Result
Proceed to
CAN communication DTC is not output.
A
CAN communication DTC is output. (for LHD, with Entry and Start System)
B
CAN communication DTC is output. (for LHD, without Entry and Start System)
C
CAN communication DTC is output. (for RHD, with Entry and Start System)
D
CAN communication DTC is output. (for RHD, without Entry and Start System)
E
|
|
||||
|
|
||||
|
|
||||
|
|
||||

| A | |
 |
| 2. CHECK ENGINE TYPE |
Check the engine type.
Engine Type Engine type
Proceed to
not 5L-E
A
5L-E
B
|
|
||||

| A | |
|
| 3. PERFORM ACTIVE TEST USING INTELLIGENT TESTER (TACHO METER OPERATION) |
Connect the intelligent tester to the DLC3.
Turn the ignition switch to ON.
Turn the intelligent tester on.
Enter the following menus: Body Electrical / Combination Meter / Active Test.
Check the operation by referring to the table below.
Combination Meter Tester Display
Test Part
Control Range
Diagnostic Note
Tacho Meter Operation
Tachometer
0, 1000, 2000, 3000, 4000, 5000, 6000, 7000* (rpm)
Confirm that the vehicle is stopped with the engine idling.
- *: except 1KD-FTV
- OK:
- Tachometer indication is normal.
- *: except 1KD-FTV
|
|
||||
| OK | |
|
| 4. READ VALUE USING INTELLIGENT TESTER (ENGINE RPM) |
Connect the intelligent tester to the DLC3.
Turn the ignition switch to ON.
Turn the intelligent tester on.
Enter the following menus: Body Electrical / Combination Meter / Data List.
Check the values by referring to the table below.
Combination Meter Tester Display
Measurement Item/Range
Normal Condition
Diagnostic Note
Engine Rpm
Engine speed/Min.: 0 rpm, Max.: 12750 rpm
600 to 700 rpm (When idling)
If the data received from the ECM exceeds the range that can be displayed on the meter, the meter continues to display the maximum value of the range.
- OK:
- Engine speed displayed on the intelligent tester is almost the same as the tachometer indication.
Record the engine speed displayed on the intelligent tester.
- HINT:
- Check the engine speed when the engine is fully warmed up and the air conditioning and all electrical accessories are off.
|
|
||||
| OK | |
|
| 5. READ VALUE USING INTELLIGENT TESTER (ENGINE SPEED) |
Connect the intelligent tester to the DLC3.
Turn the ignition switch to ON.
Turn the intelligent tester on.
Enter the following menus: Powertrain / Engine and ECT / Data List.
Check the values by referring to the table below.
Engine and ECT Tester Display
Measurement Item/Range
Normal Condition
Diagnostic Note
Engine Speed
Engine speed/Min.: 0 rpm, Max.: 16383 rpm
600 to 700 rpm (When idling)
-
- OK:
- Engine speed displayed on the intelligent tester is almost the same as the previously recorded value displayed on the intelligent tester (Body Electrical / Combination Meter / Data List / Engine Rpm).
Result Result
Proceed to
OK
A
NG (for 1GR-FE)
B
NG (for 2TR-FE)
C
NG (for 1KD-FTV, w/o DPF)
D
NG (for 1KD-FTV, w/ DPF)
E
|
|
||||
|
|
||||
|
|
||||
|
|
||||
| A | |
|
| 6. REPLACE ECM |
Replace the ECM with a new or normally functioning one.for 1GR-FE (Click here).for 2TR-FE (Click here).for 1KD-FTV (Click here).
Check the tachometer operation.
- OK:
- The operation of the tachometer returns to normal.
|
|
||||
| OK | ||
 |
||
| ||
| 7. PERFORM ACTIVE TEST USING INTELLIGENT TESTER |
Connect the intelligent tester to the DLC3.
Turn the ignition switch to ON.
Turn the intelligent tester on.
Enter the following menus: Body Electrical / Combination Meter / Active Test.
Check the operation by referring to the table below.
Combination Meter Tester Display
Test Part
Control Range
Diagnostic Note
Tacho Meter Operation
Tachometer
0, 1000, 2000, 3000, 4000, 5000, 6000 (rpm)
Confirm that the vehicle is stopped with the engine idling.
- OK:
- Tachometer indication is normal.
|
|
||||
| OK | |
|
| 8. INSPECT WAVEFORM (ENGINE SPEED SIGNAL) |
Disconnect the G6 meter connector.
Using an oscilloscope, check the signal waveform.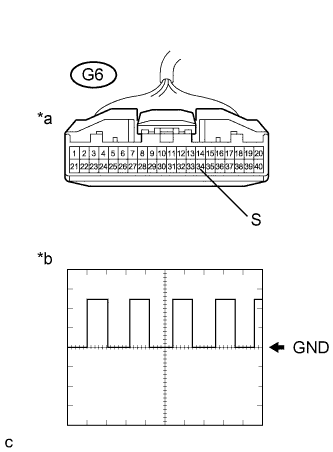
Measurement Condition Item
Content
Tester Connection
G6-34 (S) - Body ground
Tool Setting
5 V/DIV., 20 ms./DIV.
Condition
Idling with warm engine
- OK:
- Waveform is output normally (refer to illustration).
Text in Illustration *a
Front view of wire harness connector
(to Combination Meter Assembly)
*b
Speed Signal Waveform
- HINT:
- As the engine speed increases, the wavelength shortens.
|
|
||||
| OK | ||
|
||
| ||
| 9. CHECK HARNESS AND CONNECTOR |
Disconnect the G62 ECM connector.
Measure the resistance according to the value(s) in the table below.
- Standard Resistance:
Tester Connection
Condition
Specified Condition
G62-7 (TACH) - G6-34 (S)
Always
Below 1 Ω
G62-7 (TACH) - Body ground
Always
10 kΩ or higher
|
|
||||
| OK | |
|
| 10. REPLACE ECM |
Replace the ECM with a new or normally functioning one (Click here).
- OK:
- The operation of the tachometer returns to normal.
|
|
||||
| OK | ||
|
||
| ||