INSTALLATION
Removal / installation · Vehicles built from Aug 2013
| 1. ADJUST COMPRESSOR OIL |

When replacing the compressor and magnet clutch with a new one, gradually discharge the refrigerant gas from the service valve and drain the following amount of oil from the new compressor and magnet clutch before installation.
- Standard:
- (Oil capacity inside the new compressor and magnet clutch: 180 + 15 cc (6.08 + 0.51 fl.oz.)) - (Remaining oil amount in the removed compressor and magnet clutch) = (Oil amount to be removed from the new compressor)
- NOTICE:
- When checking the compressor oil level, follow the A/C system precautions.
- Since compressor oil remains in the pipes of the vehicle, if a new compressor is installed without removing some oil from the compressor, the oil amount becomes excessive. Excessive oil prevents heat exchange in the refrigerant cycle and causes refrigeration system failure.
- If the volume of oil remaining in the removed compressor and magnet clutch is small, check for oil leakage.
- Be sure to use ND-OIL 8 or equivalent compressor oil.
- When checking the compressor oil level, follow the A/C system precautions.
| 2. INSTALL COOLER COMPRESSOR ASSEMBLY |
Install the compressor with the 4 bolts and tighten the bolts in the order shown in the illustration.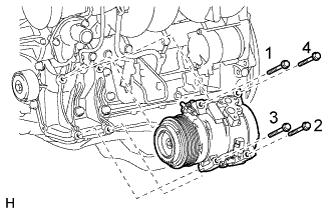

- Torque:
- 25 N*m{ 255 kgf*cm , 18 ft.*lbf }
Connect the connector.
| 3. INSTALL SUCTION HOSE SUB-ASSEMBLY |
Remove the vinyl tape attached to the hose.
Sufficiently apply compressor oil to a new O-ring and the fitting surface of the compressor.
- Compressor oil:
- ND-OIL 8 or equivalent
Install the O-ring to the suction hose.
Connect the suction hose with the bolt.
- Torque:
- 9.8 N*m{ 100 kgf*cm , 87 in.*lbf }
| 4. INSTALL DISCHARGE HOSE SUB-ASSEMBLY |
Remove the vinyl tape attached to the hose.
Sufficiently apply compressor oil to a new O-ring and the fitting surface of the compressor.
- Compressor oil:
- ND-OIL 8 or equivalent
Install the O-ring to the discharge hose.
Connect the discharge hose with the bolt.
- Torque:
- 9.8 N*m{ 100 kgf*cm , 87 in.*lbf }
| 5. CONNECT VANE PUMP ASSEMBLY |
Connect the vane pump with the 2 bolts.
- Torque:
- 21 N*m{ 214 kgf*cm , 15 ft.*lbf }
Connect the 2 connectors.
Install the pressure feed tube with the bolt.
- Torque:
- 28 N*m{ 285 kgf*cm , 21 ft.*lbf }
| 6. INSTALL FAN SHROUD |
Install the fan pulley to the water pump.
Place the shroud together with the coupling fan between the radiator and engine.
- NOTICE:
- Be careful not to damage the radiator core.
Temporarily install the fluid coupling fan to the water pump with the 4 nuts. Tighten the nuts as much as possible by hand.
Attach the claws of the shroud to the radiator as shown in the illustration.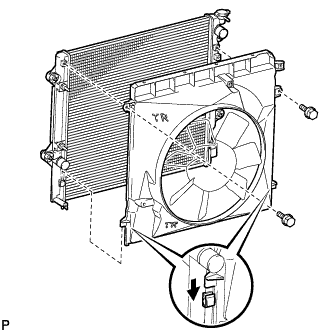
Install the shroud with the 2 bolts.
- Torque:
- 5.0 N*m{ 51 kgf*cm , 44 in.*lbf }
Install the fan and generator V-belt (Click here).
Tighten the 4 nuts of the fluid coupling fan.
- Torque:
- 25 N*m{ 255 kgf*cm , 18 ft.*lbf }
Attach the claw to close the flexible hose clamp as shown in the illustration.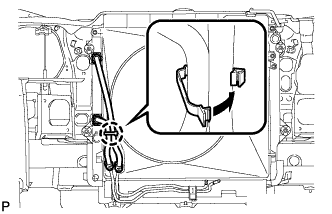
| 7. INSTALL NO. 2 RADIATOR HOSE |
Connect the No. 2 radiator hose to the radiator.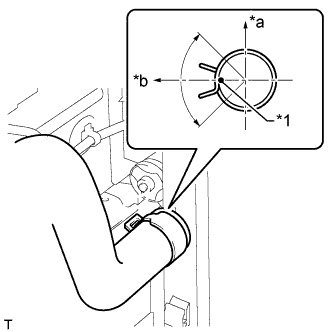
- HINT:
- Make sure the direction of the hose clamp is as shown in the illustration.
Text in Illustration *a
Upper
*b
LH Side
*1
Paint Mark
| 8. INSTALL NO. 1 RADIATOR HOSE |
Connect the No. 1 radiator hose to the radiator.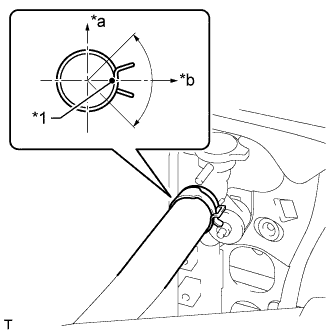
- HINT:
- Make sure the direction of the hose clamp is as shown in the illustration.
Text in Illustration *a
Upper
*b
RH Side
*1
Paint Mark
| 9. INSTALL RADIATOR RESERVOIR |
Install the radiator reservoir with the 3 bolts.
- Torque:
- 5.0 N*m{ 51 kgf*cm , 44 in.*lbf }
Connect the reservoir hose to the radiator.
| 10. INSTALL FAN AND GENERATOR V BELT |
Install the V belt to all the pulleys except the drive belt tensioner pulley.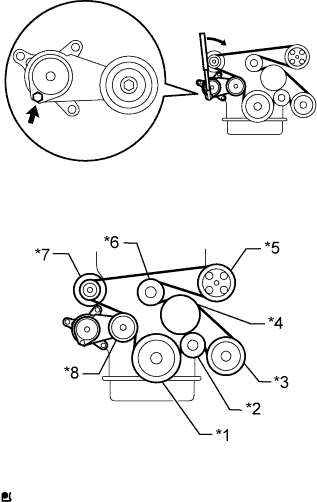
Text in Illustration *1
Crankshaft Pulley
*2
Idler Pulley
*3
Cooler Compressor
*4
Fan Pulley
*5
Vane Pump
*6
No. 1 Idler Pulley
*7
Generator
*8
Belt Tensioner
Use the hexagonal part indicated by the arrow in the illustration to move the tensioner pulley downward and install the V belt to the tensioner pulley.
- NOTICE:
- The backside of the V belt should face the tensioner pulley.
- Check that the V belt is properly set on each pulley.
- The backside of the V belt should face the tensioner pulley.
| 11. INSTALL NO. 1 ENGINE UNDER COVER SUB-ASSEMBLY |
Hook the engine under cover to the vehicle body as shown in the illustration.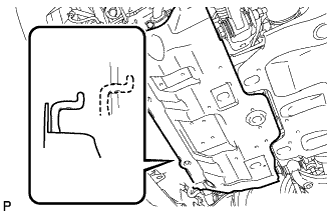
Install the 4 bolts.
- Torque:
- 29 N*m{ 296 kgf*cm , 21 ft.*lbf }
| 12. INSTALL FRONT BUMPER COVER LOWER |
Install the front bumper cover lower with the 5 bolts and clip.
- Torque:
- 8.0 N*m{ 82 kgf*cm , 71 in.*lbf }
| 13. CHARGE REFRIGERANT |
- SST
- 09985-20010
(09985-02130, 09985-02150, 09985-02090, 09985-02110, 09985-02010, 09985-02050, 09985-02060, 09985-02070)
Perform vacuum purging using a vacuum pump.
Charge refrigerant HFC-134a (R134a).
*1: For vehicles with the 2TR-FE engine which have neither the rear cooler nor cool box, the refrigerant charging amount changes based on region.Standard Model Code
Air Conditioning Type
Cool Box
Refrigerant Charging Amount
Except the model codes below
w/o Rear Cooler
w/ Cool Box
600 +/-30 g (21.2 +/-1.1 oz.)
w/o Cool Box
550 +/-30 g (19.3 +/-1.1 oz.)
w/ Rear Cooler
w/ Cool Box
800 +/-30 g (28.2 +/-1.1 oz.)
w/o Cool Box
770 +/-30 g (27.2 +/-1.1 oz.)
w/ Rear Cooler
for Cold Area Specification Vehicles
w/o Cool Box
720 +/-30 g (25.3 +/-1.1 oz.)
TRJ150L-GKMEKV
TRJ150L-GKPEKV
TRJ155L-GJPEKV
GRJ150L-GKFEKV
GRJ150L-GKAEKV
KDJ150L-GKFEYV
KDJ150L-GKAEYV
w/o Rear Cooler
w/ Cool Box
600 +/-30 g (21.2 +/-1.1 oz.)
w/o Cool Box
550 +/-30 g (19.3 +/-1.1 oz.) or 600 +/-30 g (21.2 +/-1.1 oz.) *1
w/ Rear Cooler
w/ Cool Box
800 +/-30 g (28.2 +/-1.1 oz.)
w/o Cool Box
770 +/-30 g (27.2 +/-1.1 oz.)
- NOTICE:
- Do not operate the cooler compressor before charging refrigerant as the cooler compressor will not work properly without any refrigerant, and will overheat.
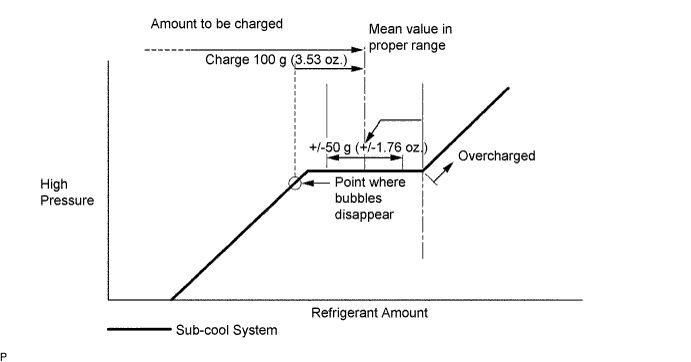
- Approximately 100 g (3.53 oz.) of refrigerant may need to be charged after bubbles disappear. The refrigerant amount should be checked by measuring its quantity, and not with the sight glass.
- Do not operate the cooler compressor before charging refrigerant as the cooler compressor will not work properly without any refrigerant, and will overheat.
| 14. ADD ENGINE COOLANT |
Tighten the cylinder block drain cock plug.
- Torque:
- 13 N*m{ 130 kgf*cm , 9 ft.*lbf }
Tighten the radiator drain cock plug by hand.
Disconnect the 2 vinyl hoses.
Add engine coolant.
- Standard Capacity:
Item
Specified Condition
for Automatic Transmission
w/o Rear Heater
8.1 liters (8.6 US qts, 7.1 Imp. qts)
w/ Rear Heater
9.9 liters (10.5 US qts, 8.7 Imp. qts)
for Manual Transmission
w/o Rear Heater
8.3 liters (8.8 US qts, 7.3 Imp. qts)
w/ Rear Heater
10.1 liters (10.7 US qts, 8.9 Imp. qts)
- NOTICE:
- Do not substitute plain water for engine coolant.
- HINT:
- TOYOTA vehicles are filled with TOYOTA SLLC at the factory. In order to avoid damage to the engine cooling system and other technical problems, only use TOYOTA SLLC or similar high quality ethylene glycol based non-silicate, non-amine, non-nitrite, non-borate coolant with long-life hybrid organic acid technology (coolant with long-life hybrid organic acid technology consists of a combination of low phosphates and organic acids).
- Press the No. 1 and No. 2 radiator hoses several times by hand, and then check the coolant level. If the coolant level is low, add coolant.
- TOYOTA vehicles are filled with TOYOTA SLLC at the factory. In order to avoid damage to the engine cooling system and other technical problems, only use TOYOTA SLLC or similar high quality ethylene glycol based non-silicate, non-amine, non-nitrite, non-borate coolant with long-life hybrid organic acid technology (coolant with long-life hybrid organic acid technology consists of a combination of low phosphates and organic acids).
Slowly pour coolant into the radiator reservoir until it reaches the F line.
Install the reservoir cap.
Install the radiator cap.*1
Start the engine and stop it immediately.*2
Allow approximately 10 seconds to pass. Then remove the radiator cap and check the coolant level. If the coolant level has decreased, add coolant.*3
Repeat steps *1, *2 and *3 until the coolant level does not decrease.
- HINT:
- Be sure to perform this step while the engine is cold, as air in the No. 1 radiator hose will flow into the radiator if the engine is warmed up and the thermostat opens.
Install the radiator cap.*4
Set the air conditioning as follows.*5
Item
Condition
Fan speed
Any setting except off
Temperature
Toward WARM
Air conditioning switch
Off
Start the engine, warm it up until the thermostat opens, and then continue to run the engine for several minutes to circulate the coolant.*6
- CAUTION:
- Wear protective gloves. Hot areas on the parts may injure your hands.
- Be careful of the fan.
- Be careful as the engine, radiator and radiator hoses are hot and can cause burns.
- Wear protective gloves. Hot areas on the parts may injure your hands.
- NOTICE:
- Immediately after starting the engine, if the radiator reservoir does not have any coolant, perform the following: 1) stop the engine, 2) wait until the coolant has cooled down, and 3) add coolant until the coolant is filled to the F line.
- Do not start the engine when there is no coolant in the radiator reservoir.
- Pay attention to the needle of the engine coolant temperature receiver gauge. Make sure that the needle does not show an abnormally high temperature.
- If there is not enough coolant, the engine may burn out or overheat.
- Immediately after starting the engine, if the radiator reservoir does not have any coolant, perform the following: 1) stop the engine, 2) wait until the coolant has cooled down, and 3) add coolant until the coolant is filled to the F line.
- HINT:
- Press the No. 1 and No. 2 radiator hoses several times by hand to bleed air while warming up the engine.
- The thermostat opening timing can be confirmed by pressing the No. 2 radiator hose by hand and checking when the engine coolant starts to flow inside the hose.
- Press the No. 1 and No. 2 radiator hoses several times by hand to bleed air while warming up the engine.
Stop the engine, wait until the engine coolant cools down to ambient temperature. Then remove the radiator cap and check the coolant level.*7
- CAUTION:
- Do not remove the radiator cap while the engine and radiator are still hot. Pressurized, hot engine coolant and steam may be released and cause serious burns.
If the coolant level has decreased, add coolant and warm up the engine until the thermostat opens.*8
If the coolant level has not decreased, check that the coolant level in the radiator reservoir is at the F line.
If the coolant level is below the F line, repeat steps *4 through *8.
If the coolant level is above the F line, drain coolant until the coolant level reaches the F line.
| 15. WARM UP ENGINE |
Warm up the engine at less than 1850 rpm for 2 minutes or more after charging the refrigerant.
- NOTICE:
- Be sure to warm up the compressor when turning the A/C switch is on after removing and installing the cooler refrigerant lines (including the compressor), to prevent damage to the compressor.
| 16. CHECK FOR REFRIGERANT LEAK |
After recharging the refrigerant gas, check for refrigerant gas leakage using a halogen leak detector.
Perform the operation under these conditions:
- Stop the engine.
- Secure good ventilation (the halogen leak detector may react to volatile gases other than refrigerant, such as evaporated gasoline or exhaust gas).
- Repeat the test 2 or 3 times.
- Make sure that some refrigerant remains in the refrigeration system. When compressor is off: approximately 392 to 588 kPa (4.0 to 6.0 kgf/cm2, 57 to 85 psi).
- Stop the engine.
Using a halogen leak detector, check the refrigerant line for leakage.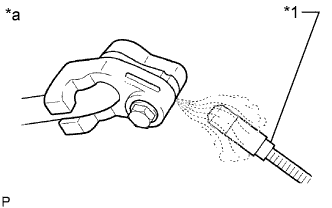
Text in Illustration *1
Halogen Leak Detector
*a
Check for Leakage
If a gas leak is not detected on the drain hose, remove the blower motor control (blower resistor) from the cooling unit. Insert the halogen leak detector sensor into the unit and perform the test.
Disconnect the connector and wait for approximately 20 minutes. Bring the halogen leak detector close to the pressure switch and perform the test.
| 17. INSTALL UPPER RADIATOR SUPPORT SEAL |
Install the upper radiator support seal with the 13 clips.