TERMINALS OF ECU
System information · Vehicles built from Aug 2014
Versions by build date: Aug 2013 – Jul 2014 from Aug 2014
| CHECK MULTIPLEX NETWORK MASTER SWITCH ASSEMBLY |


| *A |
for LHD |
*B |
for RHD |
- *1: for LHD
- *2: for RHD
Disconnect the K4*1 or J9*2 multiplex network master switch connector.
Measure the voltage and resistance according to the value(s) in the table below.
- HINT:
- Measure the values on the wire harness side with the connector disconnected.
for LHD: Terminal No. (Symbol)
Wiring Color
Terminal Description
Condition
Specified Condition
K4-11 (B) - K4-12 (GND)
L - W-B
Power supply
Always
11 to 14 V
K4-12 (GND) - Body ground
W-B - Body ground
Ground
Always
Below 1 Ω
If the result is not as specified, there may be a malfunction in the wire harness.for RHD: Terminal No. (Symbol)
Wiring Color
Terminal Description
Condition
Specified Condition
J9-11 (B) - J9-12 (GND)
L - W-B
Power supply
Always
11 to 14 V
J9-12 (GND) - Body ground
W-B - Body ground
Ground
Always
Below 1 Ω
Reconnect the K4*1 or J9*2 multiplex network master switch connector.
Measure the voltage according to the value(s) in the table below.
for LHD: Terminal No. (Symbol)
Wiring Color
Terminal Description
Condition
Specified Condition
K4-15 (DOWN) - K4-12 (GND)
B - W-B
Power window motor down input
Ignition switch ON, driver side power window regulator switch off
11 to 14 V
K4-15 (DOWN) - K4-12 (GND)
B - W-B
Power window motor down input
Ignition switch ON, driver side power window switch down (Manual operation)
Below 1 V
K4-18 (LED) - K4-12 (GND)
V - W-B
LED illumination signal
Ignition switch ON
11 to 14 V
K4-18 (LED) - K4-12 (GND)
V - W-B
LED illumination signal
Ignition switch turned off
Below 1 V
K4-20 (UP) - K4-12 (GND)
P - W-B
Power window motor up input
Ignition switch ON, driver side power window switch off
11 to 14 V
K4-20 (UP) - K4-12 (GND)
P - W-B
Power window motor up input
Ignition switch ON, driver side power window switch up (Manual operation)
Below 1 V
If the result is not as specified, the multiplex network master switch may have a malfunction.for RHD: Terminal No. (Symbol)
Wiring Color
Terminal Description
Condition
Specified Condition
J9-15 (DOWN) - J9-12 (GND)
B - W-B
Power window motor down input
Ignition switch ON, driver side power window regulator switch off
11 to 14 V
J9-15 (DOWN) - J9-12 (GND)
B - W-B
Power window motor down input
Ignition switch ON, driver side power window switch down (Manual operation)
Below 1 V
J9-18 (LED) - J9-12 (GND)
V - W-B
LED illumination signal
Ignition switch ON
11 to 14 V
J9-18 (LED) - J9-12 (GND)
V - W-B
LED illumination signal
Ignition switch turned off
Below 1 V
J9-20 (UP) - J9-12 (GND)
P - W-B
Power window motor up input
Ignition switch ON, driver side power window switch off
11 to 14 V
J9-20 (UP) - J9-12 (GND)
P - W-B
Power window motor up input
Ignition switch ON, driver side power window switch up (Manual operation)
Below 1 V
| CHECK POWER WINDOW REGULATOR SWITCH ASSEMBLY |

| *A |
for LHD |
*B |
for RHD |
- *1: for LHD
- *2: for RHD
Disconnect the J1*1 or K10*2 power window regulator switch connector.
Measure the resistance according to the value(s) in the table below.
- HINT:
- Measure the values on the wire harness side with the connector disconnected.
for LHD: Terminal No. (Symbol)
Wiring Color
Terminal Description
Condition
Specified Condition
J1-1 (GND) - Body ground
W-B - Body ground
Ground
Always
Below 1 Ω
If the result is not as specified, there may be a malfunction in the wire harness.for RHD: Terminal No. (Symbol)
Wiring Color
Terminal Description
Condition
Specified Condition
K10-1 (GND) - Body ground
W-B - Body ground
Ground
Always
Below 1 Ω
Reconnect the J1*1 or K10*2 power window regulator switch connector.
Measure the voltage according to the value(s) in the table below.
for LHD: Terminal No. (Symbol)
Wiring Color
Terminal Description
Condition
Specified Condition
J1-6 (UP) - J1-1 (GND)
L - W-B
Power window motor up input
Ignition switch ON, power window regulator switch off
11 to 14 V
J1-6 (UP) - J1-1 (GND)
L - W-B
Power window motor up input
Ignition switch ON, power window regulator switch up
Below 1 V
J1-8 (AUTO) - J1-1 (GND)
P - W-B
Power window motor auto up or down input
Ignition switch ON, door glass fully open
11 to 14 V
J1-8 (AUTO) - J1-1 (GND)
P - W-B
Power window motor auto up or down input
Ignition switch ON, power window auto up or down function operating
Below 1 V
J1-8 (AUTO) - J1-1 (GND)
P - W-B
Power window motor auto up or down input
Ignition switch ON, door glass fully closed
11 to 14 V
J1-4 (LED) - J1-1 (GND)
V - W-B
LED illumination signal
Ignition switch ON
11 to 14 V
J1-4 (LED) - J1-1 (GND)
V - W-B
LED illumination signal
Ignition switch is turned off
Below 1 V
J1-7 (DOWN) - J1-1 (GND)
B - W-B
Power window motor down input
Ignition switch ON, power window regulator switch off
11 to 14 V
J1-7 (DOWN) - J1-1 (GND)
B - W-B
Power window motor down input
Ignition switch ON, power window regulator switch down
Below 1 V
If the result is not as specified, the power window regulator switch may have a malfunction.for RHD: Terminal No. (Symbol)
Wiring Color
Terminal Description
Condition
Specified Condition
K10-6 (UP) - K10-1 (GND)
L - W-B
Power window motor up input
Ignition switch ON, power window regulator switch off
11 to 14 V
K10-6 (UP) - K10-1 (GND)
L - W-B
Power window motor up input
Ignition switch ON, power window regulator switch up
Below 1 V
K10-8 (AUTO) - K10-1 (GND)
P - W-B
Power window motor auto up or down input
Ignition switch ON, door glass fully open
11 to 14 V
K10-8 (AUTO) - K10-1 (GND)
P - W-B
Power window motor auto up or down input
Ignition switch ON, power window auto up or down function operating
Below 1 V
K10-8 (AUTO) - K10-1 (GND)
P - W-B
Power window motor auto up or down input
Ignition switch ON, door glass fully closed
11 to 14 V
K10-4 (LED) - K10-1 (GND)
V - W-B
LED illumination signal
Ignition switch ON
11 to 14 V
K10-4 (LED) - K10-1 (GND)
V - W-B
LED illumination signal
Ignition switch is turned off
Below 1 V
K10-7 (DOWN) - K10-1 (GND)
B - W-B
Power window motor down input
Ignition switch ON, power window regulator switch off
11 to 14 V
K10-7 (DOWN) - K10-1 (GND)
B - W-B
Power window motor down input
Ignition switch ON, power window regulator switch down
Below 1 V
| CHECK REAR POWER WINDOW REGULATOR SWITCH ASSEMBLY LH (for 5 Door) |

Disconnect the M2 rear power window regulator switch connector.
Measure the resistance according to the value(s) in the table below.
- HINT:
- Measure the values on the wire harness side with the connector disconnected.
If the result is not as specified, there may be a malfunction in the wire harness.Terminal No. (Symbol)
Wiring Color
Terminal Description
Condition
Specified Condition
M2-1 (GND) - Body ground
W-B - Body ground
Ground
Always
Below 1 Ω
Reconnect the M2 rear power window regulator switch connector.
Measure the voltage according to the value(s) in the table below.
If the result is not as specified, the power window regulator switch may have a malfunction.Terminal No. (Symbol)
Wiring Color
Terminal Description
Condition
Specified Condition
M2-6 (UP) - M2-1 (GND)
L - W-B
Power window motor up input
Ignition switch ON, power window regulator switch off
11 to 14 V
M2-6 (UP) - M2-1 (GND)
L - W-B
Power window motor up input
Ignition switch ON, power window regulator switch up
Below 1 V
M2-8 (AUTO) - M2-1 (GND)
P - W-B
Power window motor auto up or down input
Ignition switch ON, door glass fully open
11 to 14 V
M2-8 (AUTO) - M2-1 (GND)
P - W-B
Power window motor auto up or down input
Ignition switch ON, power window auto up or down function operating
Below 1 V
M2-8 (AUTO) - M2-1 (GND)
P - W-B
Power window motor auto up or down input
Ignition switch ON, door glass fully closed
11 to 14 V
M2-4 (LED) - M2-1 (GND)
V - W-B
LED illumination signal
Ignition switch ON
11 to 14 V
M2-4 (LED) - M2-1 (GND)
V - W-B
LED illumination signal
Ignition switch is turned off
Below 1 V
M2-7 (DOWN) - M2-1 (GND)
B - W-B
Power window motor down input
Ignition switch ON, power window regulator switch off
11 to 14 V
M2-7 (DOWN) - M2-1 (GND)
B - W-B
Power window motor down input
Ignition switch ON, power window regulator switch down
Below 1 V
| CHECK REAR POWER WINDOW REGULATOR SWITCH ASSEMBLY RH (for 5 Door) |

Disconnect the L2 rear power window regulator switch connector.
Measure the resistance according to the value(s) in the table below.
- HINT:
- Measure the values on the wire harness side with the connector disconnected.
If the result is not as specified, there may be a malfunction in the wire harness.Terminal No. (Symbol)
Wiring Color
Terminal Description
Condition
Specified Condition
L2-1 (GND) - Body ground
W-B - Body ground
Ground
Always
Below 1 Ω
Reconnect the L2 rear power window regulator switch connector.
Measure the voltage according to the value(s) in the table below.
If the result is not as specified, the rear power window regulator switch may have a malfunction.Terminal No. (Symbol)
Wiring Color
Terminal Description
Condition
Specified Condition
L2-6 (UP) - L2-1 (GND)
L - W-B
Power window motor up input
Ignition switch ON, power window regulator switch off
11 to 14 V
L2-6 (UP) - L2-1 (GND)
L - W-B
Power window motor up input
Ignition switch ON, power window regulator switch up
Below 1 V
L2-8 (AUTO) - L2-1 (GND)
P - W-B
Power window motor auto up or down input
Ignition switch ON, door glass fully open
11 to 14 V
L2-8 (AUTO) - L2-1 (GND)
P - W-B
Power window motor auto up or down input
Ignition switch ON, power window auto up or down function operating
Below 1 V
L2-8 (AUTO) - L2-1 (GND)
P - W-B
Power window motor auto up or down input
Ignition switch ON, door glass fully closed
11 to 14 V
L2-4 (LED) - L2-1 (GND)
V - W-B
LED illumination signal
Ignition switch ON
11 to 14 V
L2-4 (LED) - L2-1 (GND)
V - W-B
LED illumination signal
Ignition switch is turned off
Below 1 V
L2-7 (DOWN) - L2-1 (GND)
B - W-B
Power window motor down input
Ignition switch ON, power window regulator switch off
11 to 14 V
L2-7 (DOWN) - L2-1 (GND)
B - W-B
Power window motor down input
Ignition switch ON, power window regulator switch down
Below 1 V
| CHECK FRONT POWER WINDOW REGULATOR MOTOR ASSEMBLY LH |

- *1: for LHD
- *2: for RHD
Disconnect the K7 power window regulator motor connector.
Measure the voltage and resistance according to the value(s) in the table below.
- HINT:
- Measure the values on the wire harness side with the connector disconnected.
If the result is not as specified, there may be a malfunction in the wire harness.Terminal No. (Symbol)
Wiring Color
Terminal Description
Condition
Specified Condition
K7-1 (GND) - Body ground
W-B - Body ground
Ground
Always
Below 1 Ω
K7-2 (B) - Body ground*1
R - Body ground*1
G - Body ground*2
Battery power supply
Always
11 to 14 V
Reconnect the K7 power window regulator motor connector.
Measure the voltage according to the value(s) in the table below.
If the result is not as specified, the power window regulator motor may have a malfunction.Terminal No. (Symbol)
Wiring Color
Terminal Description
Condition
Specified Condition
K7-5 (LED) - K7-1 (GND)
V - W-B
LED illumination signal
Ignition switch ON
11 to 14 V
K7-5 (LED) - K7-1 (GND)
V - W-B
LED illumination signal
Ignition switch turned off
Below 1 V
K7-7 (DOWN) - K7-1 (GND)
B - W-B
Power window motor down output
Ignition switch ON, power window regulator master switch off
11 to 14 V
K7-7 (DOWN) - K7-1 (GND)
B - W-B
Power window motor down output
Ignition switch ON, power window regulator master switch down
Below 1 V
K7-7 (DOWN) - K7-1 (GND)
B - W-B
Power window motor down output
Ignition switch ON, door glass fully closed
11 to 14 V
K7-7 (DOWN) - K7-1 (GND)
B - W-B
Power window motor down output
Ignition switch ON, power window auto down function operating
Below 1 V
K7-7 (DOWN) - K7-1 (GND)
B - W-B
Power window motor down output
Ignition switch ON, door glass fully open
11 to 14 V
K7-10 (UP) - K7-1 (GND)
P - W-B*1
L - W-B*2
Power window motor up output
Ignition switch ON, power window regulator master switch off
11 to 14 V
K7-10 (UP) - K7-1 (GND)
P - W-B*1
L - W-B*2
Power window motor up output
Ignition switch ON, power window regulator master switch up
Below 1 V
K7-10 (UP) - K7-1 (GND)
P - W-B*1
L - W-B*2
Power window motor up output
Ignition switch ON, door glass fully open
11 to 14 V
K7-10 (UP) - K7-1 (GND)
P - W-B*1
L - W-B*2
Power window motor up output
Ignition switch ON, power window auto up function operating
Below 1 V
K7-10 (UP) - K7-1 (GND)
P - W-B*1
L - W-B*2
Power window motor up output
Ignition switch ON, door glass fully closed
11 to 14 V
| CHECK FRONT POWER WINDOW REGULATOR MOTOR ASSEMBLY RH |

- *1: for LHD
- *2: for RHD
Disconnect the J7 power window regulator motor connector.
Measure the voltage and resistance according to the value(s) in the table below.
- HINT:
- Measure the values on the wire harness side with the connector disconnected.
If the result is not as specified, there may be a malfunction in the wire harness.Terminal No. (Symbol)
Wiring Color
Terminal Description
Condition
Specified Condition
J7-1 (GND) - Body ground
W-B - Body ground
Ground
Always
Below 1 Ω
J7-2 (B) - Body ground
G - Body ground*1
R - Body ground*2
Battery power supply
Always
11 to 14 V
Reconnect the J7 power window regulator motor connector.
Measure the voltage according to the value(s) in the table below.
If the result is not as specified, the power window regulator motor may have a malfunction.Terminal No. (Symbol)
Wiring Color
Terminal Description
Condition
Specified Condition
J7-5 (LED) - J7-1 (GND)
V - W-B
LED illumination signal
Ignition switch ON
11 to 14 V
J7-5 (LED) - J7-1 (GND)
V - W-B
LED illumination signal
Ignition switch turned off
Below 1 V
J7-7 (DOWN) - J7-1 (GND)
B - W-B
Power window motor down output
Ignition switch ON, power window regulator switch off
11 to 14 V
J7-7 (DOWN) - J7-1 (GND)
B - W-B
Power window motor down output
Ignition switch ON, power window regulator switch down
Below 1 V
J7-7 (DOWN) - J7-1 (GND)
B - W-B
Power window motor down output
Ignition switch ON, door glass fully closed
11 to 14 V
J7-7 (DOWN) - J7-1 (GND)
B - W-B
Power window motor down output
Ignition switch ON, power window auto down function operating
Below 1 V
J7-7 (DOWN) - J7-1 (GND)
B - W-B
Power window motor down output
Ignition switch ON, door glass fully open
11 to 14 V
J7-10 (UP) - J7-1 (GND)
L - W-B*1
P - W-B*2
Power window motor up output
Ignition switch ON, power window regulator switch off
11 to 14 V
J7-10 (UP) - J7-1 (GND)
L - W-B*1
P - W-B*2
Power window motor up output
Ignition switch ON, power window regulator switch up
Below 1 V
J7-10 (UP) - J7-1 (GND)
L - W-B*1
P - W-B*2
Power window motor up output
Ignition switch ON, door glass fully open
11 to 14 V
J7-10 (UP) - J7-1 (GND)
L - W-B*1
P - W-B*2
Power window motor up output
Ignition switch ON, power window auto up function operating
Below 1 V
J7-10 (UP) - J7-1 (GND)
L - W-B*1
P - W-B*2
Power window motor up output
Ignition switch ON, door glass fully closed
11 to 14 V
| CHECK REAR POWER WINDOW REGULATOR MOTOR ASSEMBLY LH (for 5 Door) |

Disconnect the M4 rear power window regulator motor connector.
Measure the voltage and resistance according to the value(s) in the table below.
- HINT:
- Measure the values on the wire harness side with the connector disconnected.
If the result is not as specified, there may be a malfunction in the wire harness.Terminal No. (Symbol)
Wiring Color
Terminal Description
Condition
Specified Condition
M4-1 (GND) - Body ground
W-B - Body ground
Ground
Always
Below 1 Ω
M4-2 (B) - Body ground
W - Body ground
Battery power supply
Always
11 to 14 V
Reconnect the M4 rear power window regulator motor connector.
Measure the voltage according to the value(s) in the table below.
If the result is not as specified, the rear power window regulator motor may have a malfunction.Terminal No. (Symbol)
Wiring Color
Terminal Description
Condition
Specified Condition
M4-5 (LED) - M4-1 (GND)
V - W-B
LED illumination signal
Ignition switch ON
11 to 14 V
M4-5 (LED) - M4-1 (GND)
V - W-B
LED illumination signal
Ignition switch turned off
Below 1 V
M4-7 (DOWN) - M4-1 (GND)
B - W-B
Power window motor down input
Ignition switch ON, power window regulator switch off
11 to 14 V
M4-7 (DOWN) - M4-1 (GND)
B - W-B
Power window motor down input
Ignition switch ON, power window regulator switch down
Below 1 V
M4-7 (DOWN) - M4-1 (GND)
B - W-B
Power window motor down input
Ignition switch ON, door glass fully closed
11 to 14 V
M4-7 (DOWN) - M4-1 (GND)
B - W-B
Power window motor down input
Ignition switch ON, power window auto down function operating
Below 1 V
M4-7 (DOWN) - M4-1 (GND)
B - W-B
Power window motor down input
Ignition switch ON, door glass fully open
11 to 14 V
M4-10 (UP) - M4-1 (GND)
L - W-B
Power window motor up output
Ignition switch ON, power window regulator switch off
11 to 14 V
M4-10 (UP) - M4-1 (GND)
L - W-B
Power window motor up output
Ignition switch ON, power window regulator switch up
Below 1 V
M4-10 (UP) - M4-1 (GND)
L - W-B
Power window motor up output
Ignition switch ON, door glass fully open
11 to 14 V
M4-10 (UP) - M4-1 (GND)
L - W-B
Power window motor up output
Ignition switch ON, power window auto up function operating
Below 1 V
M4-10 (UP) - M4-1 (GND)
L - W-B
Power window motor up output
Ignition switch ON, door glass fully closed
11 to 14 V
| CHECK REAR POWER WINDOW REGULATOR MOTOR ASSEMBLY RH (for 5 Door) |

Disconnect the L4 rear window regulator motor connector.
Measure the voltage and resistance according to the value(s) in the table below.
- HINT:
- Measure the values on the wire harness side with the connector disconnected.
If the result is not as specified, there may be a malfunction in the wire harness.Terminal No. (Symbol)
Wiring Color
Terminal Description
Condition
Specified Condition
L4-1 (GND) - Body ground
W-B - Body ground
Ground
Always
Below 1 Ω
L4-2 (B) - Body ground
W - Body ground
Battery power supply
Always
11 to 14 V
Reconnect the L4 rear power window regulator motor connector.
Measure the voltage according to the value(s) in the table below.
If the result is not as specified, the rear power window regulator motor may have a malfunction.Terminal No. (Symbol)
Wiring Color
Terminal Description
Condition
Specified Condition
L4-5 (LED) - L4-1 (GND)
V - W-B
LED illumination signal
Ignition switch ON
11 to 14 V
L4-5 (LED) - L4-1 (GND)
V - W-B
LED illumination signal
Ignition switch turned off
Below 1 V
L4-7 (DOWN) - L4-1 (GND)
B - W-B
Power window motor down output
Ignition switch ON, power window regulator switch off
11 to 14 V
L4-7 (DOWN) - L4-1 (GND)
B - W-B
Power window motor down output
Ignition switch ON, power window regulator switch down
Below 1 V
L4-7 (DOWN) - L4-1 (GND)
B - W-B
Power window motor down output
Ignition switch ON, door glass fully closed
11 to 14 V
L4-7 (DOWN) - L4-1 (GND)
B - W-B
Power window motor down output
Ignition switch ON, power window auto down function operating
Below 1 V
L4-7 (DOWN) - L4-1 (GND)
B - W-B
Power window motor down output
Ignition switch ON, door glass fully open
11 to 14 V
L4-10 (UP) - L4-1 (GND)
L - W-B
Power window motor up output
Ignition switch ON, power window regulator switch off
11 to 14 V
L4-10 (UP) - L4-1 (GND)
L - W-B
Power window motor up output
Ignition switch ON, power window regulator switch up
Below 1 V
L4-10 (UP) - L4-1 (GND)
L - W-B
Power window motor up output
Ignition switch ON, door glass fully open
11 to 14 V
L4-10 (UP) - L4-1 (GND)
L - W-B
Power window motor up output
Ignition switch ON, power window auto up function operating
Below 1 V
L4-10 (UP) - L4-1 (GND)
L - W-B
Power window motor up output
Ignition switch ON, door glass fully closed
11 to 14 V
| CHECK DRIVER SIDE JUNCTION BLOCK ASSEMBLY AND MAIN BODY ECU (MULTIPLEX NETWORK BODY ECU) |
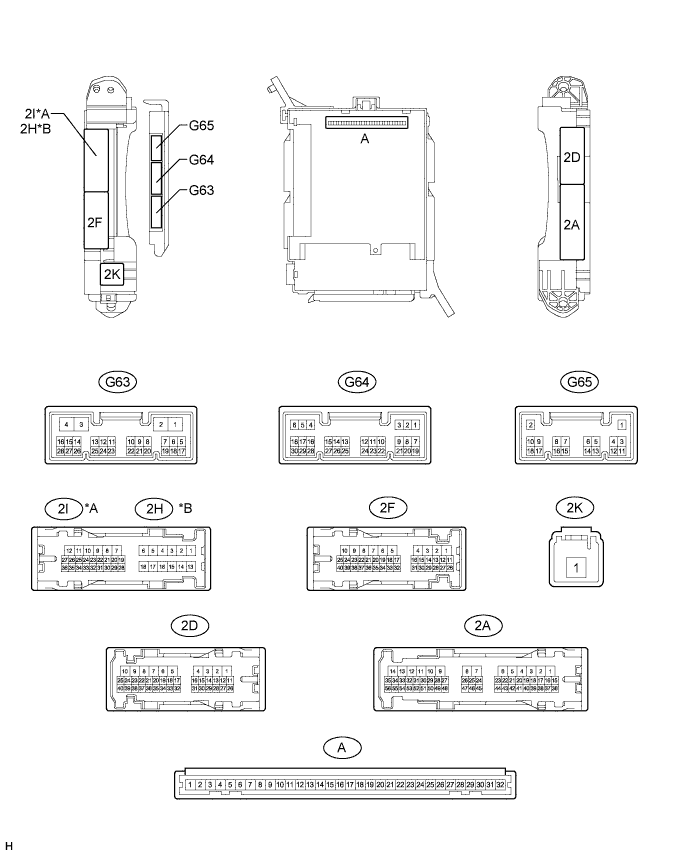
| *A |
for LHD |
*B |
for RHD |
Remove the main body ECU (multiplex network body ECU) (Click here).
Measure the voltage and resistance according to the value(s) in the table below.
If the result is not as specified, there may be a malfunction in the wire harness.Terminal No. (Symbol)
Wiring Color
Terminal Description
Condition
Specified Condition
A-30 (BECU) - Body ground
-
Battery power supply
Always
11 to 14 V
A-31 (ALTB) - Body ground
-
Battery power supply
Always
11 to 14 V
A-32 (IG) - Body ground
-
Ignition switch power supply
Ignition switch ON
11 to 14 V
A-32 (IG) - Body ground
-
Ignition switch power supply
Ignition switch off
Below 1 V
A-29 (ACC) - Body ground
-
ACC power supply
Ignition switch ACC
11 to 14 V
A-29 (ACC) - Body ground
-
ACC power supply
Ignition switch off
Below 1 V
A-11 (GND1) - Body ground
-
Ground
Always
Below 1 Ω
G63-3 (GND2) - Body ground
W-B - Body ground
Ground
Always
Below 1 Ω
Install the main body ECU (multiplex network body ECU).
Measure the voltage according to the value(s) in the table below.
for LHD: Terminal No. (Symbol)
Wiring Color
Terminal Description
Condition
Specified Condition
2I-27 (FLCY) - Body ground
R - Body ground
Front door LH courtesy switch input
Front door LH open
Below 1 V
2I-27 (FLCY) - Body ground
R - Body ground
Front door LH courtesy switch input
Front door LH closed
11 to 14 V
2D-15 (FRCY) - Body ground
B - Body ground
Front door RH courtesy switch input
Front door RH open
Below 1 V
2D-15 (FRCY) - Body ground
B - Body ground
Front door RH courtesy switch input
Front door RH closed
11 to 14 V
If the result is not as specified, the main body ECU (multiplex network body ECU) or driver side junction block assembly may have a malfunction.for RHD: Terminal No. (Symbol)
Wiring Color
Terminal Description
Condition
Specified Condition
2D-31 (FLCY) - Body ground
R - Body ground
Front door LH courtesy switch input
Front door LH open
Below 1 V
2D-31 (FLCY) - Body ground
R - Body ground
Front door LH courtesy switch input
Front door LH closed
11 to 14 V
2H-26 (FRCY) - Body ground
B - Body ground
Front door RH courtesy switch input
Front door RH open
Below 1 V
2H-26 (FRCY) - Body ground
B - Body ground
Front door RH courtesy switch input
Front door RH closed
11 to 14 V