ON-VEHICLE INSPECTION
Inspection · Vehicles built from Aug 2013
| CHECK PURGE VSV |

Check that the purge line hose is connected correctly.
Disconnect the purge line hose from the canister and connect a vacuum gauge.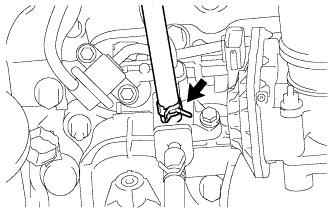

Using the procedure below, perform a purge VSV operation inspection when the engine coolant temperature is 55°C (131°F) or less (while the engine is cold (purge VSV is closed)).
- HINT:
- The ECM turns the purge VSV off so that the route between the canister and intake manifold is closed and fuel vapor in the canister is not purged to the intake manifold.
Purge VSV operation inspection procedure.
1. When the engine is idling or running at 2500 rpm, the vacuum gauge indicates 1 kPa (25 mmHg, 0.3 in.Hg) or less.
2. Inspect the purge VSV (Click here).Result Result
Procedure
Yes
Purge VSV operation normal
No
Go to next step
Result Result
Procedure
OK
Check wire harness and ECM
NG
Replace purge VSV
Using the procedure below, perform a purge VSV operation inspection when the engine coolant temperature is 80°C (146°F) or higher (while the engine is hot (purge VSV is opened)).
- HINT:
- The ECM turns the purge VSV on so that a vacuum is created in the intake manifold and the fuel vapors of the canister are purged to the intake manifold.
Purge VSV operation inspection procedure.
1. When the engine is idling, the vacuum gauge indicates 40 kPa (300 mmHg, 11.8 in.Hg) or higher.
2. Inspect the purge VSV (Click here).Result Result
Procedure
Yes
Purge VSV operation normal
No
Go to next step
Result Result
Procedure
OK
Check wire harness, ECM and purge line hose between purge VSV and intake manifold
NG
Replace purge VSV
| INSPECT FUEL CUT-OFF RPM |
Start and warm up the engine.
Maintain the engine speed at 3000 rpm.
Use a sound scope to check for injector operation noise.
Check that when the accelerator pedal is released, injector operation noise stops momentarily and then resumes.
If the result is not as specified, check the injector, wiring and ECM.
| VISUALLY INSPECT HOSES, CONNECTORS AND GASKETS |
Check that there are no cracks, leaks or damage.
- NOTICE:
- Detachment or other problems with the engine oil dipstick, filler cap, ventilation hose and other components may cause the engine to run improperly.
- Detachment or other problems with the engine oil dipstick, filler cap, ventilation hose and other components may cause the engine to run improperly.
- Air suction caused by disconnections, looseness or cracks in the parts of the air induction system between the throttle body and cylinder head will cause engine failure or engine malfunctions.
- Air suction caused by disconnections, looseness or cracks in the parts of the air induction system between the throttle body and cylinder head will cause engine failure or engine malfunctions.
| CHECK HOSES AND CONNECTORS |
Visually check for loose connections, sharp bends or damage.
| CHECK FUEL TANK ASSEMBLY |
Visually check for deformation, cracks or fuel leakage.
| INSPECT SECONDARY AIR INJECTION SYSTEM OPERATION |
Start the engine and warm it up.
Turn the ignition switch off.
Connect the intelligent tester to the DLC3.
Turn the ignition switch to ON and turn the tester on.
Enter the following menus: Powertrain / Engine and ECT / Utility / Air injection check / Manual Mode / AIR PUMP: ON, ASV: OPEN, and AIR PUMP: OFF, ASV: CLOSE.
- HINT:
- When Manual Mode is selected, intelligent tester initialization (atmospheric pressure measurement) is performed automatically. Initialization takes 10 seconds. After initialization, AIR PUMP and ASV operation can be selected.
Start the engine.
Perform the AIR system intrusive operation while the engine is idling.
Check that the air pump (AIR PUMP), ASV and pressure in the AIR system passage (PRESSURE) status displayed on the intelligent tester indicate the conditions shown in the table below.
- Standard:
Tester Operation
AIR PUMP
ASV
PRESSURE*1
PULSATION*2
AIR PUMP: ON, ASV: OPEN
ON
ON
2.4 kPa or higher
20 kPa or higher
AIR PUMP: OFF, ASV: CLOSE
OFF
OFF
Below 2.4 kPa
Below 30 kPa
Average pumping pressure (gauge pressure). The pressure should be 2.4 kPa or higher when the AIR system operates.
*2:
The cumulative exhaust pulsation calculated by the ECM. If the calculated value exceeds a certain level, the ECM determines that the exhaust pulsation is in the AIR system.
Turn the ignition switch off.
- NOTICE:
- Air Injection Check only allows technicians to operate the AIR system for a maximum of 5 seconds.
Furthermore, the check can only be performed up to 4 times per trip. If the test is repeated, intervals of at least 30 seconds are required between checks.
While AIR system operation using the intelligent tester is prohibited, the intelligent tester display indicates the prohibition (WAIT or ERROR).
If ERROR is displayed on the intelligent tester during the test, stop the engine for 10 minutes, and then try again.
- Performing Air Injection Check repeatedly may cause damage to the AIR system. If necessary, leave an interval of several minutes between Air Injection Check operations to prevent the system from overheating.
- When performing the Air Injection Check operation after the battery cable has been reconnected, wait for 7 minutes with the ignition switch turned to ON or the engine running.
- Turn the ignition switch off when the Air Injection Check operation finishes.
- Air Injection Check only allows technicians to operate the AIR system for a maximum of 5 seconds.