INSTALLATION
Removal / installation · Vehicles built Aug 2013 – Jul 2014
Versions by build date: Aug 2013 – Jul 2014 from Aug 2014
| 1. INSTALL GLOW PLUG ASSEMBLY |

Using a 12 mm deep socket wrench, install the 4 glow plugs.
- Torque:
- 13 N*m{ 130 kgf*cm , 10 ft.*lbf }
| 2. INSTALL NO. 1 GLOW PLUG CONNECTOR |
Install the No. 1 glow plug resistor insulator and No. 1 glow plug connector.
Install the glow plug connector with the 4 nuts. Uniformly tighten the nuts.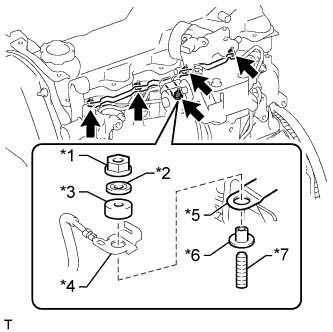

- Torque:
- 1.0 N*m{ 10 kgf*cm , 9 in.*lbf }
Text in Illustration *1
Nut
*2
Washer
*3
No. 2 Glow Plug Resistor Insulator
*4
Engine Wire
*5
No. 1 Glow Plug Connector
*6
No. 1 Glow Plug Resistor Insulator
*7
Bolt
Install the 4 screw grommets.
Connect the engine wire and install the No. 2 glow plug resistor insulator and washer with the bolt.
- Torque:
- 5.0 N*m{ 51 kgf*cm , 44 in.*lbf }
| 3. CONNECT VENTILATION HOSE |
Connect the ventilation hose.
| 4. INSTALL INTAKE PIPE |
Install the intake pipe with the 2 bolts and tighten the hose clamp.
- Torque:
- for bolt:
- 18 N*m{ 184 kgf*cm , 13 ft.*lbf }
- for clamp:
- 6.0 N*m{ 61 kgf*cm , 53 in.*lbf }
| 5. INSTALL RESONATOR WITH AIR CLEANER CAP SUB-ASSEMBLY |
Insert the hinge part of the air cleaner cap and hose into the air cleaner case, and then attach the 4 hook clamps.
Connect the air cleaner cap sub-assembly with the clamp.
- Torque:
- 5.0 N*m{ 51 kgf*cm , 44 in.*lbf }
Attach the wire harness clamp.
Connect the 2 clamps and connector.
| 6. CONNECT CABLE TO NEGATIVE BATTERY TERMINAL |
- NOTICE:
- When disconnecting the cable, some systems need to be initialized after the cable is reconnected (Click here).