INSTALLATION
Removal / installation · Vehicles built Aug 2013 – Jul 2014
Versions by build date: Aug 2013 – Jul 2014 from Aug 2014
| 1. INSTALL STARTER ASSEMBLY |

for Automatic Transmission:
Install the starter assembly with the 2 bolts.- Torque:
- 37 N*m{ 377 kgf*cm , 27 ft.*lbf }
for Manual Transmission:
Temporarily install the starter assembly with bolt.
Temporarily install the clutch flexible hose bracket with the bolt.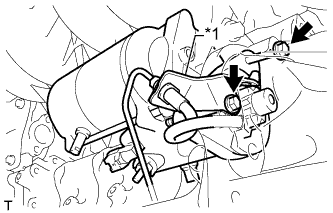

Text in Illustration *1
Clutch Flexible Hose Bracket
Tighten the 2 bolts.
- Torque:
- 37 N*m{ 377 kgf*cm , 27 ft.*lbf }
Connect the starter connector.
Connect the starter wire harness with the nut.
- Torque:
- 9.8 N*m{ 100 kgf*cm , 87 in.*lbf }
Install the terminal cap.
| 2. INSTALL TRANSMISSION OIL FILLER TUBE SUB-ASSEMBLY (for Automatic Transmission) |
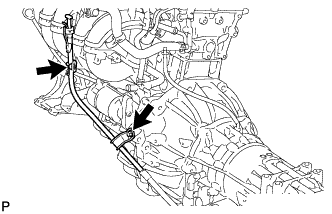 |
Coat a new O-ring with ATF, and install it to the oil filler tube.
Install the oil filler tube to the transmission with the 2 bolts.
- Torque:
- 14 N*m{ 143 kgf*cm , 10 ft.*lbf }
Install the oil dipstick.
| 3. CONNECT CLUTCH RELEASE CYLINDER ASSEMBLY (for Manual Transmission) |
Connect the clutch release cylinder with the 2 bolts.
- Torque:
- 12 N*m{ 120 kgf*cm , 9 ft.*lbf }
| 4. INSTALL REAR ENGINE UNDER COVER ASSEMBLY |
Install the rear engine under cover with the 4 bolts.
- Torque:
- 29 N*m{ 296 kgf*cm , 21 ft.*lbf }
| 5. CONNECT CABLE TO NEGATIVE BATTERY TERMINAL |
- NOTICE:
- When disconnecting the cable, some systems need to be initialized after the cable is reconnected (Click here).