B15D3 Stereo Component Amplifier Disconnected
Diagnostic trouble codes · Vehicles built from Aug 2014
Versions by build date: Aug 2013 – Jul 2014 from Aug 2014
DESCRIPTION
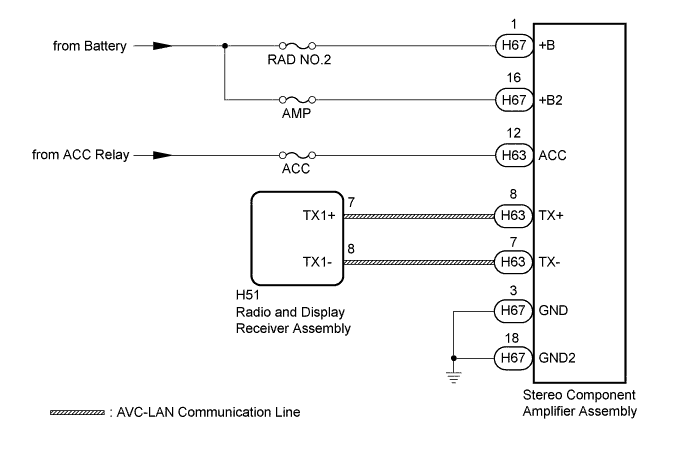
The radio and display receiver assembly and stereo component amplifier assembly are connected by the AVC-LAN communication line.This DTC is stored when an AVC-LAN communication error occurs between the radio and display receiver assembly.
| DTC Code |
DTC Detection Condition |
Trouble Area |
| B15D3 |
When either condition below is met:
|
|
- HINT:
- For the AVC-LAN communication line, the radio and display receiver assembly is the master unit.
WIRING DIAGRAM

INSPECTION PROCEDURE
- NOTICE:
- If DTC B15C3 is output, perform troubleshooting for DTC B15C3 first (Click here).
- Inspect the fuses for circuits related to this system before performing the following inspection procedure.
- If DTC B15C3 is output, perform troubleshooting for DTC B15C3 first (Click here).
- HINT:
- When replacing the radio and display receiver assembly, it is necessary to perform the vehicle contract setting for Connected Services (w/ Connected Services Function).
| 1. CHECK OPTIONAL COMPONENTS (INCLUDING ASSOCIATED WIRING) |

Check for optional components.
Check that optional components (including associated wiring) which generate radio waves are not installed.
Result Result
Proceed to
Optional components (including associated wiring) are installed.
A
Optional components (including associated wiring) are not installed.
B
- HINT:
- Electrical noise from radio waves generated by optional components or the wiring for those components may affect AVC-LAN communication.
- This DTC may be stored when an AVC-LAN communication error occurs due to electrical noise.
- Electrical noise from radio waves generated by optional components or the wiring for those components may affect AVC-LAN communication.
|
|
||||

| A | |
 |
| 2. REMOVE OPTIONAL COMPONENTS (INCLUDING ASSOCIATED WIRING) |
Remove optional components (including associated wiring).
- NOTICE:
- Do not remove optional components or associated wiring without the permission of the customer.
| NEXT | |
|
| 3. CHECK FOR DTC |
Clear the DTCs (Click here).
Check for DTCs (Click here).
- OK:
- No DTCs are output.
|
|
||||
| OK | ||
 |
||
| ||
| 4. CHECK HARNESS AND CONNECTOR (STEREO COMPONENT AMPLIFIER ASSEMBLY - BATTERY AND BODY GROUND) |
Disconnect the stereo H63 and H67 stereo component amplifier assembly connectors.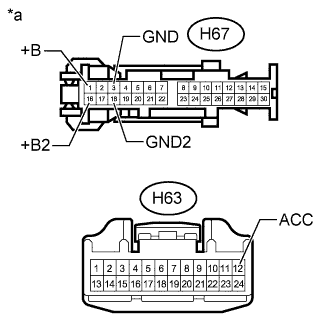
Measure the resistance according to the value(s) in the table below.
- Standard Resistance:
Tester Connection
Condition
Specified Condition
H67-3 (GND) - Body ground
Always
Below 1 Ω
H67-18 (GND2) - Body ground
Always
Below 1 Ω
Measure the voltage according to the value(s) in the table below.
- Standard Voltage:
Tester Connection
Condition
Specified Condition
H67-1 (+B) - H67-3 (GND)
Always
11 to 14 V
H67-16 (+B2) - H67-3 (GND)
Always
11 to 14 V
H63-12 (ACC) - H67-3 (GND)
Ignition switch ACC
11 to 14 V
| *a |
Front view of wire harness connector (to Stereo Component Amplifier Assembly) |
|
|
||||

| OK | |
|
| 5. INSPECT RADIO AND DISPLAY RECEIVER ASSEMBLY |
Remove the radio and display receiver assembly (Click here).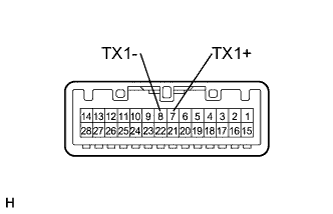
Measure the resistance according to the value(s) in the table below.
- Standard Resistance:
Tester Connection
Condition
Specified Condition
8 (TX1-) - 7 (TX1+)
Always
60 to 80 Ω
|
|
||||
| OK | |
|
| 6. CHECK HARNESS AND CONNECTOR (RADIO AND DISPLAY RECEIVER ASSEMBLY - STEREO COMPONENT AMPLIFIER ASSEMBLY) |
Disconnect the H51 radio and display receiver assembly connector.
Disconnect the H67 stereo component amplifier assembly connector.
Measure the resistance according to the value(s) in the table below.
- Standard Resistance:
Tester Connection
Condition
Specified Condition
H51-7 (TX1+) - H63-8 (TX+)
Always
Below 1 Ω
H51-8 (TX1-) - H63-7 (TX-)
Always
Below 1 Ω
H51-7 (TX1+) - Body ground
Always
10 kΩ or higher
H51-8 (TX1-) - Body ground
Always
10 kΩ or higher
|
|
||||
| OK | |
|
| 7. CHECK STEREO COMPONENT AMPLIFIER ASSEMBLY |
Replace the stereo component amplifier assembly with a known good one (Click here).
Clear the DTCs (Click here).
Check for DTCs (Click here).
- OK:
- No DTCs are output.
|
|
||||
| OK | ||
|
||
| ||