INSTALLATION
Removal / installation · Vehicles built from Aug 2013
- HINT:
- Use the same procedure for the RH and LH sides.
- The procedure listed below is for the LH side.
- A bolt without a torque specification is shown in the standard bolt chart (Click here).
- Use the same procedure for the RH and LH sides.
| 1. TEMPORARILY INSTALL FRONT NO. 1 SUSPENSION LOWER ARM SUB-ASSEMBLY LH |

Temporarily install the lower suspension arm, camber adjust cam, No. 2 camber adjust cam, No. 2 toe adjust plate and toe adjust cam with the bolt and nut.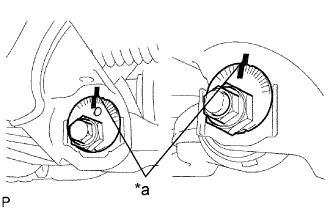

Align the matchmarks on the No. 2 camber adjust cam and toe adjust cam sub-assembly with the matchmarks on the vehicle body. Tighten the bolt and nut.
Text in Illustration *a
Matchmark
Install the front lower ball joint attachment LH with a new nut and cotter pin.
- Torque:
- 140 N*m{ 1428 kgf*cm , 103 ft.*lbf }
Connect the front lower ball joint attachment LH to the front axle with the 2 bolts.
- Torque:
- 160 N*m{ 1632 kgf*cm , 118 ft.*lbf }
| 2. TEMPORARILY INSTALL FRONT SHOCK ABSORBER WITH COIL SPRING |
Temporarily install the front shock absorber with coil spring and washer with the bolt and nut.
| 3. INSTALL FRONT STABILIZER BAR (w/ KDSS) |
Install the 2 front stabilizer lower bracket bushes to the front stabilizer bar.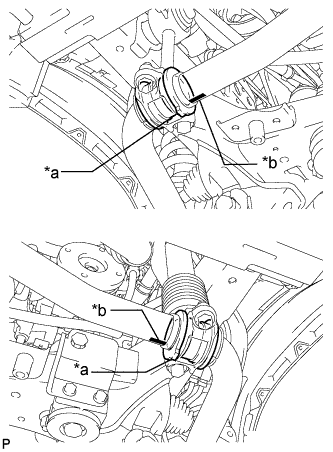
- HINT:
- Align the protrusions on the bushes with the identification marks on the front stabilizer bar with the protrusions facing inward.
Text in Illustration *a
Protrusion
*b
Mark Position
With the identification marks of the front stabilizer bar facing downwards, support the front stabilizer bar with a jack.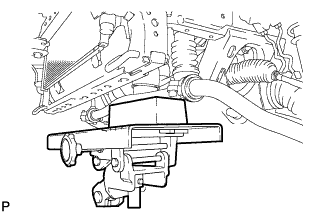
- NOTICE:
- Place a wooden block between the jack and front stabilizer bar to prevent damage.
- HINT:
- Place the jack under the center of the vehicle.
Install the front stabilizer bar and 2 front stabilizer lower brackets with the 4 bolts.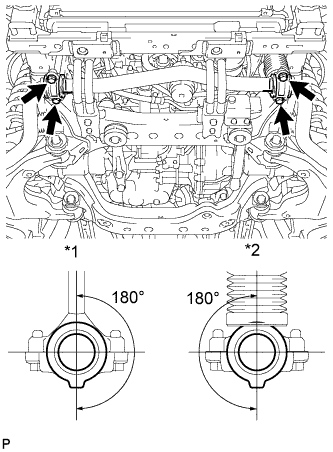
- Torque:
- 40 N*m{ 408 kgf*cm , 30 ft.*lbf }
- HINT:
- Make sure that the protrusions on the front stabilizer lower bracket bushes are positioned within 180° of the stabilizer cylinder and stabilizer link.
Text in Illustration *1
Stabilizer Link
*2
Stabilizer Cylinder
| 4. INSTALL FRONT STABILIZER END BRACKET (w/ KDSS) |
Install the 2 front stabilizer brackets and 2 front stabilizer link bushes with the 4 bolts.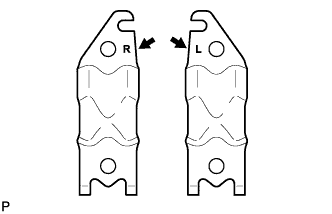
- Torque:
- 75 N*m{ 765 kgf*cm , 55 ft.*lbf }
- HINT:
- There are stamps on the front stabilizer brackets to distinguish between the right and left brackets.
| 5. INSTALL FRONT SUSPENSION MEMBER BRACE SUB-ASSEMBLY (w/ KDSS) |
Install the 2 member braces with the 6 bolts.
- Torque:
- 30 N*m{ 306 kgf*cm , 22 ft.*lbf }
| 6. INSTALL NO. 1 ENGINE UNDER COVER SUB-ASSEMBLY (w/ KDSS) |
Hook the engine under cover to the vehicle body as shown in the illustration.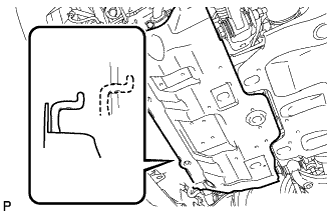
Install the 4 bolts.
- Torque:
- 29 N*m{ 296 kgf*cm , 21 ft.*lbf }
| 7. INSTALL LOWER FRONT BUMPER COVER (w/ KDSS) |
Install the front bumper cover lower with the 5 bolts and clip.
- Torque:
- 8.0 N*m{ 82 kgf*cm , 71 in.*lbf }
| 8. INSTALL FRONT WHEEL |
- Torque:
- 112 N*m{ 1142 kgf*cm , 83 ft.*lbf }
| 9. STABILIZE SUSPENSION |
Lower the vehicle.
Bounce the vehicle up and down several times to stabilize the suspension.
| 10. TIGHTEN FRONT NO. 1 SUSPENSION LOWER ARM SUB-ASSEMBLY LH |
Tighten the bolt and nut.
- Torque:
- 175 N*m{ 1785 kgf*cm , 129 ft.*lbf }
| 11. TIGHTEN FRONT SHOCK ABSORBER WITH COIL SPRING |
Tighten the nut.
- Torque:
- 95 N*m{ 969 kgf*cm , 70 ft.*lbf }
| 12. INSPECT AND ADJUST FRONT WHEEL ALIGNMENT |
Inspect and adjust the front wheel alignment (Click here).