REPLACEMENT
Removal / installation · Vehicles built from Aug 2013
| 1. DRAIN TRANSFER OIL |

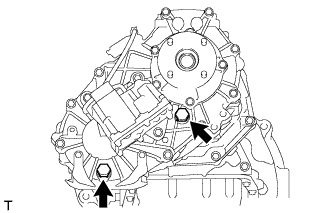  |
Remove the filler plug and gasket.
Remove the drain plug and gasket, and drain the transfer oil.
| 2. REMOVE REAR PROPELLER SHAFT ASSEMBLY |
Remove the rear propeller shaft (Click here).
| 3. REMOVE REAR OUTPUT SHAFT COMPANION FLANGE SUB-ASSEMBLY |
Using a chisel and hammer, loosen the staked part of the lock nut.
Using SST to hold the companion flange, remove the lock nut.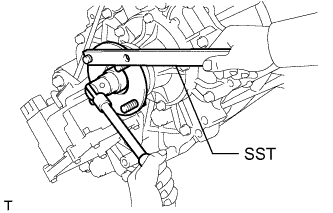
- SST
- 09330-00021
Using SST, remove the companion flange.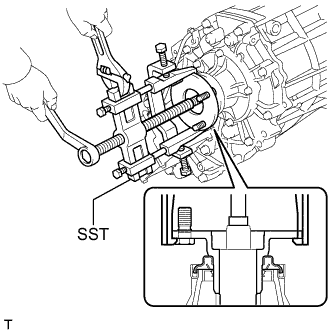
- SST
- 09950-40011
(09951-04020, 09952-04010, 09953-04030, 09954-04010, 09955-04051, 09957-04010, 09958-04011)
| 4. REMOVE REAR TRANSFER OUTPUT SHAFT COMPANION FLANGE OIL SEAL |
Using a screwdriver and hammer, tap out the oil seal from the companion flange.
- NOTICE:
- Be careful not to damage the oil seal and companion flange contact surfaces.
| 5. REMOVE TRANSFER CASE REAR OIL SEAL |
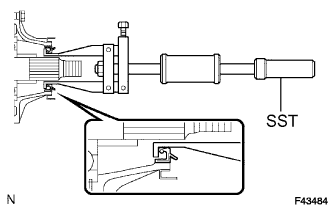 |
Using SST, tap out the oil seal.
- SST
- 09308-00010
- NOTICE:
- Be careful not to damage the oil seal and rear case contact surface.
| 6. INSTALL TRANSFER CASE REAR OIL SEAL |
 |
Coat the lip of a new oil seal with MP grease.
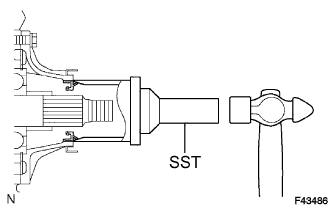
Using SST and a hammer, tap in the oil seal until its surface is flush with the case upper surface.
- SST
- 09223-46011
09631-32020
| 7. INSTALL REAR TRANSFER OUTPUT SHAFT COMPANION FLANGE OIL SEAL |
Using SST and a hammer, tap in a new oil seal.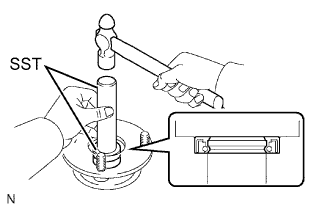
- SST
- 09950-60010
(09951-00320)
09950-70010 (09951-07100)
Coat the lip of the oil seal with MP grease.
| 8. INSTALL REAR OUTPUT SHAFT COMPANION FLANGE SUB-ASSEMBLY |
Apply gear oil to the connecting areas of the companion flange and output shaft.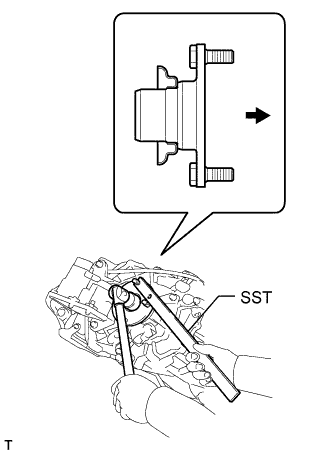
Install the companion flange to the output shaft.
Text in Illustration 
Rear
Using SST to hold the companion flange, install a new lock nut.
- SST
- 09330-00021
- Torque:
- 118 N*m{ 1203 kgf*cm , 87 ft.*lbf }
Using a chisel and hammer, stake the lock nut.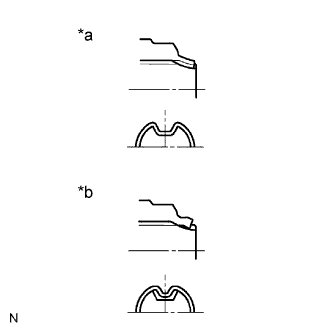
Text in Illustration *a
Correct
*b
Incorrect
- NOTICE:
- Securely stake the shaft to the lock nut groove.
- Be careful not to damage the parts around the lock nut.
- Do not apply excessive force to the shaft.
- Securely stake the shaft to the lock nut groove.
| 9. INSTALL PROPELLER SHAFT ASSEMBLY |
Install the rear propeller shaft (Click here).
| 10. ADD TRANSFER OIL |
Remove the filler plug and gasket.
Add oil so that the oil level is between 0 to 5.0 mm (0 to 0.196 in.) from the bottom lip of the filler plug hole.
- NOTICE:
- Add oil slowly.
- Add oil a little at a time, waiting several minutes between each addition of oil.
- Add oil slowly.
Wait approximately 5 minutes and check that the oil level has not changed.
Install a new gasket to the filler plug and then tighten the plug.
- Torque:
- 37 N*m{ 377 kgf*cm , 27 ft.*lbf }
| 11. CHECK FOR TRANSFER OIL LEAK |