INSTALLATION
Removal / installation · Vehicles built from Aug 2013
- HINT:
- Use the same procedure for the RH and LH sides.
- The procedure listed below is for the LH side.
- A bolt without a torque specification is shown in the standard bolt chart (Click here).
- Use the same procedure for the RH and LH sides.
| 1. INSTALL HOLLOW SPRING SUB-ASSEMBLY (for 5 Door) |

Install the hollow spring to the frame.
| 2. INSTALL REAR COIL SPRING LH |
Install the rear coil spring to the rear axle housing.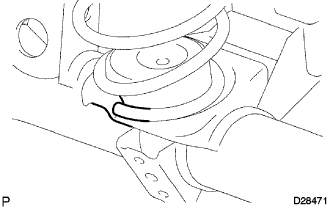

- HINT:
- Before installing the coil spring, check that the coil spring end is in the correct position. If not, reinstall the coil spring.
| 3. TEMPORARILY INSTALL REAR SHOCK ABSORBER ASSEMBLY LH |
Temporarily install the lower side of the shock absorber with the bolt.
| 4. INSTALL REAR STABILIZER LOWER BRACKET (w/ KDSS) |
Support the rear stabilizer bar with a jack.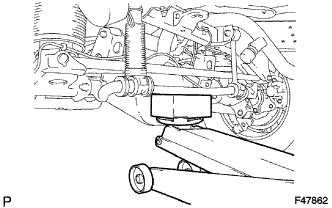
- NOTICE:
- Place a wooden block between the jack and rear stabilizer bar to prevent damage.
Install the rear stabilizer bar and 2 rear stabilizer lower brackets with the 4 bolts.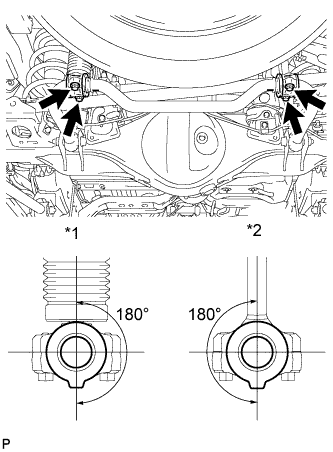
- Torque:
- 45 N*m{ 459 kgf*cm , 33 ft.*lbf }
- HINT:
- Check that the protrusions on the rear stabilizer bush are positioned within 180° of the rear stabilizer control cylinder and rear stabilizer link.
Text in Illustration *1
Rear Stabilizer Control Cylinder
*2
Rear Stabilizer Link
| 5. STABILIZE SUSPENSION |
Lower the vehicle.
Bounce the vehicle up and down several times to stabilize the suspension.
| 6. TIGHTEN REAR SHOCK ABSORBER ASSEMBLY LH |
Tighten the bolt.
- Torque:
- 98 N*m{ 999 kgf*cm , 72 ft.*lbf }
| 7. CONNECT REAR FLEXIBLE HOSE |
Connect the rear flexible hose to the connecting point with each brake tube, and then install 2 new clips.
Using a union nut wrench, connect each brake tube to the rear flexible hose while holding the rear flexible hose with a wrench.
- Torque:
- 15 N*m{ 155 kgf*cm , 11 ft.*lbf }
- NOTICE:
- Do not bend or damage the brake tube.
- Do not allow any foreign matter such as dirt and dust to enter the brake tube from the connecting point.
- Use the formula to calculate special torque values for situations where a union nut wrench is combined with a torque wrench (Click here).
- Do not bend or damage the brake tube.
Connect the rear flexible hose to the connecting point with each brake tube, and then install 2 new clips.
Using a union nut wrench, connect each brake tube to the rear flexible hose while holding the rear flexible hose with a wrench.
- Torque:
- 15 N*m{ 155 kgf*cm , 11 ft.*lbf }
- NOTICE:
- Do not bend or damage the brake tube.
- Do not allow any foreign matter such as dirt and dust to enter the brake tube from the connecting point.
- Use the formula to calculate special torque values for situations where a union nut wrench is combined with a torque wrench (Click here).
- Do not bend or damage the brake tube.
| 8. BLEED BRAKE LINE |
for Hydraulic Brake Booster:
Bleed the brake line (Click here).
for Vacuum Brake Booster:
Bleed the brake line (Click here).
| 9. INSTALL REAR WHEEL |
- Torque:
- 112 N*m{ 1142 kgf*cm , 83 ft.*lbf }