Rear Blower Motor Circuit
Circuit diagnosis · Vehicles built Aug 2013 – Jul 2014
Versions by build date: Aug 2013 – Jul 2014 from Aug 2014
DESCRIPTION
The rear blower with fan motor sub-assembly is operated by signals from the air conditioning amplifier. Rear blower motor speed signals are transmitted in accordance with changes in the duty ratio.WIRING DIAGRAM
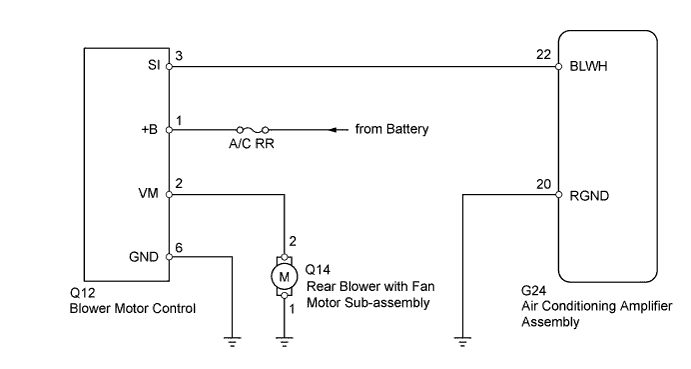

INSPECTION PROCEDURE
- NOTICE:
- Inspect the fuses for circuits related to this system before performing the following inspection procedure.
| 1. PERFORM ACTIVE TEST USING INTELLIGENT TESTER (REAR BLOWER WITH FAN MOTOR) |

Select the Active Test, use the intelligent tester to generate a control command, and then check that the rear blower with fan motor sub-assembly operates (Click here).
Air Conditioner Tester Display
Test Part
Control Range
Diagnostic Note
Rear Blower Motor
Rear blower with fan motor sub-assembly
Min.: 0, Max.: 31
-
- OK:
- Rear blower with fan motor sub-assembly operates and rear blower with fan motor sub-assembly speed changes.
|
|
||||

| OK | ||
 |
||
| ||
| 2. CHECK HARNESS AND CONNECTOR (BLOWER MOTOR CONTROL - BATTERY AND BODY GROUND) |
Disconnect the Q12 control connector.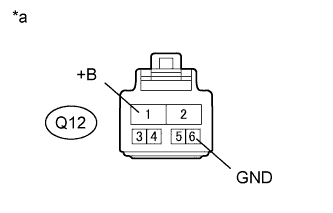
Measure the voltage according to the value(s) in the table below.
- Standard Voltage:
Tester Connection
Condition
Specified Condition
Q12-1 (+B) - Body ground
Always
11 to 14 V
Measure the resistance according to the value(s) in the table below.
- Standard Resistance:
Tester Connection
Condition
Specified Condition
Q12-6 (GND) - Body ground
Always
Below 1 Ω
| *a |
Front view of wire harness connector (to Blower Motor Control) |
|
|
||||

| OK | |
 |
| 3. INSPECT REAR BLOWER WITH FAN MOTOR SUB-ASSEMBLY |
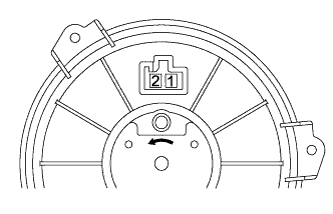 |
Remove the rear blower with fan motor sub-assembly (Click here).
Apply battery voltage to the rear blower with fan motor sub-assembly and check the operation of the rear blower with fan motor sub-assembly.
- OK:
Measurement Condition
Specified Condition
Battery positive (+) → Terminal 2
Battery negative (-) → Terminal 1
Rear blower with fan motor sub-assembly operation is normal
|
|
||||
| OK | |
|
| 4. CHECK HARNESS AND CONNECTOR (BLOWER MOTOR CONTROL - AIR CONDITIONING AMPLIFIER) |
Disconnect the G24 amplifier connector.
Disconnect the Q12 control connector.
Measure the resistance according to the value(s) in the table below.
- Standard Resistance:
Tester Connection
Condition
Specified Condition
G24-22 (BLWH) - Q12-3 (SI)
Always
Below 1 Ω
G24-22 (BLWH) - Body ground
Always
10 kΩ or higher
|
|
||||
| OK | |
|
| 5. CHECK HARNESS AND CONNECTOR (BLOWER MOTOR CONTROL - REAR BLOWER WITH FAN MOTOR) |
Disconnect the Q12 control connector.
Disconnect the Q14 motor connector.
Measure the resistance according to the value(s) in the table below.
- Standard Resistance:
Tester Connection
Condition
Specified Condition
Q12-2 (VM) - Q14-2
Always
Below 1 Ω
Q12-2 (VM) - Body ground
Always
10 kΩ or higher
|
|
||||
| OK | |
|
| 6. CHECK HARNESS AND CONNECTOR (REAR BLOWER WITH FAN MOTOR - BODY GROUND) |
Disconnect the Q14 motor connector.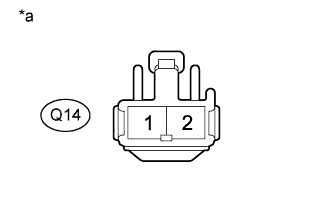
Measure the resistance according to the value(s) in the table below.
- Standard Resistance:
Tester Connection
Condition
Specified Condition
Q14-1 - Body ground
Always
Below 1 Ω
Text in Illustration *a
Front view of wire harness connector
(to Rear Blower with Fan Motor Sub-assembly)
|
|
||||
| OK | |
|
| 7. CHECK AIR CONDITIONING AMPLIFIER ASSEMBLY |
Remove the air conditioning amplifier assembly with its connectors still connected (Click here).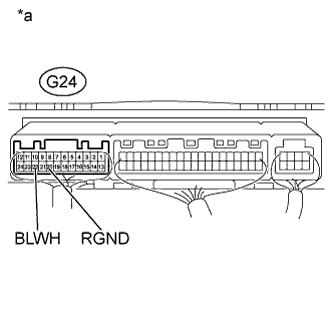
Measure the voltage according to the value(s) in the table below.
- Standard Voltage:
Tester Connection
Condition
Specified Condition
G24-22 (BLWH) - G24-20 (RGND)
Always
4.5 to 7 V
Text in Illustration *a
Component with harness connected
(Air Conditioning Amplifier Assembly)
|
|
||||
| OK | |
|
| 8. CHECK AIR CONDITIONING AMPLIFIER ASSEMBLY |
Remove the air conditioning amplifier assembly with its connectors still connected (Click here).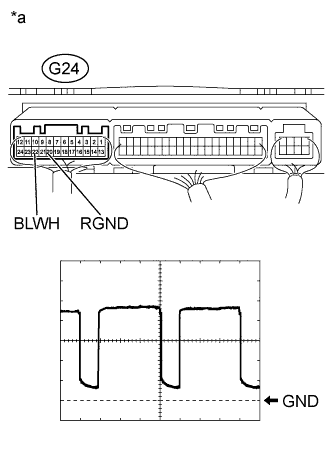
Using an oscilloscope, check the waveform.
Item
Content
Terminal No. (Symbol)
G24-22 (BLWH) - G20-20 (RGND)
Tool Setting
1 V/DIV., 500 μs/DIV.
Condition
Ignition switch ON
Blower switch LO
- OK:
- Waveform is as shown in the illustration.
Text in Illustration *a
Component with harness connected
(Air Conditioning Amplifier Assembly)
- HINT:
- Waveform varies with the blower level.
|
|
||||
| OK | |
|
| 9. REPLACE BLOWER MOTOR CONTROL |
Replace the blower motor control with a new or normally functioning one (Click here).
Operate the rear blower with fan motor sub-assembly to check that it functions properly.
- OK:
- Rear blower with fan motor sub-assembly operates normally.
|
|
||||
| OK | ||
|
||
| ||