INSTALLATION
Removal / installation · Vehicles built from Aug 2013
| 1. INSTALL REAR STABILIZER LINK ASSEMBLY |

Install the rear stabilizer link assembly with the bolt and nut.
- Torque:
- 100 N*m{ 1020 kgf*cm , 74 ft.*lbf }
- HINT:
- Turn the nut while holding the bolt.
| 2. INSTALL REAR STABILIZER CONTROL CYLINDER |
Install the 2 bleeder plug caps to the rear stabilizer control cylinder.
Install the rear stabilizer control cylinder with the bolt and nut.
- Torque:
- 100 N*m{ 1020 kgf*cm , 74 ft.*lbf }
- NOTICE:
- Do not hold the rear stabilizer control cylinder by the cylinder boot.
- HINT:
- Turn the nut while holding the bolt.
| 3. CONNECT REAR STABILIZER CONTROL TUBE ASSEMBLY |
Connect the rear stabilizer control tube to the rear stabilizer control cylinder with the 2 union bolts and 2 new pressure port gaskets.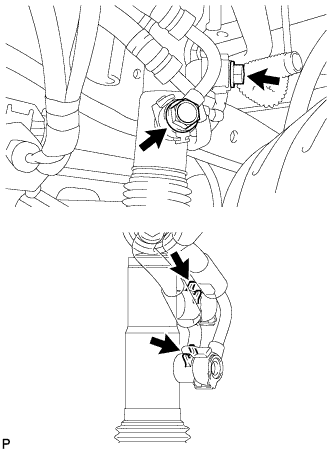

- Torque:
- 69 N*m{ 704 kgf*cm , 51 ft.*lbf }
- NOTICE:
- Insert the stoppers of the rear stabilizer control tube into the rear stabilizer control cylinder.
| 4. TEMPORARILY INSTALL REAR STABILIZER BAR SUB-ASSEMBLY |
Install the 2 rear stabilizer bushes to the rear stabilizer bar.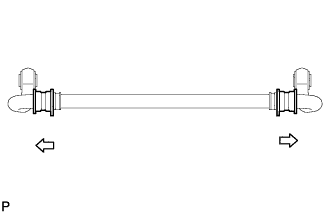
- HINT:
- Install the stabilizer bush to the outer side of the stabilizer bush stopper on the stabilizer bar.
Text in Illustration 
Outer Side
Temporarily install the rear stabilizer bar with the 2 bolts and nuts.
| 5. INSTALL REAR STABILIZER LOWER BRACKET |
Support the rear stabilizer bar with a jack.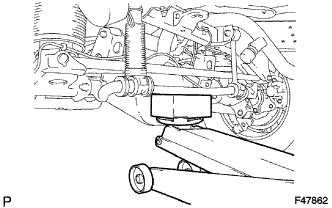
- NOTICE:
- Place a wooden block between the jack and rear stabilizer bar to prevent damage.
Install the rear stabilizer bar and 2 rear stabilizer lower brackets with the 4 bolts.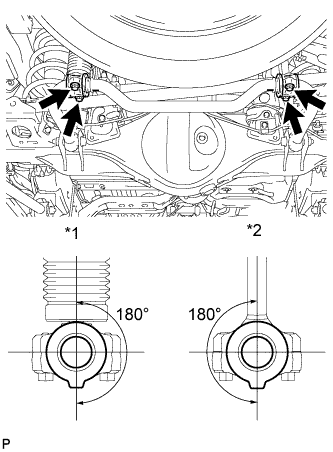
- Torque:
- 45 N*m{ 459 kgf*cm , 33 ft.*lbf }
- HINT:
- Check that the protrusions on the rear stabilizer bush are positioned within 180° of the rear stabilizer control cylinder and rear stabilizer link.
Text in Illustration *1
Rear Stabilizer Control Cylinder
*2
Rear Stabilizer Link
| 6. BLEED SUSPENSION FLUID |
Bleed the suspension fluid (Click here).
| 7. STABILIZE SUSPENSION |
Lower the vehicle.
Bounce the vehicle up and down several times to stabilize the suspension.
| 8. TIGHTEN REAR STABILIZER BAR SUB-ASSEMBLY |
Tighten the 2 bolts and 2 nuts.
- Torque:
- 110 N*m{ 1122 kgf*cm , 81 ft.*lbf }
- NOTICE:
- Turn the bolt while holding the nut.
| 9. INSTALL STABILIZER CONTROL VALVE PROTECTOR |
Install the stabilizer control valve protector with the 2 bolts.
- Torque:
- 29 N*m{ 296 kgf*cm , 21 ft.*lbf }
| 10. INSTALL SIDE STEP ASSEMBLY LH (for 5 Door) |
Install the side step with the 6 bolts.
- Torque:
- 18 N*m{ 184 kgf*cm , 13 ft.*lbf }
w/ Illumination:
Connect the 2 connectors.
| 11. INSPECT VEHICLE HEIGHT |
Inspect the vehicle height (Click here).