TERMINALS OF ECU
System information · Vehicles built from Aug 2013
| CHECK MAIN BODY ECU (MULTIPLEX NETWORK BODY ECU) AND DRIVER SIDE JUNCTION BLOCK ASSEMBLY |
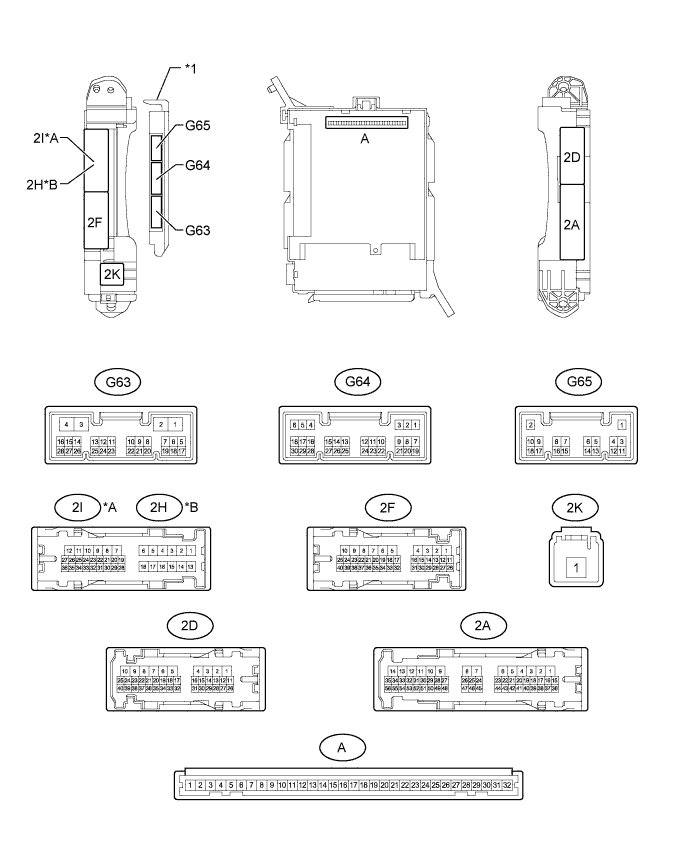

| *A |
for LHD |
*B |
for RHD |
| *1 |
Main body ECU (multiplex network body ECU) |
- |
- |
Remove the main body ECU (multiplex network body ECU) from the driver side junction block assembly (Click here).
Measure the resistance and voltage according to the value(s) in the table below.
If the result is not as specified, there may be a malfunction on the wire harness side.Terminal No. (Symbol)
Wiring Color
Terminal Description
Condition
Specified Condition
G63-3 (GND2) - Body ground
W-B - Body ground
Ground
Always
Below 1 Ω
A-11 (GND1) - Body ground
None - Body ground
Ground
Always
Below 1 Ω
A-30 (BECU) - Body ground
None - Body ground
Battery power supply
Always
11 to 14 V
A-32 (IG) - Body ground
None - Body ground
IG power supply
Ignition switch ON
11 to 14 V
| CHECK MULTIPLEX NETWORK MASTER SWITCH ASSEMBLY |
Disconnect the K4*1 or J9*2 multiplex network master switch assembly connector.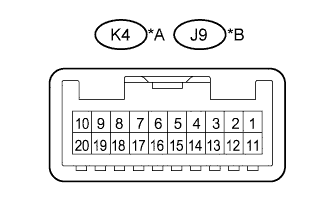
- *1: for LHD
- *2: for RHD
Text in Illustration *A
for LHD
*B
for RHD
- *1: for LHD
Measure the resistance and voltage according to the value(s) in the table below.
for LHD Terminal No. (Symbol)
Wiring Color
Terminal Description
Condition
Specified Condition
K4-12 (GND) - Body ground
W-B - Body ground
Ground
Always
Below 1 Ω
K4-11 (B) - Body ground
L - Body ground
Battery power supply
Always
11 to 14 V
If the result is not as specified, there may be a malfunction on the wire harness side.for RHD Terminal No. (Symbol)
Wiring Color
Terminal Description
Condition
Specified Condition
J9-12 (GND) - Body ground
W-B - Body ground
Ground
Always
Below 1 Ω
J9-11 (B) - Body ground
L - Body ground
Battery power supply
Always
11 to 14 V
| CHECK FRONT POWER WINDOW REGULATOR MOTOR ASSEMBLY LH |
Disconnect the K7 front power window regulator motor assembly LH connector.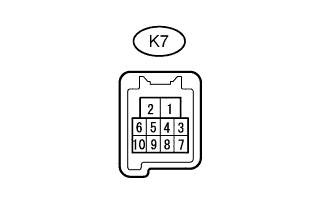
Measure the resistance and voltage according to the value(s) in the table below.
Terminal No. (Symbol)
Wiring Color
Terminal Description
Condition
Specified Condition
K7-1 (GND) - Body ground
W-B - Body ground
Ground
Always
Below 1 Ω
K7-2 (B) - Body ground
R - Body ground*1
G - Body ground*2
Battery power supply
Always
11 to 14 V
- *1: for LHD
- *2: for RHD
- *1: for LHD
| CHECK FRONT POWER WINDOW REGULATOR MOTOR ASSEMBLY RH |
Disconnect the J7 front power window regulator motor assembly RH connector.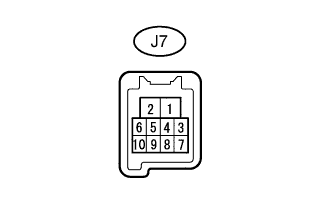
Measure the resistance and voltage according to the value(s) in the table below.
Terminal No. (Symbol)
Wiring Color
Terminal Description
Condition
Specified Condition
J7-1 (GND) - Body ground
W-B - Body ground
Ground
Always
Below 1 Ω
J7-2 (B) - Body ground
G - Body ground*1
R - Body ground*2
Battery power supply
Always
11 to 14 V
- *1: for LHD
- *2: for RHD
- *1: for LHD
| CHECK REAR POWER WINDOW REGULATOR MOTOR ASSEMBLY LH (for 5 Door) |
Disconnect the M4 rear power window regulator motor assembly LH connector.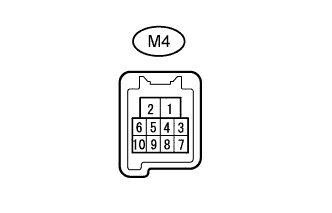
Measure the resistance and voltage according to the value(s) in the table below.
If the result is not as specified, there may be a malfunction on the wire harness side.Terminal No. (Symbol)
Wiring Color
Terminal Description
Condition
Specified Condition
M4-1 (GND) - Body ground
W-B - Body ground
Ground
Always
Below 1 Ω
M4-2 (B) - Body ground
W - Body ground
Battery power supply
Always
11 to 14 V
| CHECK REAR POWER WINDOW REGULATOR MOTOR ASSEMBLY RH (for 5 Door) |
Disconnect the L4 rear power window regulator motor assembly RH connector.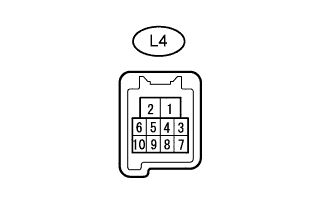
Measure the resistance and voltage according to the value(s) in the table below.
If the result is not as specified, there may be a malfunction on the wire harness side.Terminal No. (Symbol)
Wiring Color
Terminal Description
Condition
Specified Condition
L4-1 (GND) - Body ground
W-B - Body ground
Ground
Always
Below 1 Ω
L4-2 (B) - Body ground
W - Body ground
Battery power supply
Always
11 to 14 V
| CHECK SLIDING ROOF DRIVE GEAR SUB-ASSEMBLY (w/ Sliding Roof System) |
Disconnect the W2 sliding roof drive gear sub-assembly connector.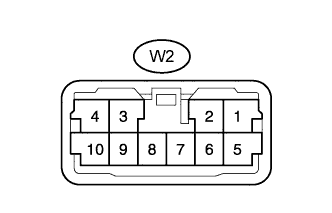
Measure the resistance and voltage according to the value(s) in the table below.
If the result is not as specified, there may be a malfunction on the wire harness side.Terminal No. (Symbol)
Wiring Color
Terminal Description
Condition
Specified Condition
W2-2 (E)- Body ground
W-B - Body ground
Ground
Always
Below 1 Ω
W2-1 (B) - Body ground
W - Body ground
Battery power supply
Always
11 to 14 V
W2-5 (IG) - Body ground
L - Body ground
IG power supply
Ignition switch ON
11 to 14 V
| CHECK CERTIFICATION ECU (w/ Entry and Start System) |
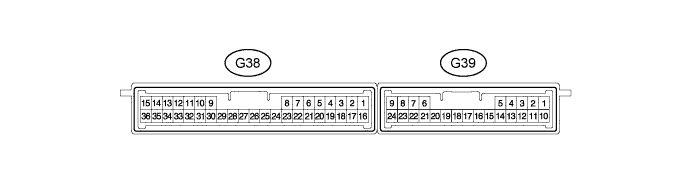
Disconnect the G38 certification ECU connector.
Measure the resistance and voltage according to the value(s) in the table below.
If the result is not as specified, there may be a malfunction on the wire harness side.Terminal No. (Symbol)
Wiring Color
Terminal Description
Condition
Specified Condition
G38-15 (E) - Body ground
W-B - Body ground
Ground
Always
Below 1 Ω
G38-1 (+B) - Body ground
V - Body ground
Battery power supply
Always
11 to 14 V
G38-16 (IG) - Body ground
W - Body ground
IG power supply
Ignition switch ON
11 to 14 V
| CHECK POWER MANAGEMENT CONTROL ECU (w/ Entry and Start System) |
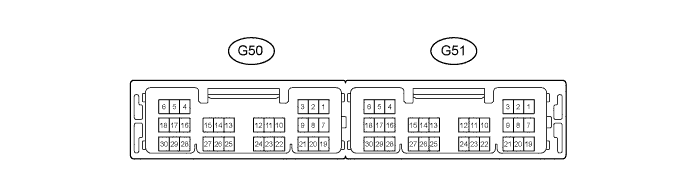
Disconnect the G51 power management control ECU connector.
Measure the resistance and voltage according to the value(s) in the table below.
Terminal No. (Symbol)
Wiring Color
Terminal Description
Condition
Specified Condition
G51-6 (GND) - Body ground
W-B - Body ground
Ground
Always
Below 1 Ω
G51-5 (GND2) - Body ground
W-B - Body ground
Ground
Always
Below 1 Ω
G51-1 (AM22) - Body ground
B - Body ground
Battery power supply
Always
11 to 14 V
G51-2 (AM21) - Body ground
B - Body ground
Battery power supply
Always
11 to 14 V
| CHECK ID CODE BOX (w/ Entry and Start System) |
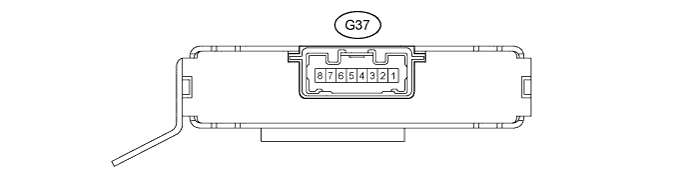
Disconnect the G37 ID code box connector.
Measure the resistance and voltage according to the value(s) in the table below.
If the result is not as specified, there may be a malfunction on the wire harness side.Terminal No. (Symbol)
Wiring Color
Terminal Description
Condition
Specified Condition
G37-8 (GND) - Body ground
W-B - Body ground
Ground
Always
Below 1 Ω
G37-1 (+B) - Body ground
V - Body ground
Battery power supply
Always
11 to 14 V
| CHECK STEERING LOCK ACTUATOR ASSEMBLY (STEERING LOCK ECU) (w/ Entry and Start System) |
Disconnect the G35 steering lock actuator assembly (steering lock ECU) connector.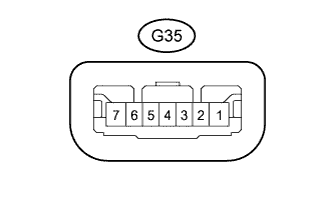
Measure the resistance and voltage according to the value(s) in the table below.
If the result is not as specified, there may be a malfunction on the wire harness side.Terminal No. (Symbol)
Wiring Color
Terminal Description
Condition
Specified Condition
G35-1 (GND) - Body ground
W-B - Body ground
Ground
Always
Below 1 Ω
G35-7 (B) - Body ground
G - Body ground
Battery power supply
Always
11 to 14 V
G35-6 (IG2) - Body ground
W - Body ground
IG power supply
Ignition switch ON
11 to 14 V
| CHECK AIR CONDITIONING AMPLIFIER ASSEMBLY |
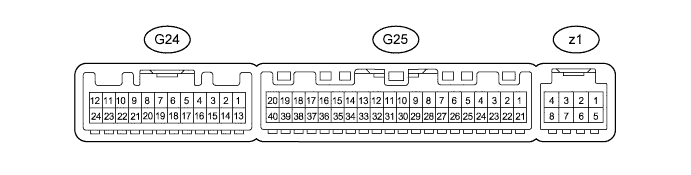
Disconnect the G25 air conditioning amplifier assembly connector.
Measure the resistance and voltage according to the value(s) in the table below.
If the result is not as specified, there may be a malfunction on the wire harness side.Terminal No. (Symbol)
Wiring Color
Terminal Description
Condition
Specified Condition
G25-14 (GND) - Body ground
W-B - Body ground
Ground
Always
Below 1 Ω
G25-21 (B) - Body ground
V - Body ground
Battery power supply
Always
11 to 14 V
G25-1 (IG+) - Body ground
L - Body ground
IG power supply
Ignition switch ON
11 to 14 V
| CHECK INTEGRATION CONTROL AND PANEL ASSEMBLY |
Disconnect the G23 integration control and panel assembly connector.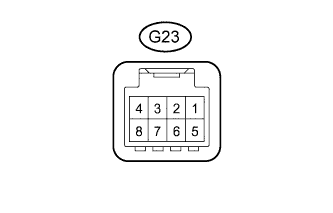
Measure the resistance and voltage according to the value(s) in the table below.
If the result is not as specified, there may be a malfunction on the wire harness side.Terminal No. (Symbol)
Wiring Color
Terminal Description
Condition
Specified Condition
G23-4 (GND) - Body ground
W-B - Body ground
Ground
Always
Below 1 Ω
G23-5 (IG+) - Body ground
L - Body ground
IG power supply
Ignition switch ON
11 to 14 V
| CHECK AIR CONDITIONING CONTROL ASSEMBLY (w/ Rear Air Conditioning System) |
Disconnect the T7 air conditioning control assembly connector.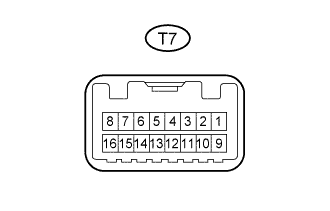
Measure the resistance and voltage according to the value(s) in the table below.
If the result is not as specified, there may be a malfunction on the wire harness side.Terminal No. (Symbol)
Wiring Color
Terminal Description
Condition
Specified Condition
T7-8 (E) - Body ground
W-B - Body ground
Ground
Always
Below 1 Ω
T7-1 (IG) - Body ground
L - Body ground
IG power supply
Ignition switch ON
11 to 14 V
| CHECK RAIN SENSOR (w/ Rain Sensor) |
Disconnect the W6 rain sensor connector.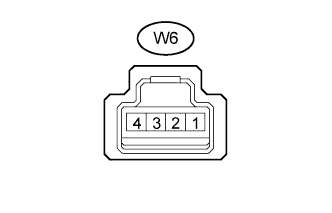
Measure the resistance and voltage according to the value(s) in the table below.
If the result is not as specified, there may be a malfunction on the wire harness side.Terminal No. (Symbol)
Wiring Color
Terminal Description
Condition
Specified Condition
W6-1 (ES) - Body ground
W-B - Body ground
Ground
Always
Below 1 Ω
W6-4 (SIG) - Body ground
GR - Body ground
IG power supply
Ignition switch ON
11 to 14 V
| CHECK WINDSHIELD WIPER RELAY ASSEMBLY (w/ Rain Sensor) |
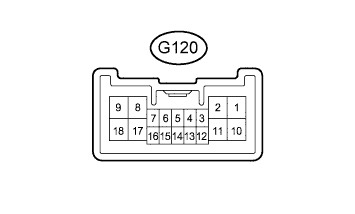 |
Disconnect the G120 windshield wiper relay assembly connector.
Measure the resistance and voltage according to the value(s) in the table below.
for LHD Terminal No. (Symbol)
Wiring Color
Terminal Description
Condition
Specified Condition
G120-1 (EW) - Body ground
W-B - Body ground
Ground
Always
Below 1 Ω
G120-17 (+B) - Body ground
G - Body ground
Battery power supply
Always
11 to 14 V
G120-3 (WIG) - Body ground
G - Body ground
IG power supply
Ignition switch ON
11 to 14 V
for RHD (for RH Side Type Wiper Switch) Terminal No. (Symbol)
Wiring Color
Terminal Description
Condition
Specified Condition
G120-9 (EW) - Body ground
W-B - Body ground
Ground
Always
Below 1 Ω
G120-11 (+B) - Body ground
G - Body ground
Battery power supply
Always
11 to 14 V
G120-7 (WIG) - Body ground
G - Body ground
IG power supply
Ignition switch ON
11 to 14 V
If the result is not as specified, there may be a malfunction on the wire harness side.for RHD (for LH Side Type Wiper Switch) Terminal No. (Symbol)
Wiring Color
Terminal Description
Condition
Specified Condition
G120-1 (EW) - Body ground
W-B - Body ground
Ground
Always
Below 1 Ω
G120-17 (+B) - Body ground
G - Body ground
Battery power supply
Always
11 to 14 V
G120-3 (WIG) - Body ground
G - Body ground
IG power supply
Ignition switch ON
11 to 14 V
| CHECK DOUBLE LOCK DOOR CONTROL RELAY ASSEMBLY (w/ Double Locking System) |
Disconnect the G49 double lock door control relay assembly connector.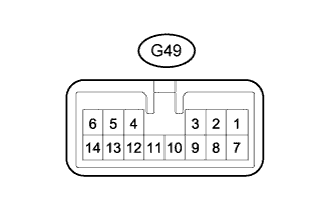
Measure the resistance and voltage according to the value(s) in the table below.
If the result is not as specified, there may be a malfunction on the wire harness side.Terminal No. (Symbol)
Wiring Color
Terminal Description
Condition
Specified Condition
G49-14 (GND) - Body ground
W-B - Body ground
Ground
Always
Below 1 Ω
G49-7 (CPUB) - Body ground
P - Body ground
Battery power supply
Always
11 to 14 V
G49-1 (+B) - Body ground
R - Body ground
Battery power supply
Always
11 to 14 V
| CHECK DRIVING SUPPORT SWITCH CONTROL ECU (for Manual Transmission, w/ Multi-function Switch) |
Disconnect the G76 driving support switch control ECU connector.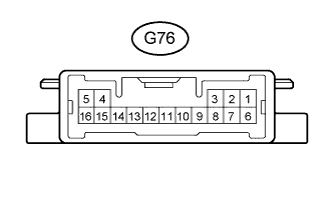
Measure the resistance and voltage according to the value(s) in the table below.
If the result is not as specified, there may be a malfunction on the wire harness side.Terminal No. (Symbol)
Wiring Color
Terminal Description
Condition
Specified Condition
G76-16 (GND) - Body ground
W-B - Body ground
Ground
Always
Below 1 Ω
G76-6 (+B) - Body ground
L - Body ground
Battery power supply
Always
11 to 14 V
G76-7 (IG) - Body ground
L - Body ground
IG power supply
Ignition switch ON
11 to 14 V
| CHECK DRIVING SUPPORT SWITCH CONTROL ECU (for Automatic Tansmission, w/ Multi-function Switch) |
Disconnect the G163 driving support switch control ECU connector.
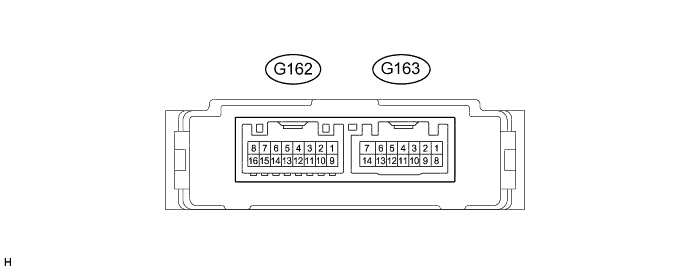
Measure the resistance and voltage according to the value(s) in the table below.
If the result is not as specified, there may be a malfunction on the wire harness side.Terminal No. (Symbol)
Wiring Color
Terminal Description
Condition
Specified Condition
G163-7 (GND) - Body ground
W-B - Body ground
Ground
Always
Below 1 Ω
G163-8 (+B) - Body ground
L - Body ground
Battery power supply
Always
11 to 14 V
G163-10 (IG) - Body ground
L - Body ground
IG power supply
Ignition switch ON
11 to 14 V
| CHECK COMBINATION METER ASSEMBLY |
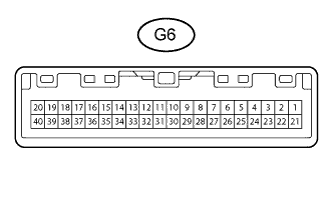 |
Disconnect the G6 combination meter assembly connector.
Measure the voltage according to the value(s) in the table below.
If the result is not as specified, there may be a malfunction on the wire harness side.Terminal No. (Symbol)
Wiring Color
Terminal Description
Condition
Specified Condition
G6-21 (E2) - Body ground
BR - Body ground
Ground
Always
Below 1 V
G6-26 (B) - Body ground
L - Body ground
Battery power supply
Always
11 to 14 V
G6-28 (IG+) - Body ground
R - Body ground
IG power supply
Ignition switch ON
11 to 14 V