REASSEMBLY
Removal / installation · Vehicles built from Aug 2013
- HINT:
- Use the same procedure for the RH and LH sides.
- The procedure listed below is for the LH side.
- A bolt without a torque specification is shown in the standard bolt chart (Click here).
- Use the same procedure for the RH and LH sides.
| 1. INSTALL STEP LIGHT ASSEMBLY (w/ Illumination) |

for 5 Door:
Install the 2 lights with the 4 bolts.
for 3 Door:
Install the light with the 2 bolts.
| 2. INSTALL STEP LIGHT BRACKET (w/ Illumination) |
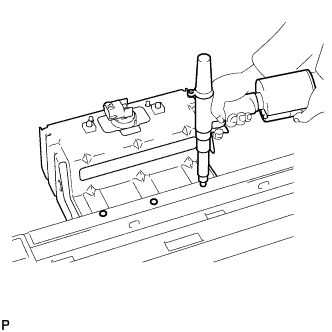  |
Install a nose piece to an air riveter or hand riveter.
Insert the mandrel part of a new rivet into the nose piece.
Using the riveter, install the step light bracket with the 3 rivets as shown in the illustration.
- HINT:
- If the rivet cannot be cut, pull it once and cut it.
- NOTICE:
-
Do not pry the rivet with the riveter as this will cause damage to the riveter and mandrel.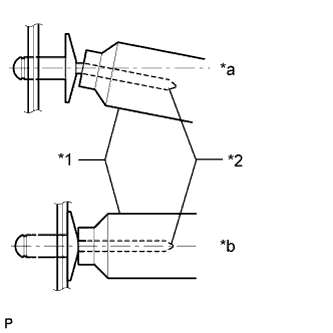
Text in Illustration *1
Riveter
*2
Mandrel
*a
INCORRECT
*b
CORRECT
-
Confirm that the rivets are seated properly against the step light bracket.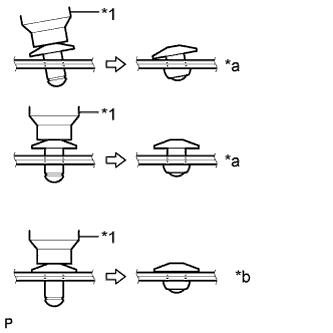
- Do not tilt the riveter when installing the rivet to the step light bracket.
- Do not leave any space between the rivet head and step light bracket.
Text in Illustration *1
Riveter
*a
INCORRECT
*b
CORRECT
-
Do not leave any space between the step light bracket and step plate. Firmly hold together the 2 items while installing the rivet.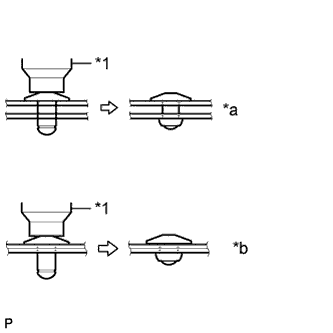
Text in Illustration *1
Riveter
*a
INCORRECT
*b
CORRECT
-
| 3. INSTALL STEP LIGHT ASSEMBLY (w/ Illumination) |
Install the bulb.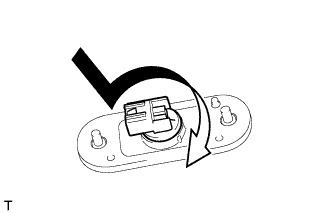
Turn the socket in the direction indicated by the arrow to install it.
| 4. INSTALL STEP PANEL WIRE LH (w/ Illumination) |
for 5 Door:
Attach the 9 clamps to install the wire.
for 3 Door:
Attach the 5 clamps to install the wire.
| 5. INSTALL SIDE STEP BRACKET SUB-ASSEMBLY LH |
Install a nose piece to an air riveter or hand riveter.
Insert the mandrel part of a new rivet into the nose piece.
Using the riveter, install the side step bracket with 3 rivets as shown in the illustration.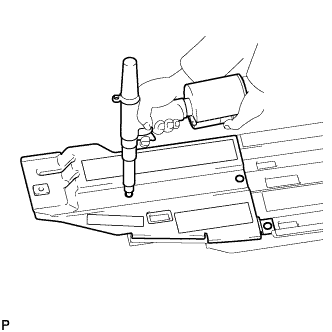
- HINT:
- If the rivet cannot be cut, pull it once and cut it.
- NOTICE:
-
Do not pry the rivet with the riveter as this will cause damage to the riveter and mandrel.
Text in Illustration *1
Riveter
*2
Mandrel
*a
INCORRECT
*b
CORRECT
-
Confirm that the rivets are seated properly against the side step bracket.
- Do not tilt the riveter when installing the rivet to the side step bracket.
- Do not leave any space between the rivet head and side step bracket.
Text in Illustration *1
Riveter
*a
INCORRECT
*b
CORRECT
-
Do not leave any space between the side step bracket and step plate. Firmly hold together the 2 items while installing the rivet.
Text in Illustration *1
Riveter
*a
INCORRECT
*b
CORRECT
-
| 6. INSTALL NO. 2 SIDE STEP PLATE COVER |
Install the No. 2 side step plate cover.
| 7. INSTALL STEP PLATE COVER LH |
Install the side step plate cover.
| 8. INSTALL STEP PLATE LH (for 5 Door) |
Attach the 17 claws to install the step plate.
Install the 3 bolts and clip.
- Torque:
- 2.3 N*m{ 24 kgf*cm , 20 in.*lbf }
| 9. INSTALL STEP PLATE LH (for 3 Door) |
Attach the 14 claws to install the step plate.
Install the 3 bolts and clip.
- Torque:
- 2.3 N*m{ 24 kgf*cm , 20 in.*lbf }
| 10. INSTALL NO. 2 ROCKER PANEL MOULDING PROTECTOR |
Install the No. 2 rocker panel moulding protector with the 2 bolts.
- Torque:
- 3.0 N*m{ 31 kgf*cm , 27 in.*lbf }
| 11. INSTALL NO. 3 SIDE STEP BRACKET LH |
Install the No. 3 side step bracket with the 2 bolts.
- Torque:
- 6.0 N*m{ 61 kgf*cm , 53 in.*lbf }
| 12. INSTALL NO. 2 SIDE STEP BRACKET LH |
Install the No. 2 side step bracket with the 2 bolts.
- Torque:
- 6.0 N*m{ 61 kgf*cm , 53 in.*lbf }
| 13. INSTALL SIDE STEP BRACKET LH |
Install the side step bracket with the 2 bolts.
- Torque:
- 6.0 N*m{ 61 kgf*cm , 53 in.*lbf }