INSTALLATION
Removal / installation · Vehicles built Aug 2013 – Jul 2014
Versions by build date: Aug 2013 – Jul 2014 from Aug 2014
| 1. INSTALL HEADPHONE TERMINAL |

Attach the 4 claws to install the 2 headphone terminals.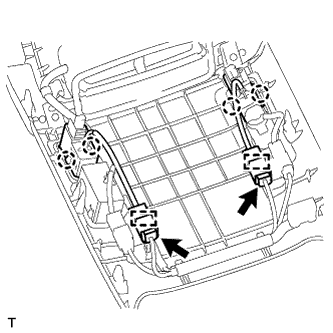

Attach the 2 clamps and connect the 2 connectors.
| 2. INSTALL VIDEO (VIDEO ADAPTER) TERMINAL |
Attach the 4 claws to install the video terminal.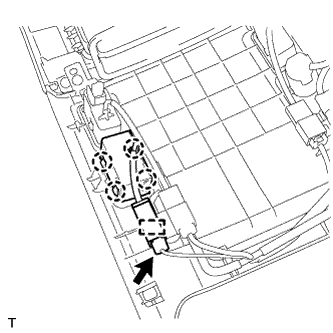
Attach the clamp and connect the connector.
| 3. INSTALL REAR CONSOLE END PANEL SUB-ASSEMBLY |
Connect each connector.
Attach the 4 clips and 4 claws to install the rear console end panel.
| 4. INSTALL NO. 1 STEREO JACK ADAPTER ASSEMBLY (for Automatic Transmission) |
Attach the 2 claws to install the stereo jack adapter.
| 5. INSTALL NO. 1 STEREO JACK ADAPTER ASSEMBLY (for Manual Transmission) |
Attach the 2 claws to install the stereo jack adapter.
| 6. INSTALL CONSOLE PANEL SUB-ASSEMBLY (for Automatic Transmission) |
Connect each connector.
Attach the 8 clips and 2 claws to install the console panel.
| 7. INSTALL CONSOLE PANEL SUB-ASSEMBLY (for Manual Transmission) |
Connect each connector.
Attach the 8 clips and 2 claws to install the console panel.
| 8. INSTALL SHIFT LEVER KNOB SUB-ASSEMBLY |
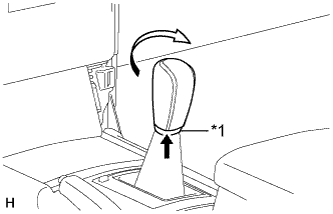 |
Install the shift lever knob and twist it in the direction indicated by the arrow.
Install the shifting hole cover to the shift lever knob.
Text in Illustration *1
Shifting Hole Cover
| 9. INSTALL FRONT CONSOLE UPPER PANEL GARNISH |
w/o Seat Heater System:
Connect the connector.
Attach the 5 clips to install the front console upper panel garnish.
w/o CRAWL:
Connect each connector.
Attach the 5 clips to install the front console upper panel garnish.
w/ CRAWL:
Attach the 5 clips to install the front console upper panel garnish.
| 10. INSTALL INSTRUMENT PANEL FINISH PANEL END LH |
Attach the 4 clips to install the instrument panel finish panel end LH.
| 11. INSTALL INSTRUMENT PANEL FINISH PANEL END RH |
Attach the 4 clips to install the instrument panel finish panel end RH.
| 12. INSTALL NO. 2 INSTRUMENT PANEL FINISH PANEL CUSHION |
Attach the 5 clips to install the No. 2 instrument panel finish panel cushion.
| 13. INSTALL NO. 1 INSTRUMENT PANEL FINISH PANEL CUSHION |
- HINT:
- Use the same procedure described for the No. 2 instrument panel finish panel cushion.
| 14. INSTALL INTEGRATION CONTROL AND PANEL ASSEMBLY |
Connect the connector.
Attach the 4 clips to install the integration control and panel assembly.
| 15. CONNECT CABLE TO NEGATIVE BATTERY TERMINAL |
- NOTICE:
- When disconnecting the cable, some systems need to be initialized after the cable is reconnected (Click here).