INSTALLATION
Removal / installation · Vehicles built from Aug 2013
| 1. INSTALL NO. 2 OIL COOLER TUBE SUB-ASSEMBLY |

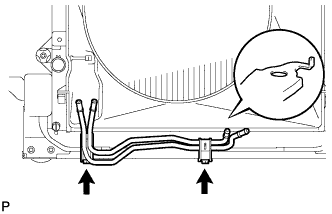  |
Install the No. 2 oil cooler tube with the 2 bolts.
- Torque:
- 14 N*m{ 143 kgf*cm , 10 ft.*lbf }
- NOTICE:
- Make sure the rotation stopper of the tube contacts the crossmember.
| 2. INSTALL NO. 2 OIL COOLER INLET HOSE AND NO. 2 OIL COOLER OUTLET HOSE |
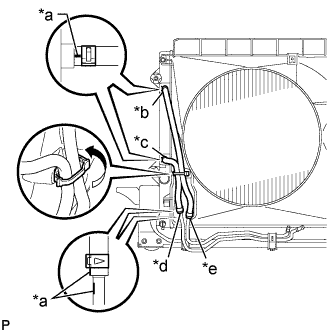 |
Connect the No. 2 oil cooler inlet hose and No. 2 oil cooler outlet hose to the No. 2 oil cooler tube.
Text in Illustration *a
Paint Mark
*b
Yellow Paint Mark
*c
Green Paint Mark
*d
Blue Paint Mark
*e
Pink Paint Mark
Connect the 2 hoses to the radiator to install them, and then pass the 2 hoses through the No. 1 flexible hose clamp and close the clamp.
- NOTICE:
- When connecting the hoses to the tube, support the tube by hand and be careful to prevent the tube from being deformed.
- Make sure the paint marks and pinching portion of each clip are facing the directions shown in the illustration.
- When connecting the hoses to the tube, support the tube by hand and be careful to prevent the tube from being deformed.
| 3. INSTALL NO. 1 OIL COOLER INLET TUBE AND NO. 1 OIL COOLER OUTLET TUBE |
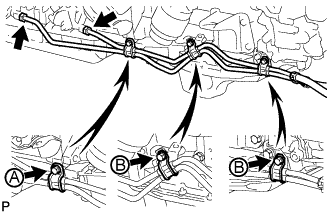 |
Temporarily install the 2 end of the oil cooler tubes to each oil cooler tube union by hand.
Close the 3 No. 2 flexible hose clamps and install the 3 bolts.
- Torque:
- for bolt A:
- 14 N*m{ 143 kgf*cm , 10 ft.*lbf }
- for bolt B:
- 5.5 N*m{ 56 kgf*cm , 49 in.*lbf }
Using a union nut wrench, tighten the oil cooler tubes.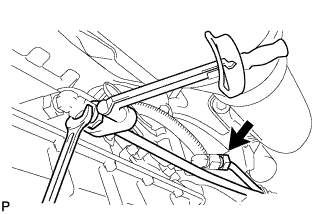
- Torque:
- 34 N*m{ 347 kgf*cm , 25 ft.*lbf }
- NOTICE:
- Use the formula to calculate special torque values for situations where a union nut wrench is combined with a torque wrench (Click here).
| 4. INSTALL NO. 1 OIL COOLER INLET HOSE AND NO. 1 OIL COOLER OUTLET HOSE |
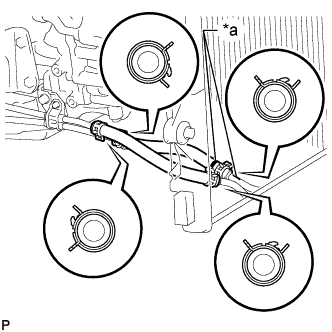 |
Connect the No. 1 oil cooler inlet hose and No. 1 oil cooler outlet hose to the oil cooler inlet tube and No. 1 oil cooler outlet tube.
Text in Illustration *a
Pink Paint Mark
Connect the 2 hoses to the No. 2 oil cooler tube to install them.
- NOTICE:
- When connecting the hoses to the tube, support the tube by hand and be careful to prevent the tube from being deformed.
- Make sure the paint marks and pinching portion of each clip are facing the directions shown in the illustration.
- When connecting the hoses to the tube, support the tube by hand and be careful to prevent the tube from being deformed.
| 5. ADJUST AUTOMATIC TRANSMISSION FLUID LEVEL |
Adjust the automatic transmission fluid level (Click here).
| 6. INSTALL FRONT NO. 1 FENDER APRON TO FRAME SEAL RH |
Install the front No. 1 fender apron to frame seal with the 5 clips.
| 7. INSTALL FRONT FENDER APRON SEAL RH |
Install the front fender apron seal RH with the 5 clips.
| 8. INSTALL REAR ENGINE UNDER COVER ASSEMBLY |
Install the rear engine under cover with the 4 bolts.
- Torque:
- 29 N*m{ 296 kgf*cm , 21 ft.*lbf }
| 9. INSTALL NO. 1 ENGINE UNDER COVER SUB-ASSEMBLY |
Hook the engine under cover to the vehicle body as shown in the illustration.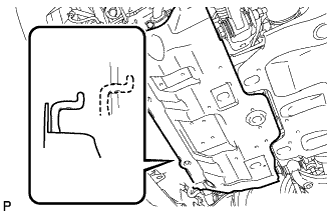
Install the 4 bolts.
- Torque:
- 29 N*m{ 296 kgf*cm , 21 ft.*lbf }