INSTALLATION
Removal / installation · Vehicles built from Aug 2013
| 1. INSTALL EXHAUST MANIFOLD |

Install a new gasket to the cylinder head.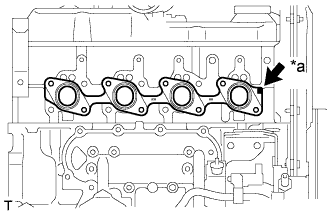

Text in Illustration *a
Front Mark
- HINT:
- Be sure to install a new gasket in the correct direction as shown in the illustration.
Install the exhaust manifold with the 6 bolts and 2 new nuts. Uniformly tighten the bolts and nuts in several steps.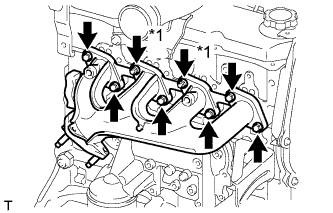
- Torque:
- 52 N*m{ 530 kgf*cm , 38 ft.*lbf }
Text in Illustration *1
Nut
| 2. INSTALL NO. 1 EXHAUST MANIFOLD HEAT INSULATOR |
Install the insulator with the 3 bolts.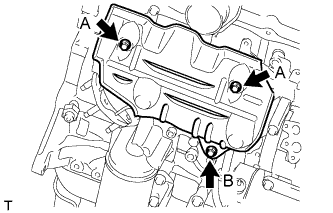
- Torque:
- for bolt A:
- 18 N*m{ 185 kgf*cm , 13 ft.*lbf }
- for bolt B:
- 19 N*m{ 195 kgf*cm , 14 ft.*lbf }
| 3. INSTALL ENGINE OIL LEVEL DIPSTICK GUIDE |
Apply clean engine oil to a new O-ring.
Install the O-ring to the guide.
Install the guide with the 2 bolts.
- Torque:
- 18 N*m{ 185 kgf*cm , 13 ft.*lbf }
| 4. INSTALL ENGINE OIL LEVEL DIPSTICK |
Install the oil level dipstick to the guide.
| 5. INSTALL FRONT EXHAUST PIPE ASSEMBLY |
Install a new gasket and the front exhaust pipe to the exhaust manifold with 3 new nuts.
- Torque:
- 54 N*m{ 554 kgf*cm , 40 ft.*lbf }
Install the No. 1 exhaust pipe support bracket with the 2 bolts.
- Torque:
- 71 N*m{ 724 kgf*cm , 52 ft.*lbf }
Install the clamp with the bolt.
- Torque:
- 19 N*m{ 194 kgf*cm , 14 ft.*lbf }
| 6. INSTALL INTAKE PIPE |
Install the intake pipe with the 2 bolts.
- Torque:
- 18 N*m{ 184 kgf*cm , 13 ft.*lbf }
Tighten the intake pipe clamp.
- Torque:
- 6.0 N*m{ 61 kgf*cm , 53 in.*lbf }
| 7. INSTALL RESONATOR WITH AIR CLEANER CAP SUB-ASSEMBLY |
Insert the hinge part of the air cleaner cap and hose into the air cleaner case, and then attach the 4 hook clamps.
Connect the air cleaner cap sub-assembly with the clamp.
- Torque:
- 5.0 N*m{ 51 kgf*cm , 44 in.*lbf }
Attach the wire harness clamp.
Connect the 2 clamps and connector.
| 8. INSPECT FOR EXHAUST GAS LEAK |
- If gas is leaking, tighten the areas necessary to stop the leak. Replace damaged parts as necessary.
| 9. INSTALL FRONT NO. 1 FENDER APRON TO FRAME SEAL RH |
Install the frame seal with the 5 clips.
| 10. INSTALL FRONT FENDER APRON SEAL RH |
Install the apron seal with the 5 clips.