REPLACEMENT
Removal / installation · Vehicles built from Aug 2013
- HINT:
- When replacing the filter, use TOYOTA genuine parts or equivalent parts.
| 1. REMOVE FUEL FILTER ASSEMBLY (w/ Fuel Heater) |

Disconnect the 2 fuel hoses.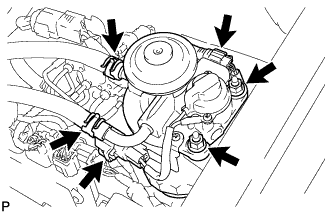

Disconnect the level warning switch connector and fuel heater connector.
Remove the 2 nuts and fuel filter assembly.
| 2. REMOVE FUEL FILTER ASSEMBLY (w/ Clogging Switch) |
Disconnect the 2 fuel hoses.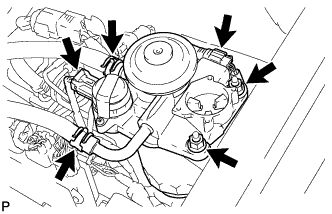
Disconnect the level warning switch connector and clogging switch connector.
Remove the 2 nuts and fuel filter assembly.
| 3. DRAIN FUEL |
Loosen the fuel filter drain plug and drain the fuel from the fuel filter.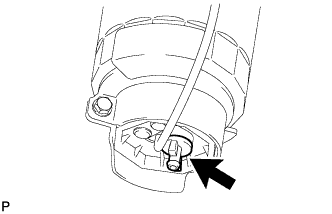
| 4. REMOVE FUEL HEATER ASSEMBLY (w/ Fuel Heater) |
Detach the fuel heater connector clamp from the fuel filter cap.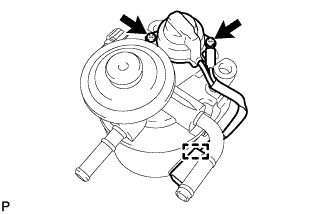
Remove the 2 screws and fuel heater.
| 5. REMOVE FUEL FILTER COVER |
Detach the level warning switch connector clamp from the fuel filter cap.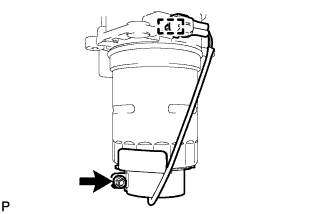
Remove the bolt, fuel filter cover and fuel filter gasket.
| 6. REMOVE LEVEL WARNING SWITCH |
Clamp the fuel filter assembly in a vise between aluminum plates.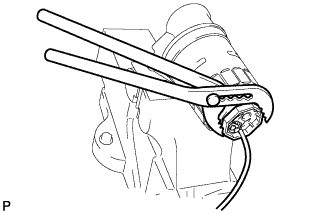
- NOTICE:
- Be careful not to damage the fuel filter cap.
Using pliers, remove the level warning switch.
- NOTICE:
- Be careful not to damage the level warning switch.
Remove the warning switch gasket from the level warning switch.
| 7. REMOVE FUEL FILTER ELEMENT SUB-ASSEMBLY |
Using SST, remove the fuel filter element.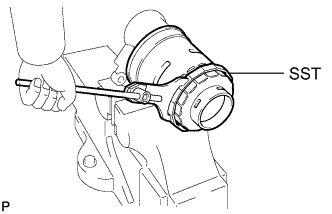
- SST
- 09228-64010
| 8. INSTALL FUEL FILTER ELEMENT SUB-ASSEMBLY |
Check and clean the installation surface of the fuel filter element.
Apply fuel to the gasket of a new fuel filter element.
Lightly screw the fuel filter element into place and tighten it until the gasket comes into contact with the seat.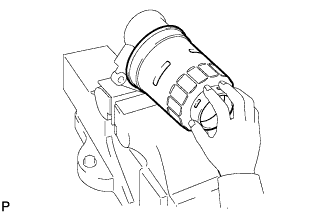
Tighten the fuel filter element an additional 3/4 turn by hand.
| 9. INSTALL LEVEL WARNING SWITCH |
Clamp the fuel filter assembly in a vise between aluminum plates.
- NOTICE:
- Be careful not to damage the fuel filter cap.
Using pliers, remove the level warning switch.
- NOTICE:
- Be careful not to damage the level warning switch.
Remove the warning switch gasket from the level warning switch.
| 10. INSTALL FUEL FILTER COVER |
Install the fuel filter gasket and fuel filter cover to the fuel filter element assembly.
Tighten the bolt.
- Torque:
- 3.4 N*m{ 35 kgf*cm , 30 in.*lbf }
Attach the level warning switch connector clamp to the fuel filter cap.
| 11. INSTALL FUEL HEATER ASSEMBLY (w/ Fuel Heater) |
Install the fuel heater with the 2 screws.
- Torque:
- 2.0 N*m{ 20 kgf*cm , 18 in.*lbf }
Attach the fuel heater connector clamp to the fuel filter cap.
| 12. INSTALL FUEL FILTER ASSEMBLY (w/ Fuel Heater) |
Install the fuel filter assembly with the 2 nuts.
- Torque:
- 18 N*m{ 184 kgf*cm , 13 ft.*lbf }
Connect the level warning switch connector and fuel heater connector.
Connect the 2 fuel hoses.
| 13. INSTALL FUEL FILTER ASSEMBLY (w/ Clogging Switch) |
Install the fuel filter assembly with the 2 nuts.
- Torque:
- 18 N*m{ 184 kgf*cm , 13 ft.*lbf }
Connect the level warning switch connector and clogging switch connector.
Connect the 2 fuel hoses.
| 14. BLEED AIR FROM FUEL SYSTEM |
- w/ DPF (Click here)
- w/o DPF (Click here)
| 15. INSPECT FOR FUEL LEAK |
- w/ DPF (Click here)
- w/o DPF (Click here)