INSTALLATION
Removal / installation · Vehicles built Aug 2013 – Jul 2014
Versions by build date: Aug 2013 – Jul 2014 from Aug 2014
- CAUTION:
- Wear protective gloves. Sharp areas on the parts may injure your hands.
- HINT:
- Use the same procedure for RHD and LHD vehicles.
- The procedure listed below is for LHD vehicles.
- Use the same procedure for the RH and LH sides.
- The procedure listed below is for the LH side.
- Use the same procedure for RHD and LHD vehicles.
| 1. INSTALL FRONT POWER SEAT SWITCH LH |

Connect the power seat switch connector.
Install the power seat switch with the 3 screws.
| 2. INSTALL FRONT SEAT CUSHION SHIELD LH |
Attach the 3 wire harness clamps and connect the seat wire connector.
Attach the 3 claws to close the wire harness cover.
Remove the clip attached to the separate type front seat cushion spring assembly and install it to the front seat cushion shield LH.
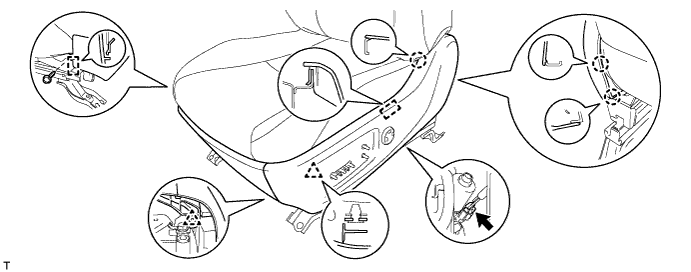

Attach the 2 clips, 3 claws and guide.
Attach the guide of the front seat No. 1 inner cushion shield LH and install the screw.
Connect the lifter motor connector.
| 3. INSTALL RECLINING POWER SEAT SWITCH KNOB |
Attach the 2 claws to install the reclining power seat switch knob.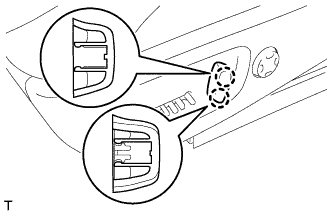
| 4. INSTALL SLIDE AND VERTICAL POWER SEAT SWITCH KNOB |
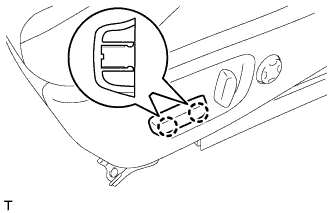 |
Attach the 2 claws to install the slide and vertical power seat switch knob.
| 5. INSTALL FRONT SEAT ASSEMBLY |
Install the front seat assembly (Click here).