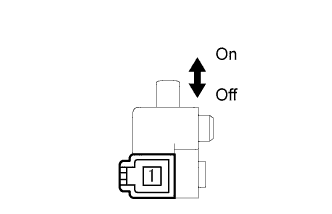
Parking Brake Switch Circuit
Circuit diagnosis · Vehicles built from Aug 2014
Versions by build date: Aug 2013 – Jul 2014 from Aug 2014
DESCRIPTION
This circuit includes the parking brake switch assembly and fold seat control ECU.WIRING DIAGRAM
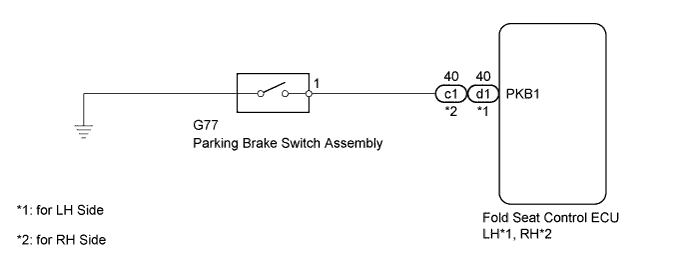

INSPECTION PROCEDURE
| 1. CHECK BRAKE WARNING LIGHT |
 |
Check that the brake warning light comes on when the parking brake is applied and goes off when the parking brake is released.
- OK:
- The brake warning light operates as specified above.
|
NG |
 |
|
|
|
| OK |
|
 |
|
| 2. CHECK HARNESS AND CONNECTOR (FOLD SEAT CONTROL ECU - PARKING BRAKE SWITCH) |
|
Disconnect the d1*1 or c1*2 ECU connector.
- *1: for LH Side
- *2: for RH Side
Disconnect the G77 parking brake switch connector.
Measure the resistance according to the value(s) in the table below.
- Standard Resistance:
for LH Side
Tester Connection
|
Condition
|
Specified Condition
|
d1-40 (PKB1) - G77-1
|
Always
|
Below 1 Ω
|
d1-40 (PKB1) - Body ground
|
Always
|
10 kΩ or higher
|
for RH Side
Tester Connection
|
Condition
|
Specified Condition
|
c1-40 (PKB1) - G77-1
|
Always
|
Below 1 Ω
|
c1-40 (PKB1) - Body ground
|
Always
|
10 kΩ or higher
|
|
NG |
 |
|
| REPAIR OR REPLACE HARNESS OR CONNECTOR |
|
|
| OK |
|
 |
|
| PROCEED TO NEXT SUSPECTED AREA SHOWN IN PROBLEM SYMPTOMS TABLE (Click here)
|
|
| 3. INSPECT PARKING BRAKE SWITCH ASSEMBLY |
|
- Remove the parking brake switch assembly (Click here).
Measure the resistance according to the value(s) in the table below.
- Standard Resistance:
Tester Connection
|
Condition
|
Specified Condition
|
1 - Switch body
|
On (Shaft is not pressed)
|
Below 1 Ω
|
1 - Switch body
|
Off (Shaft is pressed)
|
10 kΩ or higher
|
|
NG |
|
|
| REPLACE PARKING BRAKE SWITCH ASSEMBLY (Click here)
|
|
|
| OK |
|
|
|
|